
 Click image(s) for a larger view. | Wish a loved one a happy birthday with this creative card!
Instructions
What You Will Need
Other Supplies
|
 Click image(s) for a larger view. | Celebrate a new arrival with this cute card!
Instructions
What You Will Need
Other Supplies
|
 Click image(s) for a larger view. | Customize this beautiful card with patterned cardstock and rub-ons!
Instructions
What You Will Need
Other Supplies
|
 Click image(s) for a larger view. | This card is perfect for the little princess in your life.
Instructions
What You Will Need
Other Supplies
|
 Click image(s) for a larger view. | Use the 50 States cartridge for more than just homework! This beautiful card was created with the Flower and Bird creative features on the 50 States cartridge.
Instructions
What You Will Need
Other Supplies
|
Birthday Card for a Friend's Spouse – Cards, Stamps and Paper Crafts at Splitcoaststampers.com
http://www.spli
http://www.spli
|

Baby Tri Shutter Card – Cards, Stamps and Paper Crafts at Splitcoaststampers.com
http://www.spli
http://www.spli
|

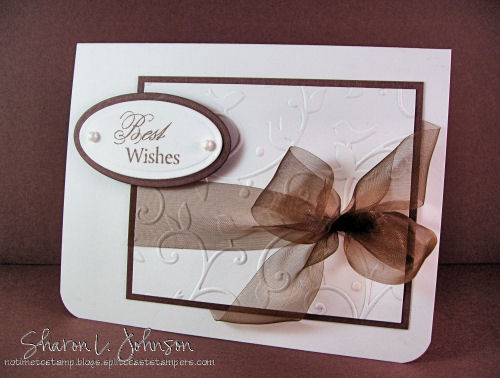
Sincere Tri-Fold Shutter Card – Cards, Stamps and Paper Crafts at Splitcoaststampers.com
http://www.spli
http://www.spli
|

Build-A-Bear Stair Step Card
Ink: Basic Black Classic Pad; Ballet Blue, Pumpkin Pie, Old Olive, Close to Cocoa and Creamy Caramel Stampin' Write markers
A Child's Year...Spring
 I know, I know....I'm a bit late for Spring. Or....I'm just really early! I wish I could control what inspires me, but in the mean time...I will have to just take what I get! These garden images lend themselves so well to the WIMG cartridge, another one of my faves. I hope you like it!
A Child's Year
garden image cut @ 2 3/4 and on shadow
Walk In My Garden
tulip border cut @ 4"


Here’s another picture …

I hope you decide to have some fun and joing us!! Just click here and upload
SCRAPS 4 FUN by Sonia Kertznus
http://www.scra
http://www.scra
SWEET PEA - Peachy Keen Stamps Challenge # 6
 {Click on image to enlarge}
Hello there! here is my card for Peachy Keen Stamps Challenge # 6. It is to use a face (from any of the Peachy Keen Stamps faces) and use it any way you want it. Now, the prize this week is something you can't miss. It is a $20 gift certificate to use at Peachy Keen Stamps, but here is the great thing about it, for every entry over 20, the prize will go up $1 more. If there are 35 entries, the price will be $35, if there are 120 entries, the prize will be $120, and what if there are 500 entries? Well,... Kathy will issue a $500 gift certificate... so head on over there and join us in this awesome challenge....
Supplies:
- Core-dinations Cartstock White... (love the texture of this paper)
- Bo-Bunny back to backs Wasabi Dot cardstock.
- Cricut New Arrival Cartridge cut at 3" in the blackout mode to be able to stamp the...
- Peachy Keen PK-650 Just Baby Faces and I used one of the littleless ones at 3/8".
- Copic Markers R00 and RV13 to color the face and heart and E71 for the hair.
- Martha Stewart punch.
- Kaiser Pearls.
- Other: ATG, Xyron, Pop Dots, Exact knife and zip pen 0.1.
SCRAPS 4 FUN by Sonia Kertznus
http://www.scra
http://www.scra
WISHING YOU WHERE HERE - Cuttlebug Challenge Be Inspired # 44
 {Click on image to enlarge}
Good morning everyone!... I woke up to see the new post at the Cuttlebug Challenge and WOW! what a great surprise it was. All my talented teammates did AWESOME as always, but since this was a challenging one for me, I was very excited to see all the other samples. The challenge this week is to create a scene card, and we are sponsored by Sakura Of America for this one. I had never used their products, and now I am hooked... I used Stick♥lers and Souffle 3D puffy ink, and the results are gorgeous... If you haven't use them before, you got to try them... they are very easy to use.
Supplies:
- Core'dinations white wash cardstock.
- Cuttlebug Swiss Dots and D'vine Swirls embossing folders.
- Sakura Stick♥lers ad Souffle pens.
- Other: ATG, pop dots, glue gun, scissors and sand pape
SCRAPS 4 FUN by Sonia Kertznus
http://www.scra
http://www.scra
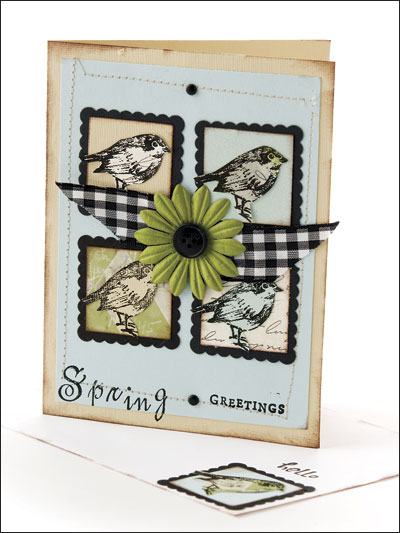
LIFE IS TWEET - Scrapbooks & Stuff Spark Saturday challenge # 2
 {Click on image to enlarge}
Hello there! I just got off from work and will be home alone tonight. YEAP! hubby and son are having a sleep over at gramma and grandpa's. Isn't it lovely? I do think so, I will have "ME" time, meaning scrappy time...WOO HOO! Last night I did this card for Scrapbooks & Stuff, and love how it card came out, and the best part is that I put it together faster than expected. (FYI, I am a VERY slow scraper) lol. You should go and visit Scrapbooks & Stuff and play along. the prize for the winner will be a Core'dinations paper stash. Hope you like my card:
Supplies:
- CTMH White Daisy.
- Basic Grey Marrakesh & Doodlebug Designs.
- Cuttlebug Swiss Dots, Stitched Circles embossing folder and Floral Border Die.
- Spellbinders Circle and Scalloped Circle Nesties.
- Cricut Happily Ever After Cartridge for the bird.
- Basic Grey Pearls.
- K & Company buttons.
- Other: ATG, stitching, pop dots. white unibal signo pen.
You might also like:
SCRAPS 4 FUN by Sonia Kertznus
http://www.scra
http://www.scra
ALOHA - CPS challenge # 131
 {Click on image to enlarge}
I did this card for CPS challenge # 131 using the scraps from my last layout (in the post before this one). I saw this sketch and liked it very much so I grabbed one of my new Cricut cartridges and came up with this card in less than 10 minutes. Hope you like it.
Supplies:
- Bazzill Cardstock.
- SEI (use the reverse of the lo scraps) and Bo Bunny.
- Cricut Life is a Beach cartridge, big flower cut at 3" and title cut at 1.5".
- Tim Holtz Red Brick distress Ink.
- Stickles Lime Green.
- Other: ATG, sewing machine, pod dots, sponge daubers, xyron.
e-PatternsCentral.com | Yellow Love Card
http://www.e-pa
http://www.e-pa
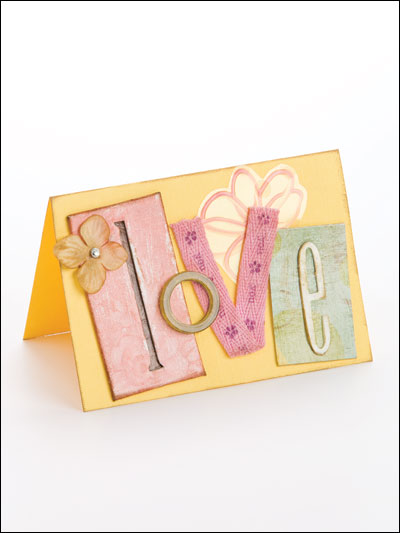
Finished size: 5" x 3 1/2"
e-PatternsCentral.com | Simple Floral Thank Yous
http://www.e-pa
http://www.e-pa
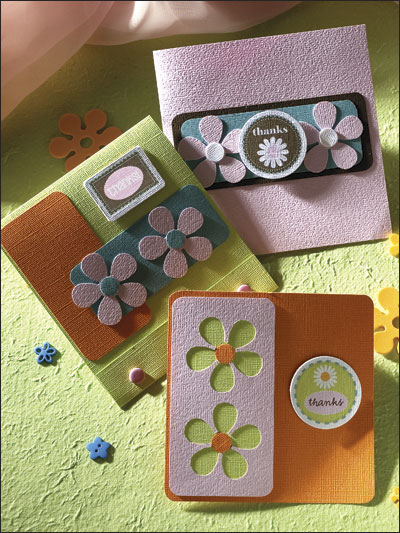
Size: Single-Fold Card: 4 1/2" x 5 1/2". Matchbook Card: 5" x 5 1/2". Single-Panel Card: 5" x 5"
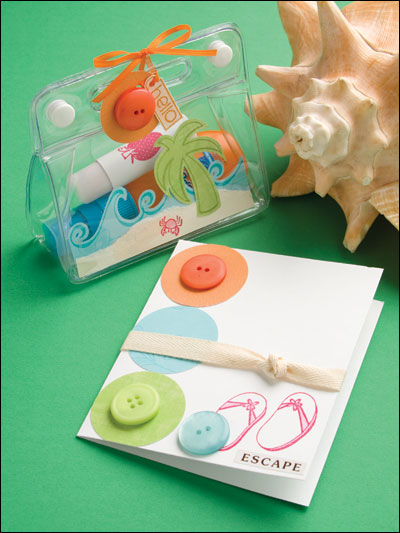
e-PatternsCentral.com | Summer Fun Gift Set
http://www.e-pa
http://www.e-pa
No Time To Stamp? » Dry Embossed Projects
http://notimeto
http://notimeto

TLC160 Thinking of You! – Cards, Stamps and Paper Crafts at Splitcoaststampers.com
http://www.spli
http://www.spli
|

No Time To Stamp? » Fun Folds
http://notimeto
http://notimeto
Here’s a peek inside!!! Ooh, I just smile looking at this!!! I’ll try to contain myself, but honestly, this was THE most fun project I think I have EVER done!!! I SO love all these type of things. Hope the recipient does, too!!! Lush ribbons, pretty buttons, vintage/recycled pieces of lace, satin flowers and all sorts of pretties — pearls, pins, crystals and charms!
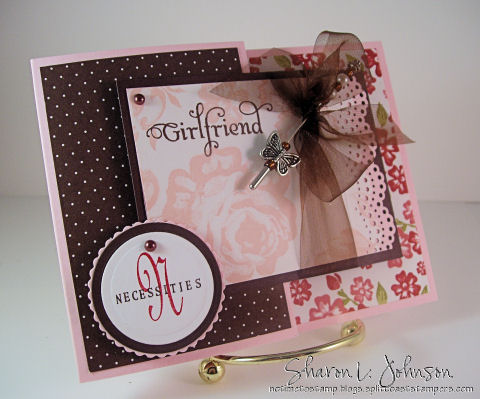
Here’s the Joy Fold Card — so fun to do!!! A great tutorial on this Joy Fold Card, complete with all measurements, can be found at SCS in this tutorial written by Beate — thank you, Beate!!! This is a quick and fun fold that packs a lot of punch with very little effort!
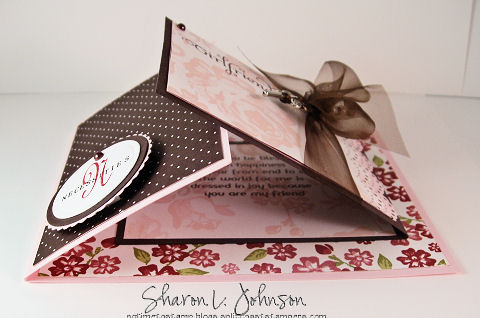
In this shot I’m just trying to let you see how the card functions!
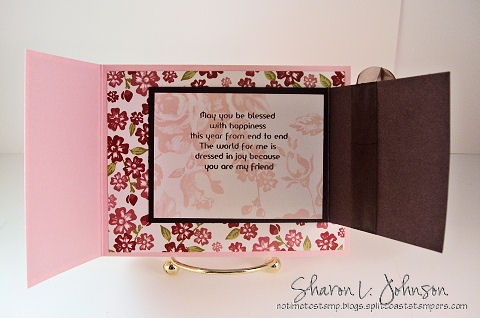
Here’s the card opened fully. This fun girlfriend sentiment, as well as the girlfriend greeting on the front, are in a set called Glamour Girls by Crafty Secrets. I got mine from Joan’s Garden. And now that you’ve seen the completed card, here’s how I did it:
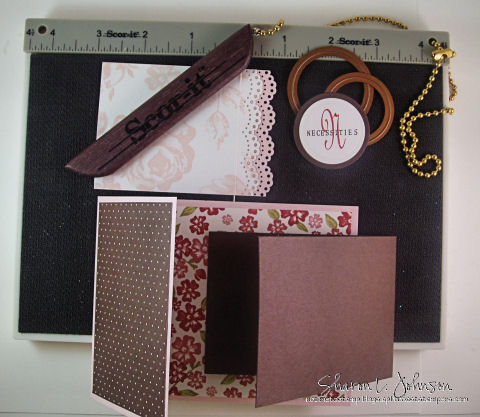
The card base is 4.25″ x 8.5″, and using my Mini Scor-it, I scored at 3″, so when folded my card base is 4.25″ x 5.5″, a standard sized card. The smaller card that will be on top is cut 3″ x 8″ and scored at 4″. That’s it. Add your DP and assemble as shown in photos or, better yet, refer to Beate’s tutorial linked above. Can you see my scalloped top (Martha Stewart Scallop Punch) ? The DP is attached with double sided tape to a piece of SU cardstock — so it is quite thick, but I scored the embossed line above the scallops on my Mini Scor-It without any problems whatsoever — a beautiful embossed line — just a subtle detail, but it’s all the little details thatproduce agreat end result. Here’s a close-up:

OSW CHF Cards – Cards, Stamps and Paper Crafts at Splitcoaststampers.com
http://www.spli
http://www.spli

| ||||
| |


No Time To Stamp? » Dry Embossed Projects
http://notimeto
http://notimeto
No Time To Stamp? » Dry Embossed Projects
http://notimeto
http://notimeto
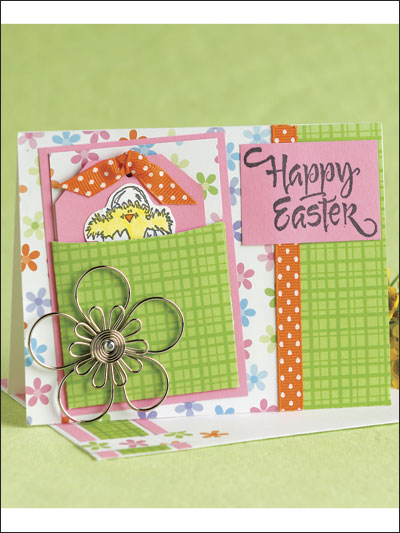
e-PatternsCentral.com | Peekaboo Easter Card
http://www.e-pa
http://www.e-pa
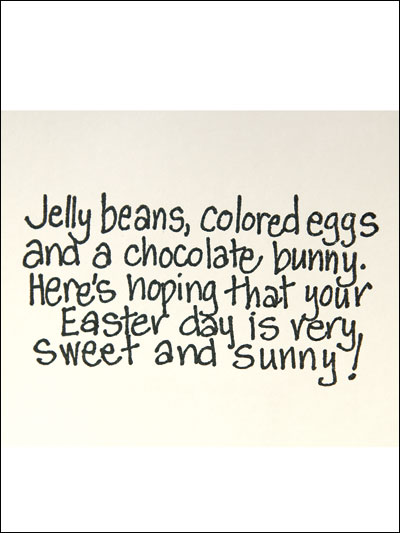
inside :

de this card for my neice whose bday is at the end of the month...wasn't sure how long it would take to complete
 I tried to combine as many different products as possible...because I have so many things that I never use...Paper and ribbon are AC Christmas, charms and buckle are Dollar Tree from my almost 10 yr old stash, inked like crazy 'cause I learned that here on the MB, Name is All Mixed Up (a cart I hardly ever use!), birthday quote is a vellum sticker from K & Co., brads are CTMH. It was fun...I think I'll make another for my other neice.
 Attachment (1)
No Time To Stamp? » Baby Cards
http://notimeto
http://notimeto
Cuttle-Pal Chick and Answers
I am so sorry to bore you folks to death, but I just can’t get off this kick! I am *so* into these super simple and quick cards lately using a combination of the Cuttlebug and Scor-Pal, and I can’t seem to put Nursery Necessities away - I just love it!!! Here’s my latest:
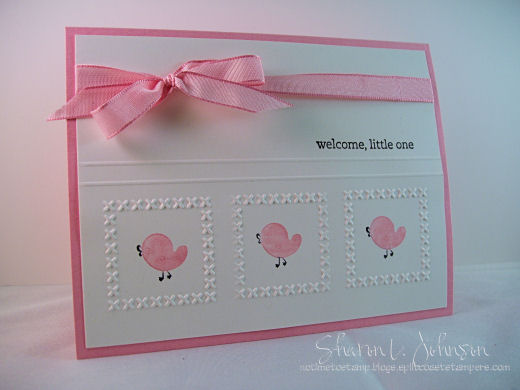
This is made in a similar fashion to the cards in my previous posts. White panel is 4 x 5.25″. The small folder was used to emboss with the Cuttlebug. Place the folder in the center, run through the CB, then do each side, so it is going through the CB 3 times. Then take it to the Scor-Pal, turn it upside down so the embossed squares are facing the table (wrong side up), line up the top of the embossed square on the4 1/2″ line, then score at the 4 1/4 and 4″ lines, pressing hard and going over it twice to get a good impression. Turn it over and it should look like the above. Stamp as shown, attach ribbon to panel, attach completed panel to card base — done!!! Another super quickie with the use of good and fun tools!!!
This is made in a similar fashion to the cards in my previous posts. White panel is 4 x 5.25″. The small folder was used to emboss with the Cuttlebug. Place the folder in the center, run through the CB, then do each side, so it is going through the CB 3 times. Then take it to the Scor-Pal, turn it upside down so the embossed squares are facing the table (wrong side up), line up the top of the embossed square on the4 1/2″ line, then score at the 4 1/4 and 4″ lines, pressing hard and going over it twice to get a good impression. Turn it over and it should look like the above. Stamp as shown, attach ribbon to panel, attach completed panel to card base — done!!! Another super quickie with the use of good and fun tools!!!
- Stamps: Nursery Necessities
- Paper: Whisper White, Pretty in Pink
- Ink: Pretty in Pink and Basic Black Markers, Black Stazon
- Accessories: Ribbon, Cuttlebug, Stitched Squares Embossing Folder, Scor-Pal
No Time To Stamp? » Baby Cards
http://notimeto
http://notimeto
Buttons and Bows…
… and new found friends from afar and fun and games on top of it all! I was thrilled when a few weeks back I received an invitation to play with some very talented girls *across the pond* in the United Kingdom. As a result I’ve run across some blogs that are new to me and seen some awesome creations that I’d like to share with all of you today.
The Next Level is relatively new. Each week they put forth a challenge, their talented DT creates projects, and the public is invited to play. Sponsors are also involved each week, which means a chance for the participants to win some wonderful merchandise. This week’s theme is *Buttons and Bows*. I was invited to play along with their DT this week and all of you are also invited to play and link your creations. Of those playing, multiple winners will be drawn for prizes! How fun! Click here to see the prize offerings this week. Click here to get to the challenge page of The Next Level and read the details and see all the cards created by the DT with links to their blogs. Be sure to click into their blogs to get all the fun details on their projects!
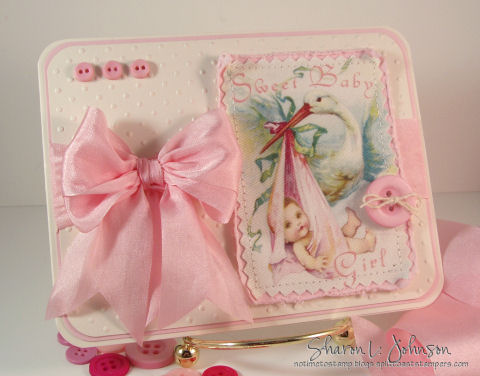
Here is my Buttons and Bows creation:
The Next Level is relatively new. Each week they put forth a challenge, their talented DT creates projects, and the public is invited to play. Sponsors are also involved each week, which means a chance for the participants to win some wonderful merchandise. This week’s theme is *Buttons and Bows*. I was invited to play along with their DT this week and all of you are also invited to play and link your creations. Of those playing, multiple winners will be drawn for prizes! How fun! Click here to see the prize offerings this week. Click here to get to the challenge page of The Next Level and read the details and see all the cards created by the DT with links to their blogs. Be sure to click into their blogs to get all the fun details on their projects!
Here is my Buttons and Bows creation:
What’s more appropriate for a Buttons and Bows creation that a Sweet Baby Girl card! I made this card quite simply by using many little pretties – Cotton Scraps (Baby Girl) for the focal image, cut with Fiskars Pinking Shears and stitched onto a pink mat which was then distressed. My background is done with the Cuttlebug and an embossing folder, my ribbon is 1.25″ wide May Arts Pink Silk, the bow being made on the Bow Easy, and my little buttons are from Wal-Mart, the larger one being tied with 100% Jute String by May Arts. And that’s about it — just a matter of putting a few pretty things together — my FAVORITE way to make a card!!!
Stamps and Ink: NonePaper: PTI Vintage Cream, SU Pink PirouetteAccessories: Cotton Scraps Baby Girl, 1.25″ and 1/4″ Pink Silk Ribbon, Ivory Jute String, Bow Easy,Fiskars Pinking Shears and Scor-It, all from the Stamp Simply Ribbon Store; Buttons and Aleene’s Fast Grab Tacky Glue from Wal-Mart; Glue Glider from Joan’s Garden; Cuttlebug and Swiss Dots Embossing Folder; SU Corner Rounder; Sewing Machine and Thread; Scissor Blades to distress.
Thanks so much for stopping in today. I hope you take the time to check out The Next Level Buttons and Bows Blog Challenge for this week and play along if you have the time. Playing and linking your creation will enter you in the drawing for prizes, and what could be more fun!!!
Thanks all — see you real soon!
No Time To Stamp? » Baby Cards
http://notimeto
http://notimeto
Buttons and Bows for Baby Boys
Published by notimetostamp under Baby Cards, Bow Easy, Cotton Scraps, Crafty Secrets Projects, Dry Embossed Projects
Today I have a Buttons and Bows card for a baby boy! And even with buttons and bows it does look boyish enough — for a newborn anyway! The card is quite simple, using a Cuttlebug embossing folder for the background and machine stitching on the focal image.
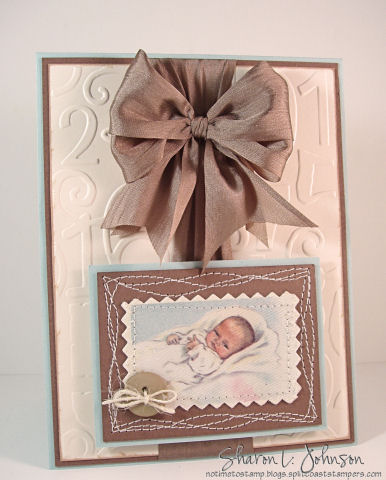
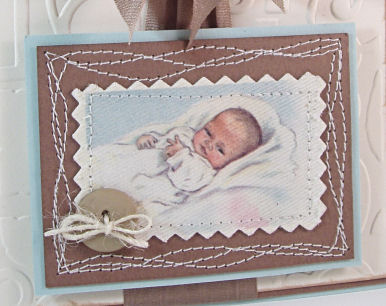
I made this for our newest great-nephew, Eli Andrew, who came into the world on July 1. We hope to see him this weekend! The image is from the Baby Boy Cotton Scraps, cut with Fiskars Pinking Sheers, matted onto cardstock which is stitched at the sewing machine. The Taupe Silk Ribbon is a good match to the SU Close to Cocoa cardstock and the bow is made with the Bow Easy.
A fun and quick way to prepare a focal image panel at the sewing machine. It is elevated on foam mounting tape. The button is threaded with Ivory Jute String.
No Time To Stamp? » Baby Cards
http://notimeto
http://notimeto
Vintage Baby Gift Card Holder
Published by notimetostamp under Baby Cards, Bow Easy, Gift Card Holders, JustRite Products, Scor-It
I love to make gift card holders and this is in a non-traditional size with a vintage feel. In shades of soft yellows, ivory and a touch of blue I consider this to be gender-neutral, suitable for either a girl or boy. And it is oversized, not made to fit into an envelope but meant to be given as is, either personally to the new Mom and Dad or at a baby shower, or how pretty it would be gently placed in a gift basket along with other beautiful goodies. It is made from one full 8 1/2 x 11″ sheet of cardstock and the finished measurements are 4 1/2 x 8 1/2. Instructions to follow later in the post. But let’s take a look:

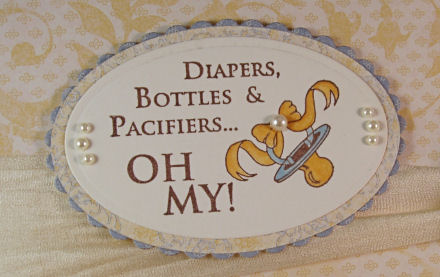
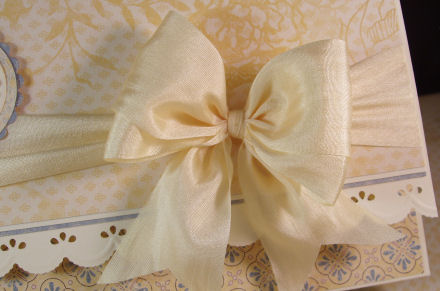
I loved the vintage feel of this DP by SU (Bella Birds), so I added a border with a Martha Stewart Lace Punch and my 100% Ivory Silk Bow. This image from the Baby Stamp Ensemble by JustRite also has a vintage feel to it that I love!
The image is stamped in VersaFine Vintage Sepia (it was the perfect shade of brown) and Copic colored. Be mindful, VersaFine is NOT the ink you would typically use to Copic color, I just cheated as I wanted that color today. My image from the Baby Stamp Ensemble was cut and layered with my Petite Oval Nestabilities, and Kaiser Pearls in Champagne were added.
Here you can better see the detail of the lace punched border and my bow using 100% Silk Ribbon, made on the Bow Easy.
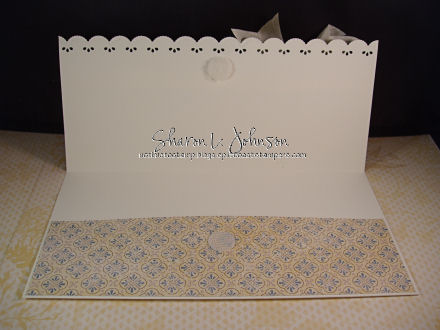
Here is the gift card holder inside. The large pocket can hold all kinds of goodies. The top flap is held securely closed with a Velcro Dot closure.
No Time To Stamp? » Masculine Cards
http://notimeto
http://notimeto
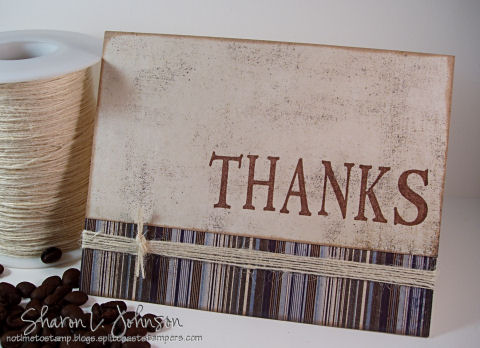
I think it fits the bill: masculine, string, knots, Stamped Simply! Not a whole lot to say! As before, I put down a narrow strip of red sticky tape across the card front and then wrapped my string on top of it — holds the string perfectly!!! I like this rugged look on a guy card. I was happy to be able to make my own THANKS in a size I wan
Labels: masculine card, thank you, bakers twine
No Time To Stamp? » Masculine Cards
http://notimeto
http://notimeto

Three cards in less than 30 minutes. I think they’ll be approved by my guys as to simplicit
I used some Martha Stewart paper, and a Martha Stewart trim punch. I love my Martha! Ha ha.  I got the Just Because stamp from Michael's out of their dollar bin. If you haven't checked that out...you really should! And I used the Stretch Your Imagination cart for the ice cream cone.
Thanks for looking!

Attachment (1)
I got the Just Because stamp from Michael's out of their dollar bin. If you haven't checked that out...you really should! And I used the Stretch Your Imagination cart for the ice cream cone. Thanks for looking!
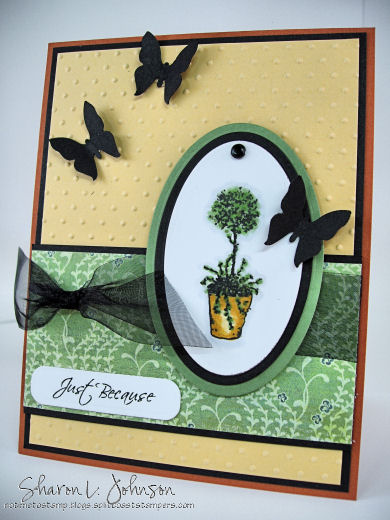
Attachment (1) Hello Spring Flower Garden

This week's Cricut Cardz Challenge was to create a spring themed card using flower, butterflies and/or birds. Well I used two out of three so that wasn't too bad. I also tried a new card fold - the side step, and I don't mind telling you that I had a lot of fun with this one. I found the side step to be more creator friendly than just the step card so you'll see more of these in the future.
For this card though I used several cartridges:
Paper Pups for the butterflies - cut at 3/4"
Stretch Your Imagination for the caterpillar - cut at 1"
Cricut Sampler (I don't have Walk in My Garden) for the flowers - cut at 2"
Zooballoo for the grass - cut at varying sizes for layering on the steps
Camp Out for the sign - cut at 2 1/2"
Animal Kingdom for the hello - cut at 1/2"
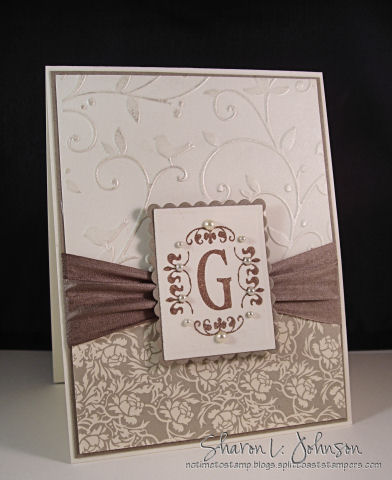
No Time To Stamp? » Wedding Cards
http://notimeto
http://notimeto
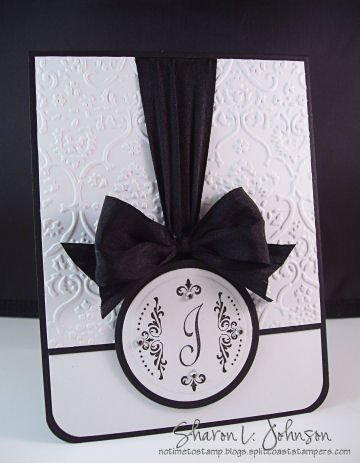
As expected, a simple card — black and white, Cuttlebug embossing, single initial monogram for the newlyweds and my fun and flirty black silk ribbon treatment. I’ve received a lot of emails asking how I do this. I have explained it previously, but never with photos, so this time I’ll try adding photos and see if that helps. It’s really so easy:
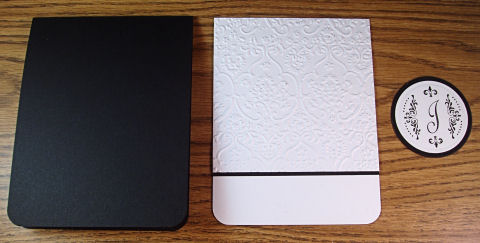
These are the pieces I start with: a black top fold card, my white panel and my monogram.
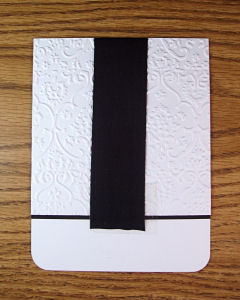
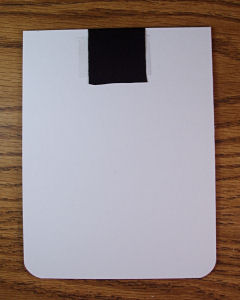
Photo 1 - Using a good heavy double sided tape, adhere the ribbon on the card front so it will be UNDER the monogram.
Photo 2 - Run the ribbon up the card front and secure on card back with the same type of tape.
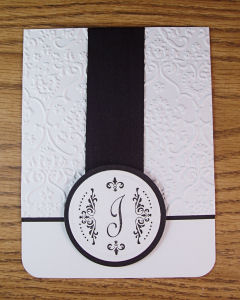
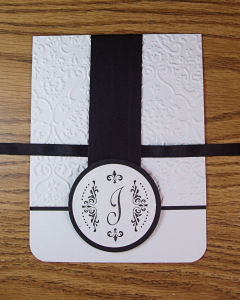
Photo 1 - Going back to the card front, adhere your monogram using SU Dimensionals
Photo 2 - Using a 1/4″ width of matching silk ribbon, run it UNDER the wide ribbon, as shown.
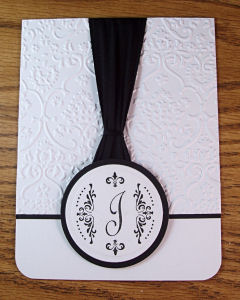
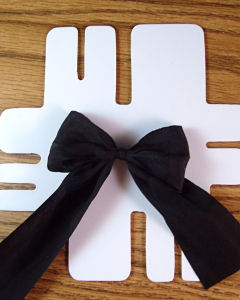
Photo 1 - It’s hard to see as the ribbon is so black, but I just drew the ribbon tails up and tied into a tight knot, then cutting my ends short and turning that ribbon so the tails end up UNDER the wide ribbon. It helps to use tweezers to do this.
Photo 2 — Make a bow on the Bow Easy
Note: If you are good at bow tying - you can skip the narrow ribbon and the Bow Easy — just run another length of wide silk under the wide silk strip attached to the card, draw up your tails and tie your bow.
And here’s another look at the final result. My bow is glued on with Aleene’s Fast Grab Tacky Glue (very cheap/Wal-Mart). I added clear rhinestones to the Damask monogram image. A quick and simple card with a bit of a formal look!
Labels: wedding card, cuttlebug
No Time To Stamp? » Wedding Cards
http://notimeto
http://notimeto
A simply stamped monogrammed wedding card. Not a lot of explaining needed
Labels: wedding card, cuttlebug
Beaded Staple Tutorial
 This is a card that was demonstrated at the Stampin' Up! Leadership Conference that I went to in January.
Using beaded staples as an accent on your card was a new technique for me.
The photos were taken by Ginger Abrose (one of my roomies at Leadership and another SU! demo). This technique was demonstrated during one of the general sessions and Ginger took photos of the large screen.
Want to learn more stamping techniques, view hundreds of card, scrapbook and 3-D ideas and have a blast with thousands of other crazy stamping women? Sign up to be a demonstrator during the awesome Sale-A-Bration $159 Special and you could attend the annual Stampin' Up! Convention in Salt Lake City with me this summer. Call me at (608) 437-1756 for more details or to sign up!
Here's how to add beaded staples to your projects:

1. Punch a staple out of your stapler, dip the tips in an inkpad and "stamp" the staple on your card where you want it.
 2. Use the paper piercer and foam mat from the Crafter's Tool Kit to poke holes where you stamped the two dots with the staple.
 3. Thread beads onto the staple.
 4. Put the staple through the two holes on your project and bend the ends down on the back to secure.
Stamp the image again in Basic Black ink on a smaller piece of neutral card stock (the same color as your main image) and punch it out using the 1-1/4" circle punch. Color this image in using the coloring method of your choice.
Layer your colored-in circle piece on a punched 1-3/8" circle of a darker color card stock (usually Basic Black, but you can get creative).
Line the circle image up with the image on your main image and tape into place. The result is a "spotlight" of color.
 Since Sale-A-Bration is quickly coming to an end, I also wanted to share another Friendship Blooms card with you. This one was sent to me by my upline, Kristen Bryant. I just love the elegant simplicity of it!
The color combo is a bit hard to see in the photo, but it is a very unique blend of Soft Sky and Taken with Teal. I never would have thought to put those two together!
The background was done with the So Swirly Jumbo Wheel in Whisper White ink. The pearl in the middle adds the touch of elegance and can be found in the Pretties Kit.
A Pop-Up Card and Prizes!
This adorable pop-up card was one of the projects that we did at my upline Kristen Bryant's demonstrator meeting on Sunday.

And here's the surprise inside:

Supplies: Say It with Scallops stamp set; Whisper White, Summer Sun, Tangerine Tango, Riding Hood Red and Pacific Point card stock; Riding Hood Red Classic Pad; 1-1/4" Square, Scallop Square, Star, Large Star and 1-3/4" Circle Punches; Riding Hood Red Striped Grosgrain Ribbon; Paper Snips; Crimper
How to make the Spiral pop-up: Punch out a 1-3/4" Circle and cut it into a spiral! Glue the center of the spiral to the middle of the bottom inside card. Put a dab of adhesive on the end of the spiral. (I used glue dots, but Kristen used Tombow Multi-purpose, so use whatever you prefer.) Close your card to adhere the top of the spiral to the inside top of the card - that way you know it will close properly.
How to make the stars: Run your card stock through the crimper BEFORE you punch out your stars. For the large stars, punch out a SMALL star FIRST, leaving enough room to punch a large star around it. (Turn the large star punch upside down to center around the small star.
And here's the surprise inside:
Supplies: Say It with Scallops stamp set; Whisper White, Summer Sun, Tangerine Tango, Riding Hood Red and Pacific Point card stock; Riding Hood Red Classic Pad; 1-1/4" Square, Scallop Square, Star, Large Star and 1-3/4" Circle Punches; Riding Hood Red Striped Grosgrain Ribbon; Paper Snips; Crimper
How to make the Spiral pop-up: Punch out a 1-3/4" Circle and cut it into a spiral! Glue the center of the spiral to the middle of the bottom inside card. Put a dab of adhesive on the end of the spiral. (I used glue dots, but Kristen used Tombow Multi-purpose, so use whatever you prefer.) Close your card to adhere the top of the spiral to the inside top of the card - that way you know it will close properly.
How to make the stars: Run your card stock through the crimper BEFORE you punch out your stars. For the large stars, punch out a SMALL star FIRST, leaving enough room to punch a large star around it. (Turn the large star punch upside down to center around the small star.
The greeting on this card could easily be changed to 'thank you', 'happy birthday', 'congratulations' or anything else you need!

Make a Card with a Hidden Message!
If you liked yesterday's Easter card, you'll love making your own Hidden Message card.


To make a Hidden Message Card:

Surprise! Here's the hidden message:

To make a Hidden Message Card:
- Start with your base card. I started with a 4-1/4" x 5-1/2" base of Kraft card stock and plan to just write where the hidden message is. You can make the base a regular card, if you would like.
- Make the bottom half of the front. The bottom Chocolate Chip piece of card stock is 2-3/4" x 4-1/4" and I used the Spiral punch along the top border. If you want to use the Scallop Edge or Eyelet Border punches, you'll want to account for the card stock that is punched off and make this piece a little larger.
- Make the top half of the front. The top Pacific Point card stock is 3" x 4-1/4". I tied a knot in the Kiwi Kiss ribbon, wrapped it around and attached the ends to the front (under the b is for birthday image).
- Hinge the top and bottom together. Overlap the bottom half over the top half by about 1/2". Punch a hole through both layers on the left side using the 1/16" circle punch and use a brad to attach.
- Put it all together. Tape the bottom and sides of the bottom half to your base card. DO NOT put adhesive where it will interfere with the "swing" of the top.
- Add your message. Slide the top of the card up and to the left. Stamp or write your hidden message.
Happy Easter!
Here's a fun Easter card with a hidden message that Kerry McDonough sent me.Surprise! Here's the hidden message:
Same Layout, Different Occasions
Stamp Set: Fun & Fast Notes
Ink:Basic Black, Soft Subtle Stampin' Write markers
Paper: Certainly Celery, Barely Banana, Whisper White
Accessories:Big Shot, Stampin' Up! Backgrounds I texturz plates, Texturz Impressions Pad, Texturz Silicone Rubber, Whisper White Organza Ribbon, dimensionals, blender pen
My Butterfly Birthday Cards
From JoAnn Walsh...

and Heather Momon...

and Heather Momon...
and my mom, Cheryl Wick...
Bright Birthday Card
Bright Birthday Card
Dusty Durango Purse Set
I ended up with a package of Dusty Durango Designer Series paperby mistake and decided to see what I could do with it. I am a bright color person, so Dusty Durango is a little out of my color comfort zone. Here's one of the projects I came up with...
Stamps: Oval All stamp set
Ink: Dusty Durango Classic Pad
Paper: Chocolate Chip, Whisper White and Dusty Durango card stock, Dusty Durango Designer Series Paper
Accessories: Large Oval and Scallop Oval punches, Crop-a-Dile, Paper cutter with Scoring blade, dimensionals, glue stick, sticky strip, Flower Assortment Designer brads, 5/8" Chocolate Chip grosgrain ribbon, velcro dot
No comments:
Post a Comment