
Gift Box Birthday Card (xpost) - Sweet Treats Cartridge - Provo Craft Community
http://communit
http://communit
I made this one for a friend whose birthday was last week :) Cuts are from Sweet Treats.
Hope you like it. More pics on my blog. Thanks for looking.
Giselle

Hope you like it. More pics on my blog. Thanks for looking.
Giselle
Okieladybug's Scrap N' More: Birthday
http://okielady
http://okielady
Well if ya have read the blog lately you know one of my new haunts is Sheetload of Car ds. Today I thought I would give the Front and Center card a try. It is from the May 2008 issue of their Ezine, and you can download the instructions for free. The instructions are for 6 cards but they do have instructions for a single card.
I have been making so many Christmas and Halloween cards lately I thought I should make a few birthday cards. I used the cupcake from the Celebrations cart. I LOVE THAT CUPCAKE!!
Notice the different color mats? Well yeah....I was on the phone and messed up my cuts so had to use two different colors. But I think they still turned out nice.
Here are a few close up photos.
On this one I used the paper from where I punched for th e eyelets to decorate the "icing" of the cupcake. I thought it made it look like it had those little hard candies on the icing. Oh and I did ink the paper on this one to add more dimension.....well okay I confess. After I had it done I realized the color blended in with the mat and kinda got lost, that is why I inked it. If ya click on the picture you can see the cupcake "paper" better. I used mulberry paper and glued and folded on the lines that cuts for it. I think it gives it a nice dimension. I used the Numbers cuttlebug folder on the mat. Of course I used my trusty Colorbox Cat Eye Inks.
On this one I used the Distressed Cuttlebug folder, I have to admit it is one of my favorites and don't think it gets enough credit! And do you see Stickles? Of course you do! HA HA HA Yeah I couldn't resist. I think I might have over doodled on this one, but too late now!! I did use some of my precious brads on the cards. I told my friend Scrappinbee that I was gonna start using stuff more and stop thinking "OMG IF I USE IT I WON'T HAVE IT ANYMORE". I mean afterall we buy the stuff to use it so why do we hoard it? *okie sighs* I know I know I have asked this question many times before and one day I hope to find the answer! BUT.....in the meantime if ya'll find the answer please share it with me!
ds. Today I thought I would give the Front and Center card a try. It is from the May 2008 issue of their Ezine, and you can download the instructions for free. The instructions are for 6 cards but they do have instructions for a single card.I have been making so many Christmas and Halloween cards lately I thought I should make a few birthday cards. I used the cupcake from the Celebrations cart. I LOVE THAT CUPCAKE!!
Notice the different color mats? Well yeah....I was on the phone and messed up my cuts so had to use two different colors. But I think they still turned out nice.
Here are a few close up photos.
On this one I used the paper from where I punched for th
e eyelets to decorate the "icing" of the cupcake. I thought it made it look like it had those little hard candies on the icing. Oh and I did ink the paper on this one to add more dimension.....well okay I confess. After I had it done I realized the color blended in with the mat and kinda got lost, that is why I inked it. If ya click on the picture you can see the cupcake "paper" better. I used mulberry paper and glued and folded on the lines that cuts for it. I think it gives it a nice dimension. I used the Numbers cuttlebug folder on the mat. Of course I used my trusty Colorbox Cat Eye Inks.On this one I used the Distressed Cuttlebug
folder, I have to admit it is one of my favorites and don't think it gets enough credit! And do you see Stickles? Of course you do! HA HA HA Yeah I couldn't resist. I think I might have over doodled on this one, but too late now!! I did use some of my precious brads on the cards. I told my friend Scrappinbee that I was gonna start using stuff more and stop thinking "OMG IF I USE IT I WON'T HAVE IT ANYMORE". I mean afterall we buy the stuff to use it so why do we hoard it? *okie sighs* I know I know I have asked this question many times before and one day I hope to find the answer! BUT.....in the meantime if ya'll find the answer please share it with me!Okieladybug's Scrap N' More: Birthday
http://okielady
http://okielady
Sunburst Card
I didn't really know what to name this card and I had to name it something since I made a cut file for it. So I went with 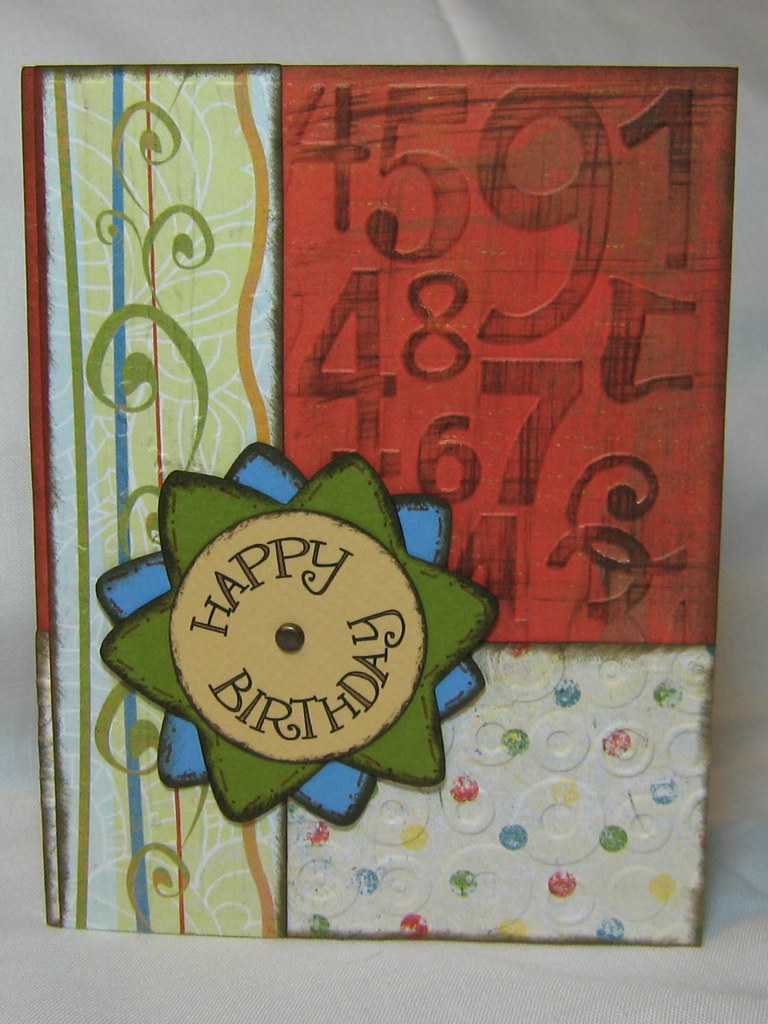 SUNBURST CARD. I made the file to cut 4 at a time since ya know by now I figure why make just one! I used only the George cartridge for this card. The file mats are labeled....PP means printed paper and SC means solid color. But of course you can do it however you want. I just needed to label it so I would remember. The LO came from PageMaps. You lay the full mat, then the bottom mat then the side mat.
I used the Numbers, Distressed Stripes and Spots and Dots *I think it is called* Cuttlebug folders.
The Happy Birthday was printed from the computer using MS Word Text art. I did the printer trick to get it to print on the circle. Which is I get it the size I need in Word, print it on plain paper, then used the herma dotta repostionable runner to tape the circle on top of the printing on the regular paper and then ran it through the printer again. I LOVE THIS METHOD!! Makes it nice when you don't have the just right stamp!
As you can see I used a small brad to attach the sunburst to the card. Oh yes, and I inked the edges but I bet ya'll surprised by that now are ya! HA HA HA!! It was pretty fast to put together and I think I like this one!
SUNBURST CARD. I made the file to cut 4 at a time since ya know by now I figure why make just one! I used only the George cartridge for this card. The file mats are labeled....PP means printed paper and SC means solid color. But of course you can do it however you want. I just needed to label it so I would remember. The LO came from PageMaps. You lay the full mat, then the bottom mat then the side mat.I used the Numbers, Distressed Stripes and Spots and Dots *I think it is called* Cuttlebug folders.
The Happy Birthday was printed from the computer using MS Word Text art. I did the printer trick to get it to print on the circle. Which is I get it the size I need in Word, print it on plain paper, then used the herma dotta repostionable runner to tape the circle on top of the printing on the regular paper and then ran it through the printer again. I LOVE THIS METHOD!! Makes it nice when you don't have the just right stamp!
As you can see I used a small brad to attach the sunburst to the card. Oh yes, and I inked the edges but I bet ya'll surprised by that now are ya! HA HA HA!! It was pretty fast to put together and I think I like this one!
Hiding in My Craft Room: Sweet Treats Circut Cartridge Bithday Wishes Card
http://www.hidi
http://www.hidi
Sweet Treats Circut Cartridge Bithday Wishes Card
I made this card using MojoMonday Sketch 126. Who doesn't need Birthday cards? I didn't have anyone particular in mind this time. Chances are my oldest daughter will end up needing it! I used Sweet Treats Cricut cartridge. It is really a great cartridge with a lot of cute images!

 Recipe:
Other: DCWV Spring Glitter Stack Tag cut at 4", Scalloped borders cut with SU scallop edge in Real Rose DP, Cupcake cut at 2 1/2" in So Saffron stamped with Regal Rose, Rose Red, Chocolate Chip, Flower cut at 1 1/2" in Rose Red, Regal Rose, So Saffron (all layers are cut at the same size and will be perfectly proportional)
Ink: SU Rose Red & Regal Rose
Stamps: PTI (Papertrey Ink) Cupcake Collection & Mega Mixed Messages
Accessories: Rose Red Ribbon, White Gel Pen on Cherry

Close up of the flower image!

 Recipe:
Card Base: SU Rose Red 4 1/4" X 5 1/2" (folded)
Card front: Regal Rose 4 X 5 1/4
Ink: SU Rose Red & Regal Rose
Stamps: PTI (Papertrey Ink) Cupcake Collection & Mega Mixed Messages
Accessories: Rose Red Ribbon, White Gel Pen on Cherry

Close up of the flower image!
Hope Your Birthday is a Hoot! by kiddielitter - Cards and Paper Crafts at Splitcoaststampers
http://www.spli
http://www.spli
|
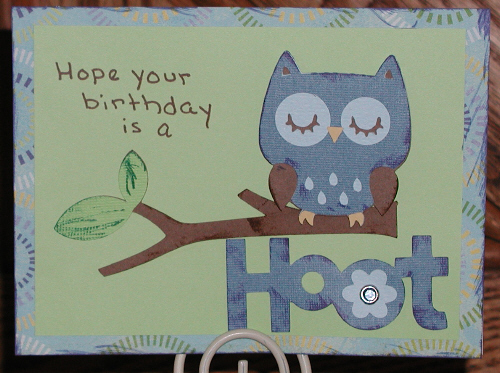
 Photo Details Photo Details | |||
| Poster: kiddielitter
|
pots and Dots-Made by Momo Challenge


Hi everyone! Today is BBTB2's end of the month blog hop! You can start the hop at BBTB2 or if you came from the very talented Donna, then you are in the right spot!
This week the DT was asked to use the gennie lamp from Paper Doll Dress Up. I had such a hard time with this one! lol! I'm still not a 100% loving this card, but it works...
 I embossed the brown circle and used white ink to soften it because it looked a lil too dark. And with the gennie lamp, I did some doodling and added some blue gems...and a lil bow...

What do ya think? Yay or nay..lol ;p
This week the DT was asked to use the gennie lamp from Paper Doll Dress Up. I had such a hard time with this one! lol! I'm still not a 100% loving this card, but it works...


What do ya think? Yay or nay..lol ;p
Super Cute Octopus..and my Natalie!


Another Owl card & a Mini Tutorial...


Now onto the mini tutorial...for this card I used the clouds from Create a Critter and I just randomly placed them onto the circle layer of the scallop card..


I also wanted to share another card I made with the For the Boys set, it's a card for Grandpa! :)


Dear Friend Card..


Lol..I bought 2 more Lite carts! It's funny because when these first came out I told myself 'No way! they are too over priced!' but now I have 4 already! They are just too darn cute! I really have been saving my pennies, honestly! So I bought B is for Boy and Sugar and Spice which are my newest favs! Here are a few little cards I've been working on...this one is from Sugar and Spice


 These 2 are from B is for Boy...

 I put glossy glaze on the water parts.
 I used Scrappy Mom's Amusing Animals Stamp set for the sentiment.
 For the fish bowl card I just welded 2 of the bases together.


Two very ripe bananas Plus the Cricut equals....
Some very yummy banana bread!

Yumm...so my bananas where so ripe I didn't even want to touch them! LOL ..I knew it was time for some baking! And then I thought 'Hey, I can make a super cute tag to go on top of the bread!' and here we are!

I used the Sweethearts cartridge for all the pieces even the tag! And I used PK Critter Face Stamps for the eyes.

Happy Monday everyone! I hope you all enjoyed your weekend. Today is BBTB2 day and this week we are doing dinosaurs! The DT had a lot of fun with this challenge , there is lots more inspiration to check out HERE!
For my card I used the adorable dino from the B is for Boy Lite cart (my husband said the head looked funny, but I think it's cute! lol!)...I also did a Z fold card.


 And I did some embossing and doodling of course! And I used Scrappy Mom's Amusing Animal stamp set for the sentiment.
 I hope you all can join in the challenge this week, you can use any dinosaur you have, just have fun with it! We love seeing your projects! Have a Dino-mite day! :p
For my card I used the adorable dino from the B is for Boy Lite cart (my husband said the head looked funny, but I think it's cute! lol!)...I also did a Z fold card.


The sentiment says -You're so Kind-

I used the Home Decor cartridge for the flourish and the cute lil birdie. I embossed the yellow background and stamped the sentiment onto vellum and adhered with two blue eyelets. I also did a bit of doodling, pop doting and inking for an extra touch!


I love the way it came out and with the color challenge, it made it so much easier because I knew all the colors would flow. :)
I did get a little bit of inspiration from THIS book.
Thanks for stopping by and keep an eye out for more projects with the new sets from me and the DT...Momo has a super cute card you can check out and Lauren, Melanie & Tammy have more inspiration!
**Also, I don't know if you saw the little blinkie at the top of my page,but this Saturday the Scrappy Mom's Design Team will be having a fun blog hop to showcase the new stamp sets..and we will have a few guest designers with us! I can't wait, it's gonna be a fun hop! :)
Supplies:
Pattern Paper-My Minds Eye
Bird and Flourish-Home Decor Cartridge
Sentiment-Scrappy Mom's Stamps-Everyday Greetings
Another Sneak Peek!


And here are the cute lil cards I came up with, I used Create a Critter for both of these and my Peachy Keen Critter face set (in Med. size)...
Hang in There!


Aren't these too cute!?! I love 'em both!
Hang in There!


Hooray, it's Turkey Day!


Aren't these too cute!?! I love 'em both!
Ok, so since we are celebrating Momo's bday, it only makes sense that she would make the theme of the hop 'Birthday' and I decided to make a set of 4 coordinating cards, in my favorite color ~Pink!~ and of course lots of polka dots! I used one of my favorite cricut cartridges Sweet Treats for all of the cuts and some super cute Peachy Keen faces and Scrappy Mom's stamps for the sentiments, take a look!...


This card is a mini, cut at 4x4. The face is from the PK Retro Faces and the sentiment is from Scrappy Mom's ~Sweet Somethings~ set.

This cute party face is from the PK Simple Sallies faces and the sentiment is from SMS
~The Charmed Life~ set.

These present faces are from the PK Funshine Faces and the sentiment is from SMS
~Sweet Somethings~ set.

Lots of glitter on the 'cake' and 'cherry'! :)
So what do you think! Cute!?! I'm so glad I got these all done now because I always end up making bday cards at the last minute!
Well..I couldn't leave you without a card to share..
I used the new PK acrylic pieces for the star and stamped the face with the Happy Lashes face set and the sentiment is from the newest Scrappy Mom's Stamp set 'Simple Sentiments'.


I added lots of glitter too!
Ok guys, thanks for stopping by, have a great day! :)
Christmas cards


Halloween cards


In Style Tag
 Well I decided to do my 1st challenge..this is the "In style" BBTB2 challenge for this week. All of the creations on that blog are amazing and all of the designers are so talented! You should definitely check it out if you have a chance! So what I did was cut the tag from Sweet treats and embossed w/my cuttlebug and inked the edges. Next I cut the cute outfit from New Arrival and added some bling. And lastly the saying is from Graphically Speaking.
 You might also like:
Butterfly & Pearls


This is one of those 'one size fits all' type of cards...I left it blank on the inside that way it can be a 'thank you, happy birthday, just because, or get well'. The butterfly is from Home Accents and the frame is from Gypsy wanderings. I added some pearls, did some faux stitching, inking and used the cuttlebug to emboss the circle behind the butterfly. It was pretty simple! TFL!

 Another BBTB2 challenge for me! I'm loving doing these challenges! This week was to use the snowman from the Doodle Charms cart. So I decided this was gonna be a city snowman & I cut the cityscape from Plantin School Book, the lamp post was from Graphically Speaking,and the hat was from A child's year. I cut the snow freehand and embossed with the cuttle bug. I added some googly eyes, ribbon, and some brads for his buttons. TFL!

BBTB2-Ice Cream and a Blog Hop!


The sentiments are from the Sweet Somethings stamp set by Scrappy Mom's Stamps.
For the gift bag I stamped the cherries and added a cute tag along with some twine to tie it all together.


Challenge #4 with Sandra-Zoobaloo..


My Project:


I used Petal Pink Crinkle Ribbon on the card and the box.

The border punch is from Martha Stewart. The cupcake is cut at 2" (Sweet Treats cartridge) and the stamped sentiments all come from The Pink Stamper. The pretty scalloped square is from Gypsy Wanderings. I also used glitter, glitter glue, flower eyelet and setter, button, and Dimensionals.


Houses Built of Cards
http://housesbu
http://housesbu


Houses Built of Cards
http://housesbu
http://housesbu
Loving you more each day!
I just love when I picture a card in my head, and it actually comes out looking the way I imagined it! Doesn't always happen, but I got lucky on this one!
The background shape came from the tag feature on Winter Frolic, the little girl and boy shape is from A Child's Year and pop dotted from the background, used the Cuttlebug on the background, some ribbon, a Prima Flower with a button for the center, a stamped sentiment from my stash, and lots of gray inking.
Thanks for looking!

Labels: A Child's Year, Cuttlebug, Prima Flowers, Winter Frolic
Houses Built of Cards
http://housesbu
http://housesbu
And since I just finished this project for a color challenge on My Pink Stampers blog, and it just so happens to use a Peachy Keen stamp...I thought I would share this tonight as well! The challenge was to use brown, blue, and green (and I had to use a "little" yellow!). I used the Smiley Cards cartridge, added a face from Peachy Keen's Princess Face Assortment. The candle flames got a dose of Stickles, and the frosting was covered with Glossy Accents. The sentiment is from a Pink by Design stamp set that I just got, and some buttons, string, and doodling finished it all off.

Tree from Serenade
I have LOVED this tree from the Serenade cartridge ever since I first saw it. Since I have that cartridge, and hadn't gotten a chance to use it yet, it was pretty simple to pick what I wanted to be my first cut from the cartridge! The background shape came from Lacey Labels, then I added some Glossy Accents to the leaves. Stamped the sentiment from a stamp in my stash, added some ribbon, and finished with a little bling with my Jolee's Heat Set tool.
Have a happy and safe New Year - hard to believe it is already that time!!! I just got used to writing 2010...

Labels: tree, serenade, cuttlebug, lacey labels
Dimensional Glaze tutorial:
 Step 1: Cut the cherry out twice at 3" (fits the 3" cupcake) from red and brown cardstock. This cut is on the cricut Home Decor cartridge.
Step 2: Cut the stem off the red cherry.

Step 3: Put the red cherry through your xyron sticker machine UPSIDE DOWN so that the adhesive is on the top.

Step 4: Cover with red glitter.

Step 5: Apply dimensional glaze around outside edges of cherry.

Step 6: Fill in the center with dimensional glaze.

Step 7: Let dry, then layer on top of brown cherry die cut.
 Looks good enough to eat! (well, almost)
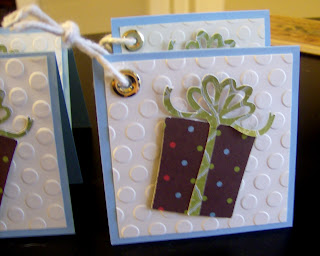
Mojo Monday sketch challenge

The Cutting Cafe Camera Set

These new sets from The Cutting Cafe couldn't have come out at a better time for me. I made this project using the CAMERA SHAPED PHOTO HOLDER TEMPLATE, the PHOTO BACKGROUND PRINTABLE STAMP SET and the CHRISTMAS MINI COLORED SET. Just yesterday we took a little road trip with our four year old granddaughter, Payton. We took her to Bronner's Christmas Wonderland in Frankenmuth, Michigan. You have never seen such a fantastic Christmas store in your life. It was Payton's first trip there and she was enchanted. (Though she pooped out quicker than we thought she would). I made this photo holder to give her the pictures we took while we were there. The pictures will be placed in her Christmas Daily album I made for her. As the name implies, this is a holder for photos that is shaped like a camera. First I printed the Photo Background onto white cardstock then cut out the Camera Shaped Photo Holder. Using a scrap of Christmas paper I cut a decorative edge to place on the front of the holder and the piece to hold the photos inside. The circular Holiday Photos sentiment was punched out with a two inch punch and placed atop the black circle. The Christmas tree was cut from the Christmas Mini Colored set as well as the punched Merry Christmas circular sentiment.

The date and place tag is part of the set and I just cut it and placed it on the inside for a reminder of the date the photos were taken. Isn't Payton adorable standing next to that life size snowman? She got to pick out an ornament to take home and put on her Christmas tree along with one for her baby sister. This is a long-standing tradition in our family...getting an ornament from Bronner's. When the first of our five children was born we went to Bronner's and bought her first Christmas ornament. Every year thereafter, for each of our five kids, we bought them a Christmas ornament. It went on the tree that year and then went into a box with their name on it. Then when they married or moved away from home they took their box of ornaments for their own Christmas trees. Now we carry that tradition on to our grandchildren. They always know they will get an ornament as part of their Christmas presents.
AMERA PHOTO SHAPED HOLDER TEMPLATE....CUTTING FILE
This CAMERA PHOTO SHAPED HOLDER template - cutting file comes with the following:
A Camera photo shaped card with a holder in the inside to hold up to ten 4 by 6 photos
20 circle sentiments (will punch out using a 2 inch circle punch)
22 straight sentiments
A smaller camera shaped card with a matching envelope

 Designed By: Regina Easter


A Camera photo shaped card with a holder in the inside to hold up to ten 4 by 6 photos
20 circle sentiments (will punch out using a 2 inch circle punch)
22 straight sentiments
A smaller camera shaped card with a matching envelope
inside of camera shaped holder...with pictures
This project also uses the BABY MINI WORDS
Design team projects:
Below is a picture of the basic look of the camera.
Price: $4.99
Cricut Cardz Challenge #54

Painted Snowflake
Happy Thursday! Today I'm sharing a card I made for this week's Viva la Verve! challenge. I was in a playful mood, so I pulled out some white acrylic paint, added a little bit of water and painted it directly on the snowflake from Glad Tidings and stamped onto basic gray cardstock. {Note: if you're stamping with paint, be sure to have water and a scrubber handy, so you can immediately clean your stamp, otherwise the paint will dry and its no fun trying to get dried paint out of the little crevices.} Then I just brushed a little of the whitewash mixture on the edges of the square for a snowy looking edge.

For the pear pizazz panel, I arranged about seven of the sentiments from Glad Tidings on a long acrylic block and stamped it in pear pizazz as a background, filling in open areas on the sides with the small snowflake from the set. The white background is embossed with a holiday Cuttlebug folder I rediscovered in the great studio clean-up last weekend. For accent, I added some green lace trim, a Making Memories pearl cluster, then tied on some bells with 1mm silver cording from Pizzazz Aplenty and accented my circle with some shiny silver pearls.
That's all for today! Thanks so much for stopping by!
Make a Wish
 This cupcake card was cut at 5 1/2" from the new Sweet Treats cartridge. 'make a wish' was cut at 1".
  There is a tutorial for the glitter flame below or just click on the tutorials label on the right.
You might also like:

For this card I used the Storybook cartridge. I stamped on the "E" with versamark watermark ink and them embossed with clear embossing powder.

I cut the butterfly 3 times, layered and then used the watermark ink and clear embossing powder to make it shiny. :-)


You might also like:
Chocolate covered strawberry

I used the Sweet Treats cartridge for this card (One of my favorite carts!)

Cut the card base (Page 50) at 4". This is just a plain card, but fit the strawberry exactly. The patterned cardstock is from DCWV. Cut all other layers with your paper trimmer. Round the corners with a corner rounder punch.

Cut the Strawberry top (Page 34: shift/layer) at 2 1/2" Real Dial size. Emboss with your swiss dots cuttlebug folder and ink lightly with black ink.

Cut another strawberry top from dark brown. (same size) Trim as shown in picture below. For the strawberry leafs, cut from green (p. 34 layer) at 5" Real Dial size. Then trim off excess. (You don't need the icecream part). Tape a white piece of paper on the back of the strawberry as shown.

Draw lines on the leafy part with a colored pencil (I used Crayola) and then use gamsol on a small sponge and a blender stick to blend the colored pencil a bit.

Assemble strawberry and spray with glimmer mist. Use glitter glue on the white dots.

cover brown cardstock with dimensional glaze and let dry (a long time!) When it is all dry, adhere to top of strawberry. Looks yummy!

You might also like:
Saturday, February 20, 2010
A Child's Year card

I had lots of scraps leftover from a mini album I am making (will post pics soon) so I decided to make a card with the leftovers. I tied the edge with ribbon and tulle. The little girl is cut from A Child's Year cartridge (p. 60) at 3 1/2" with the shadow cut too.
Here are some close ups:


You might also like:


Thank You' - CAC and JBC cartridges
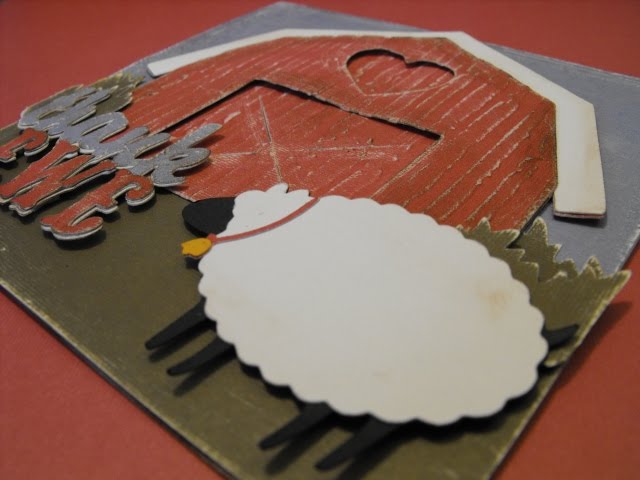
I couldn't decide which sheep I liked better on this 'Thank Ewe' card. I love both of these cartridges! (Create a Critter and Just Because Cards) The JBC sheep is first and the CAC sheep is the last picture.
This sheep is from the Just Because Cards cartridge (p. 35) cut at 5". The Thank You (JBC - p. 35) was cut at 3.5". The barn was cut from Create a Critter (p. 71) at 2 3/4". I cut the barn out twice, once in white and once in red and then cut the top layer once from red. I hand cut the white trim from the barn and adhered it to the red.


Here is the sheep from CAC on the same card:

I used my cuttlebug to emboss the barn, then sanded (white core cardstock) and inked lightly with Distress ink (Walnut). The grass was cut from PDDU on my Gypsy. I also used dimensional tape for the layers of grass, the barn and on the sheep and sentiment.
Guest Designer: DeeDee (Scrappin With DeeDee)
Okay, now on to my project for today! I have for you a really cute idea for the holidays. You could use this for your child's classroom goodies or maybe even just for that friend or family member that showed up at your door unexpectedly! I'm going to explain how to make a goodie bag topper and and a gift card holder/greeting card all in one.
 Here's the goodie bag topper. I used only the Winter Woodlands cartridge to make this one.
 If you've visited my blog lately, you probably already know that I love to create things using frozen dinner boxes. For this project I've used a Healthy Choice Cafe' Steamer Box that is green on the inside. Using the snowflake on page 35 of the manual, cut (1) shadow @ 4" from the green box and (1) shadow @ 4" from white card stock. The white one is your liner. Score both in half and fold.
 Since the inside of your topper is all decorated with food and nothing too Christmasy, you'll want a liner for your box piece. Of course you can use green card stock in place of the box piece if you don't want to collect frozen dinner boxes like I do! LOL! Glue white liner to inside of the topper and set aside.
 Now for the holly leaf. Referring to page 41 of the manual, cut (1) shadow @ 3", (1) regular cut @ 3", (1) shift cut @ 3" and (1) layer cut @ 3".
 Apply glue and stack the layers accordingly and this is what your holly leaf will look like all finished. Set aside.
 The "kisses" is just half of the "frosty kisses" phrase on page 65 of the manual. Cut (1) shadow and (1) regular cut @ 2". Apply glue and assemble. Use picture above to guide you in placement and putting all the pieces together. When you have all the details done, insert the bag in the topper, punch two holes about 1" apart toward the top center of the topper, fill the bag with kisses and then thread a 12" length of red ribbon through the topper and bag combo and tie it in a bow. The little bags I used are from Stampin Up.
 Now for the gift card holder/greeting card. I used another holly leaf cut, the same as above and also added some Nestabilities circles and a few letters from Cuttin' Up. The gift card holder is the envelope from Plantin Schoolbook.
 You will need (1) white card base measuring 5 1/2" x 4 1/4", (1) designer paper measuring 5 1/4" x 3 1/4", (1) green frozen dinner box piece measuring 1" x 5 1/4", (1) small and (1) medium scalloped Nestie cut from the green frozen dinner box, (1) envelope cut @ 3 1/4" from Plantin Schoolbook using the Tall Ball feature, the letters "for you" cut at 3/4" from the Cuttin Up and (1) 12" piece of red ribbon. Use the picture above for placement of each element.
This is a little video I made just in case you'd like to watch it too!
That's about all for now! I hope you've enjoyed my pictorial and will be able to try one for yourself as well. Please let us know here by commenting below if you get to make one for yourself, we'd love to see your creations too!
If you have any questions, just ask. I'd be glad to help in any way I can! THANKS for visiting today! HUGS!
Friday, April 30, 2010
Guest Designer: Kimberly (Sentimental Scrapper) - Vintage Card with Handmade Flower


I also used Ribbon and Tulle and a pearl from my stash and the Martha Stewart Lace Doily Punch. I inked everything with the Tim Holtz distress inks. (antique linen, walnut, and tattered rose) The patterned paper is from Fiskars.
Here is a video showing how to make this pretty paper flower:
I have had so much fun creating and sharing these projects! Thanks again for the opportunity, Jody! And thank you for all of your sweet comments! Come hang out with me on my blog, My Craft Spot, anytime!
Saturday, July 24, 2010
What a Pear!
Hi Everyone! This is Robyn, also known as My Pink Stamper from mypinkstamper.com and I am so excited to be a guest designer this week on Hallmark Scrapbook! I really wanted to spotlight my new stamp sets that were released a few weeks ago that they are carrying on their website. This one is called Fruit & Veggie Puns. I am going a little Punny Crazy!!
This card was made using the Preserves cartridge along with Coordinations cardstock.
I absolutely LOVE the colors on this card and can you believe I didn't even use pink? What a thought!! LOL! I don't use pink ALL the time but I would like to most of the time. :)

The pear was cut at 3 3/4 inches. I hope you enjoy!!

Thanks for letting me participate today over on Hallmark Scrapbook! It was a pleasure!!
Feeling Sick? Milk it!


Here's a video about how I made this card:
You might also like:
Ewe are the best!
Robyn over at My Pink Stamper has 5 new stamp sets and they are fabulous!! I used the Even More Punny-licious set for the 'Ewe are the best'. The ''Thank You' on the tag came from an older set (Everyday life).
The Sheep came from the Just Because Cards cartridge (cut at 6"). I used a Martha Stewart edge punch, Crinkle Ribbon, Crate Paper patterned cardstock and Glossy Accents to make the dark brown and accents on the sheep stand out and look shiny.

I used the Vanilla Bean Crinkle Ribbon, a button and some twine.

You might also like:
Jesus is the reason for the season card - Peachy Keen Stamp challenge #40

This is the card I came up with:

The Baby Jesus and manger are cut from the Paper Doll Dess Ups Cartridge and the Star is from the George cartridge. The stamped sentiment comes from My Pink Stamper.

I used Cranberry and Vanilla Bean Crinkle Ribbon for the candy cane border. I punched tiny holes along the bottom of the card and then threaded the ribbon through the holes. I started with Cranberry, then threaded Vanilla Bean through the next hole, Cranberry in the next hole, etc. until I got to the end of the row. Then I taped a second piece of Cranberry ribbon on the back of the cardstock piece so I could tie the bow. Clear as mud? :-)

The face stamp is from Peachy Keen. I used an older set (Funshine faces) for the eyes and nose and Everyday character faces for the itty bitty mouth.

May your troubles be less and your blessings be more and nothing but happiness walk through your door! - Irish blessing :-)
Celebrate the Season - Fun and easy things to do with ribbon!
Christmas will be here before we know it! For now, I am trying to get a head start on my stash of Christmas cards and gift tags!

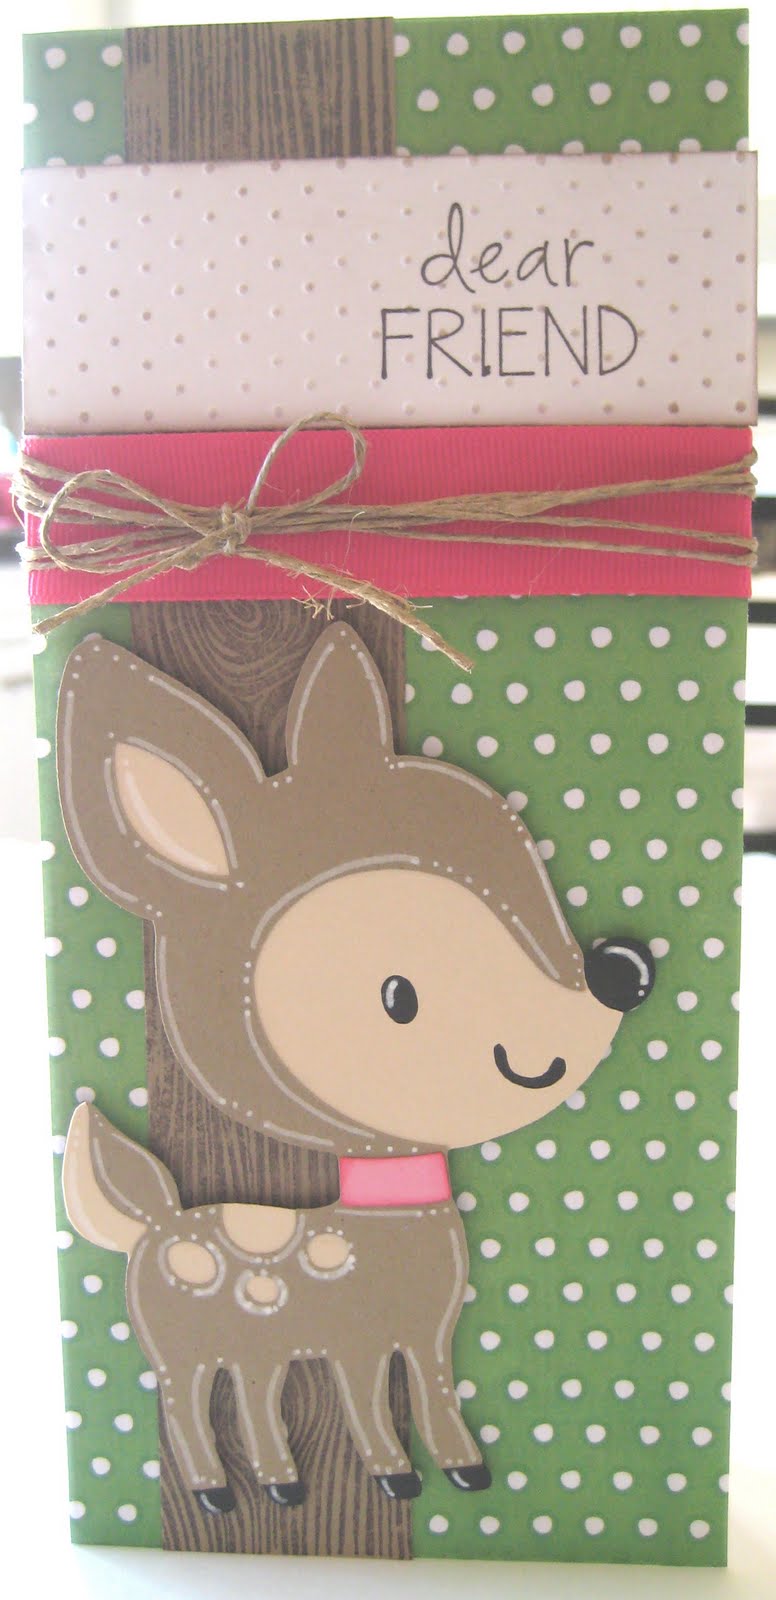
All of the sentiments on the card and tag are stamps from My Pink Stamper. The cardstock is a mix from my stash, but mostly Crate Paper. The overall card measures 5 3/4 inches by 5 3/4 inches. The red paper is a 5 1/2 square. The green is 5 x 5 inches and the cream square is 4 3/4 x 4 3/4.

The deer and trees are from Gypsy Wanderings. I cut the deer at 3.08 inches and the trees at 3.43, 2.92 and 3.55.

Scroll down for videos showing how I made the gathered border and how to crochet the sweet little flower!

I used Cranberry Crinkle Ribbon from My Craft Spot for the ruffled border and for the bow.

I inked everything with Walnut and Tea Dye distress inks.

This tree was cut from Gypsy Wanderings at 3.55. I cut it twice. Once in brown and once in green. Then I trimmed off the bottom of the green so I could layer it on top of the brown.

Scroll down for videos showing how to make the Crinkle Ribbon Flower and the Crocheted flower!

Videos:
Part One: Gathered Crinkle Ribbon
Part Two: Crinkle Ribbon Flower
Part Three: Crocheted Flower
Here is the pattern for the crocheted flower:
Ch 4; join with slip stitch to form ring.
Rnd 1: Chain 1, (sc in ring, work 2 Love Knots) 6 times; join with slip stitch to first sc, finish off: 6 petals
Love Knot: Ch 1, pull up loop on hook to measure 1/2"m YO and draw through (loose ch made), sc in back ridge only of loose ch just made.
I used a US 7 or 1.5 MM crochet hook. :-)
Glittery Snowman card! - Peachy Keen challenge

I stamped the face on this cute snowman using the Peachy Keen Everyday Faces set. I wanted my snowman to glitter like snow does on a cold sunny day. I experimented with lots of different things (tossed them all in the garbage) and finally decided to use spray adhesive and glitter. The face kind of faded into the background with the glitter on top, so I added Glossy Accents over the eyes, nose, and mouth.

I made the snowman from ovals cut from the George cartridge and stretched on my gypsy. The hat came from Winter Woodland.

The stamped sentiment came from My Pink Stamper.

I used Stormy Day Crinkle Ribbon. I sprayed the ribbon with adhesive and added a touch of glitter to soften it up!

Have a wonderful day!
Warmest Winter Wishes!

The tag was cut at 4 inches from Tags Bags Boxes and more. I used Sea Foam Crinkle Ribbon for the bow and a crocheted flower, button, and thread.

I cut the Ice skate from Gypsy Wanderings on my Gypsy at 1.86 w by 2.24 h. The scalloped circle is cut from mini monograms at 3.23 x 3.57 and the inner circle is cut at 2.67 by 3.78.

Warmest winter wishes to you!
Sweet Treats Cake card

I ran all of the cake embellishments through my Xyron sticker machine upside down, then covered each piece with glitter before adhering to the cake. I used a punch for the flowers on the cake plate.

The scalloped border was made with my Gypsy. I turned the letter "D" (Jumbo font) on the Lyrical Letters cartridge sideways and welded a bunch of them onto a long, thin rectangle (from the George cartridge) until it was the right size for my card. Have I mentioned that I love my Gypsy?!

I used a striped patterned paper for my cake. (DCWV cardstock) To get everything to line up, I first cut the cake out on white cardstock. Then I removed the cut out cake, but left the 'stencil' on my mat. Next, I slid my piece of patterned cardstock in under the 'stencil' until it was lined up just how I wanted it. I removed the white before cutting the cake out on the patterned cardstock.

Now I have a cake that looks like I cut it out of a lot of different papers and then pieced them together, but without all of the work!

For the cake plate, I wanted it to look glassy, so I used my watermark ink and clear embossing powder. If I have a small piece, like the cake plate, I like to put the whole piece on the ink pad and then use the lid to press down on it. This gives more even coverage than just holding the die-cut and trying to ink it.

A little bird told me


Hi Everyone. My Dad turns 70 Today and here is the card I made for him. We all know how difficut it can be to come up with cards for us guys! So I used a cut I use a lot, and I'm really pleased how it turned out for him. Happy Birthday Dad..
I've left a step by step on my blog if you fancy giving it a go.

I've left a step by step on my blog if you fancy giving it a go.
Masculine Birthday card

I made this card from scraps. I embossed the black and gray pieces with my "Diamond Plate" Cuttlebug folder. I stamped a plain white tag and tied it on with some orange and white thread.
Labels: masculine card, cuttlebug, bakers twine, birthday card
The first one was a special request by a friend. She wanted a thank you card for her chiropractor who had been super great when her neck went out a couple weeks ago. So...what has a longer neck than a giraffe? I also cut out a little bandaid from the Everyday Paper Dolls cartridge, to put on the neck of the giraffe, but when I took the picture of the card, I still had wet stickles on the neck, so I couldn't put it on.

I love this first one!!! The cartridges used were Sentimentals for the stamp background, and Pooh and Friends for the clouds and kite. LOTS of printed paper - got brave on that one!


The flower, of course, is from Picturesque, the scallop circle is from Accent Essentials, and a stamp for the sentiment. Cuttlebug for texture, a little ink, and some doodling with a white pen. Thanks for looking!
Posted by Houses Built of Cards at 5:35 AM 1 comments Since I had been playing with the Smiley Cards cartridge so much, I thought I should check out some of the other cartridges I gained through the Gypsy download! This one used Indie Art - and this is, hands down, my favorite cut from that cartridge. The picture doesn't show it very well, but I used some Glossy Accents on the ice cream and drip. Also some inking around the edges, My Pink Stamper for the sentiment, and a Fiskars paper punch for the lacy bit on the bottom. Super quick and easy!

I love the color combination on this one! This is for the weekly challenge on the Cricut Circle Blog. There were four colors you had to use, and it had to be a thank you card! I loved the colors, so it was an easy card to make this time. Heart and bird are from the Give a Hoot cartridge. The ribbons were my initial inspiration, since I had ribbon in all of the right colors in my stash. Added a stamp sentiment, and a small flower stamp all over the background of the heart, as well as some dots with my Sakura Glaze pen.

The challenge on the last one was to make a thank you card! I couldn't resist making at least one easel card! I cut this mushroom from the Smiley Cards cartridge, and used my Gypsy's hide contour feature to hide the face. Then I placed a couple of circles on it to make cutouts through the top layer to let the bottom peak out. Love how that turned out, and love that I discovered another way to use this cartridge! The flowers for the inside are cut from Walk in my Garden, and layered with buttons for the center. This card also has a lot of inking, a stamped sentiment, and glossy accents on the outside edge of the circle as well as on the mushroom.

2 fun cards!
Lucked out last night, ended up with 2 cards I really like! I wonder if it had something to do with actually accomplishing something useful before I sat down to play! (Cleaned my bedroom and bathroom after my two daughters went to bed - they were in desperate need of it!) Anyway, both of these came out really fun!
The first one I used a cut from the Country Life cartridge, and added a face on the watering can from the new Peachy Keen Snow Cuties face assortment (about time I finally used those!). Then I added glossy accents on the watering can and pot, and stickles on the water, flower, and stem. The lacy bottom piece is using a Martha Stewart edge punch, added some buttons and ribbon on tip, a stamped sentiment, and lots of faux stitching with my white gel pen.

On this second one, I used one of the "sticker" cuts from Just Because Cards. Then ran the background through the Cuttlebug. The sentiment came from Create a Critter. Added Glossy Accents (yep, I love the stuff!) over the blue part on the "sticker", and over the word "howdy". Finished off with a little faux stitching with my black Sakura Glaze pen.

Jolee's heat set tool.


The new challenge this week on the Cricut Circle Blog is to make something vintage inspired. This is kind of a different stretch for me, so I figured I would tackle it right away before I lost my nerve! I am really happy with how this turned out, even though it scared me to begin with!
Used A Child's Year for the black cutouts, Cuttlebug on the blue background piece, some ribbon, Prima Flowers, buttons, string pearls, and some heart shaped brads that I snapped the back off of and glued to the buttons. Also added a computer printed sentiment. Turns out Glossy Accents works great as a glue for sticking on pearls and buttons too!
Thanks for looking!
Thanks for looking!

No comments:
Post a Comment