
You're never more than a thought away.
Hi everyone! Today I have a card for you using Plantin Schoolbook! Even though it is primarily a font cartridge, it does have a few other shapes on it as well, like the flowers I used for this card. I cut the flowers at 1", stamped and sponged them. I used Stampin' Up!'s Awash with Flowers stamp set for the stems. I stamped the sentiment and punched it out with a 1 3/4" circle punch and then accented it with a few smaller punched circles. I used the Eyelet Border Punch on the yellow piece for some added interest.
Thanks for looking! :)


Thanks for looking! :)


2010
Cute As A Bug!
Today I used Just Because Cards for this "so cute" card. I cut the card out at 5 1/2" along with all the coordinating cuts. I used the Cuttlebug with the Dots and Spots embossing folder for the base for some added interest. I used Dazzling Diamonds and a little bling on my lady bug. She's so fancy! hehe! I had some scraps of designer paper from SU! so I used that for the phrase.


0
Just a bird in a tree. :)
Hi everyone, hope you all had a great 4th of July! Today I have a square, 4 1/4" x 4 1/4" card for you using Give a Hoot. The tree is cut at 2 3/4" and the bird is cut at 3/4". I did use a handheld, 1/16" circle punch for the bird's eye, since it was cut so small. The hearts on the side are from Stampin' Up!'s Heart to Heart punch and the yellow border was made using the Scallop Trim Border Punch.
Thanks for looking! :)


Thanks for looking! :)


I Heart You, Friend
Today I made this cute little 4"x4" card using Life's A Beach cartridge. I used the square card feature to cut out the card base. This particular cartridge doesn't have a coordinating cut to go with the card so I had to fidget a little bit. I ended up cutting the turtle out at 2" with the Paper Saver button ON. It doesn't match up perfect but I think it's pretty close!

I used SU! cardstock, stamp set and some ribbon from Walmart. I added some Stickles to the shell just for a bit of fun. I hope who ever receives this will enjoy it as much as I do! I think it can be used for so many things. Thank you, birthday, get well, sympathy, etc.

I used SU! cardstock, stamp set and some ribbon from Walmart. I added some Stickles to the shell just for a bit of fun. I hope who ever receives this will enjoy it as much as I do! I think it can be used for so many things. Thank you, birthday, get well, sympathy, etc.
Happy Anniversary, Mom & Dad!
Hi everyone! Today I have yet another Create a Critter card for you. Normally I wouldn't do another Create a Critter card so soon, but this was for my parents 30th anniversary, and I wanted it to be extra cute, and I think this cartridge has the best animals. I went off of the same layout style that I did on the 3" x 3" note card from last Tuesday, so you can see how you can turn a 3" x 3" note card layout into a standard A2 sized card. The mom bird is cut at 1 1/2" and the dad bird at 1 3/4". The sentiment I printed from the computer because I didn't have a "Happy Anniversary" stamp in the size that I wanted. I am pretty pleased with how this came out, what do you think? All products used at Stampin' Up!
Thanks for looking! :)


Thanks for looking! :)


Happy Birthday!
I noticed today that my birthday cards were running low so I decided to make one for today. I'll probably be working on a few in the next week or so. Hope you like them!


I used Potpourri Cricut cartridge for the present cut at 3". I cut my craft card stock at the standard A2 size (4 1/4" x 5 1/2"). Basically, you cut a 8 1/2" x 11" paper in half, then fold in half. Wahlah! Your standard A2 size! I punched the edge with the Fiskars Threading Water punch. I lined the back of the front flap with barely banana card stock so the little holes would show up more. Love them. Dotted them with some Stickles for a little fun. I used a bunch of different stamp sets for "Happy Birthday" do make a pattern on the craft card stock with Versamark ink. Ribbon is from Walmart. My fav. :) Finished her off with a little white gel pen.


I used Potpourri Cricut cartridge for the present cut at 3". I cut my craft card stock at the standard A2 size (4 1/4" x 5 1/2"). Basically, you cut a 8 1/2" x 11" paper in half, then fold in half. Wahlah! Your standard A2 size! I punched the edge with the Fiskars Threading Water punch. I lined the back of the front flap with barely banana card stock so the little holes would show up more. Love them. Dotted them with some Stickles for a little fun. I used a bunch of different stamp sets for "Happy Birthday" do make a pattern on the craft card stock with Versamark ink. Ribbon is from Walmart. My fav. :) Finished her off with a little white gel pen.
Sending Birthday Wishes
Another birthday card! Today I used the other pieces of the present that were cut for my card on Tuesday. I cut out the party hat as well using the Potpourri Cricut cartridge at 3 1/2". I used some scraps of designer paper from SU!

I used a strip of craft card stock instead of ribbon for this one. I used one of the new SU! edge punches on both sides of the craft and then inked with Fresh Snow ink from Papertrey Ink. The sentiment is from Everyday Button Bits stamp set from PTI inked with Simply Chartruese ink from PTI.

I finished it off using an Old Olive marker from SU! to do some faux stitching around the edges. I rounded two of the corners using the Corner Chomper. That's it for this one! Pretty quick and easy.
Hope you like it! Have a great day!
S{ick}? - Feel better soon!
Hi everyone! Today I have a 4" x 4" card for you using Cuttin' Up! I am starting to look at the cartridge handbooks more closely, and I found this super cute speech bubble card...on a font cartridge! I hadn't even noticed it before, and there are a few different styles to choose from too. I chose just the regular cut, no shift, layer, or anything like that, and it's cut at 4". Here is a little tip for you... The shift button for this card I chose, is NOT a layer. It's just an accent. I thought it was a layer, or possibly like a frame for the center cutout, but it's not. No biggy, I just used the inside of the large speech bubble frame I cut out (that I thought was the frame, lol), for the purple background inside the cutout. *Everything listed after this is Stampin' Up!* I used 3 of the new In Colors that just came out: Concord Crush, Pear Pizazz, and Peach Parfait. I inked all the edges with Chocolate Chip ink before putting it all together. The background was stamped with the Polka Dot background stamp (it's retired, sorry). The inside purple square was stamped using the En Francais background stamp. I used Word Play for the S{ick}? sentiment and then punched it out with the XL Fancy Flower Punch. The owl is from Love Bandit and then I punched him out with the 3/4" Circle Punch, I think he's adorable! It's supposed to look like he's the one telling you to feel better, lol. I did some faux stitching around the speech bubble center and around the inside of the purple piece which is only visible when the card is open. I finished it off with some Pear Pizazz ribbon. I snipped a little slit on the fold of the card so I could get the tiny piece of ribbon in there and then glue it down, and then I tied a knot on the other side, almost to give the allusion that it goes all the way across.
Thanks for looking! :)


Thanks for looking! :)


Teacher Gift Enclosure
Hi everyone! Since school is starting up again, I thought I would make something for a teacher. I used Hello Kitty Greetings to cut the apple and books at 3 1/4". I sponged the edges of all the pieces, sponging a little extra on one side of the apple so it would look like a shadow. Then on the opposite side (of the apple) I drew a little reflection mark with the Signo White Gel Pen so it would look like a highlight. After that I covered the entire apple with Crystal Effects to make it shiny and more realistic. The whole gift enclosure measures a little under 3 1/2" x 4 1/4". I didn't have exact measurements because I basically cut everything after I cut out the apple and books. I then cut a piece of Daffodil Delight (yellow) card stock and adhered it to the back for writing a message.
Thanks for looking! :)


Thanks for looking! :)


Peace, love & Cricut!
Hi everyone! Today I have a card for you using the Cars cartridge. I was going use a cut of Lightning McQueen, but I think that a lot of those cuts might be a little too detailed for card making size. The smaller pieces just wouldn't cut out nicely without tearing. I think if you are able to cut everything larger, they would be really adorable. I was flipping through trying to find something cute that was an accessory, and I found this really neat peace sign which I cut at 1 3/4". I cut the heart out by hand and then stamped and inked it. The dotted mini background stamp is called Dot, Dot, Dot, and the love was done using the Rough Type Alpha set. The embossed background was done using the Square Lattice embossing folder, and then I inked over the top very lightly after it was embossed. After I was done I added Crystal Effects to the tops of both of the peace signs to make them shiny.
Thanks for looking! :)


Thanks for looking! :)


Happy Birthday Cupcake
Hi everyone! Today I have a card for you using Wild Card. I used the cupcake blackout feature and cut it at 5 1/2", and this will fit in a standard A2 sized envelope if you didn't want to make your own. A lot of the time, when I'm cutting the base of something, I prefer the blackout feature. The reason I chose to use it for the cupcake was because the regular one would have cut all the guidelines for the cupcake pieces. For instance, it would have cut all the little lines up and down where the wrapper layer would go. Since this was a pretty easy one to layer, I prefer not to have those cut lines as a guide because you can see them from inside the card. The candle I cut out twice in 2 different colors and then cut the flame part off of the Concord Crush piece and layered it on top of the Daffodil Delight so it would be two different colors. I also use a white gel pen on the candle to make the stripes, then inked over them with Concord Crush so they weren't so bold. I embossed the frosting and then sponged all the edges. I added a few flat backed pearls to finish it off along with some ribbon.
Thanks for looking! :)


Cute Squirrel
Hi everyone! I noticed that I hadn't used my Happily Ever After cartridge on here yet, so it was time to bust it out! I cut this cute squirrel at 3" in Crumb Cake and Early Espresso and then embossed just her tail with the SU Square Lattice embossing folder. I stamped the Rose Red card base with the Woodgrain background stamp and then the Baja Breeze piece with the Polka Dot background stamp (which is retired). I used an Itty Bitty punch for the little flower and then added a rhinestone. To finish it off I added some Pear Pizazz ribbon and some faux stitching.
Thanks for looking! :)


Thanks for looking! :)


Hi everyone! Today I have a 3" x 3" note card for you. Some of you probably remember that a little bit ago I made a card using the negative image of a cut. Well, today I decided to use the image that was left over from that card. The flower is cut at 2 1/2".
All products used are Stampin' Up!
Thanks for looking! :)
Please feel free to visit my blog! www.beecraftee.com


_____________________________
All products used are Stampin' Up!
Thanks for looking! :)
Please feel free to visit my blog!
www.beecraftee.com _____________________________
Camo Boy Cards by geekgirl415 - Cards and Paper Crafts at Splitcoaststampers
http://www.spli
http://www.spli
|
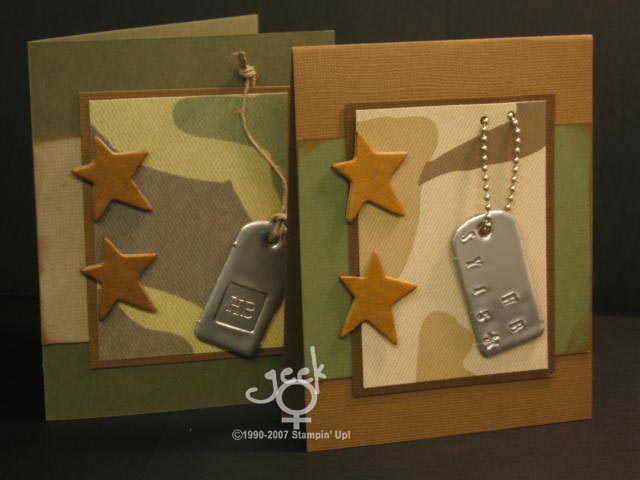
 Photo Details Photo Details | |||
| Poster: geekgirl415
|
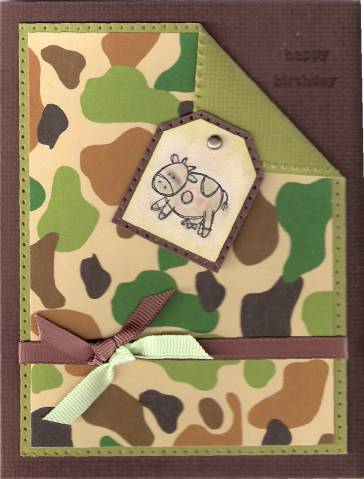
Cow "MOO" flage birthday by laynie_cat - Cards and Paper Crafts at Splitcoaststampers
http://www.spli
http://www.spli
|
Camo birthday by Ameribeth - Cards and Paper Crafts at Splitcoaststampers
http://www.spli
http://www.spli
|

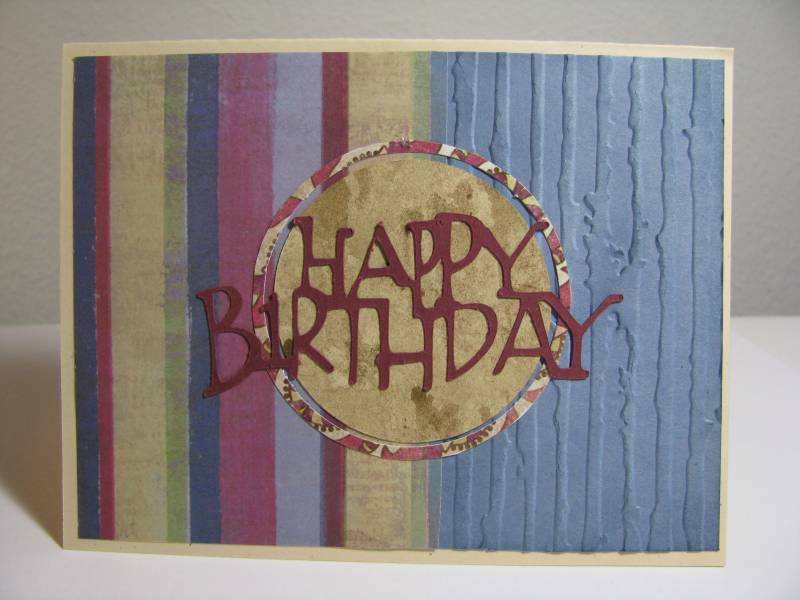 |
| CAS Masculine Blue striped BD |
e-PatternsCentral.com | Happy Happy Birthday
http://www.e-pa
http://www.e-pa
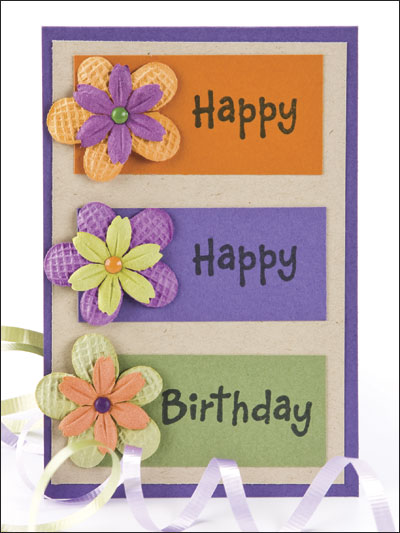
Happy Happy Birthday |
Size: 3 1/2" x 5 1/4".
Skill Level: Easy
| ITEM # | PRICE |
|---|---|
| EG00426 | $1.19 |
Share This Item: 


View More:
Google Image Result for http://crafts.peteandkerry.com/cards/061508_01.JPG
http://www.goog
http://www.goog
ther fun one!


 These 5 handmade cards come with thick, sturdy, color coordinated envelopes, and a piece of white, blank card stock, for writing a note on, inside!


I don't think we can ever have enough birthday cards!  For the first sketch I chose to do a cupcake card. Cupcakes are somehow a bit addictive to me but oddly enough.....I don't like eating them. I would much rather have pie..MMM PIIIEEE *okie closes her eyes and licks her lips imagining a nice coconut cream pie...opens her eyes and blinks* oh yes back to the card.
I got the cupcake from Doodlecharms and the Celebrate from Celebrations. The ribbon is lemongrass grosgrain. I did use Diamond stickles on the edge of the frosting and the dots on the lettering. It looks brown on the lettering because I used Chocolate Chip Stampin Up marker to make the dots and then added the stickles. For the flame I used red, orange and yellow stickles. On the candle I added Glossy Dimesions to give it waxy look.
The paper on the frosting of the cupcake is from DCWV Glitter Spring stack *okie is still quite impressed with herself for using some of her pretty paper*. Here are two close up shots of the card.

For the second card I wanted something that could be used for any occ asion. I can easily add Happy Birthday, Congratulations, etc to the inside when I need to. I know the colors might look odd and believe me I would have never thought about using these colors together but I SSOO TOTALLYYYY CHEATED!! Someone had posted a website on the Cricut Messageboard that helps with colors. The website is Scraptitude and I highly recommend it if you are color challenged like me! They have color combinations for Close to My Heart and Stampin Up. If you click on the link you can choose which company you want to find colors for.
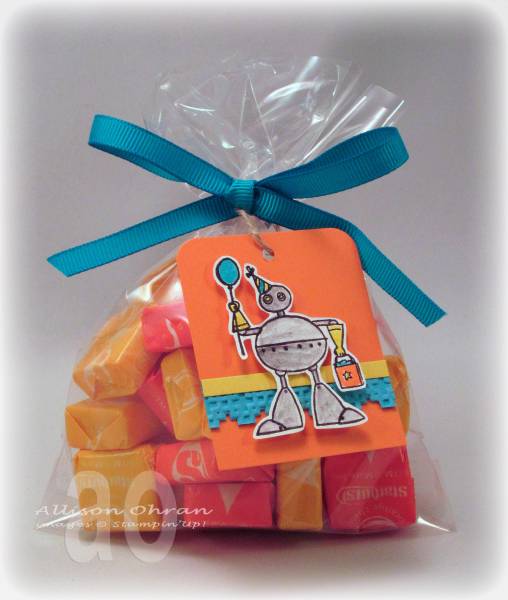
I used Plantin Schoolbook for everything but the tag, it came from Tags, Bags, Boxes and More. I added the strip of brown at the bottom on my own.
The sentiment is from my hostess set I got from Stampin Up and and the dots along the top of the card are also a SU stamp. I did use my Stamp-ma-jig to line them up correctly. I JUST LOVE LOVE LOVE THE STAMP-MA-JIG!! The little swirl at the bottom of the tag and the flourish at the top of the tag are stamps are from See D's Connetion Collection.
Here are a couple of close up shots.
 For the first sketch I chose to do a cupcake card. Cupcakes are somehow a bit addictive to me but oddly enough.....I don't like eating them. I would much rather have pie..MMM PIIIEEE *okie closes her eyes and licks her lips imagining a nice coconut cream pie...opens her eyes and blinks* oh yes back to the card.
I got the cupcake from Doodlecharms and the Celebrate from Celebrations. The ribbon is lemongrass grosgrain. I did use Diamond stickles on the edge of the frosting and the dots on the lettering. It looks brown on the lettering because I used Chocolate Chip Stampin Up marker to make the dots and then added the stickles. For the flame I used red, orange and yellow stickles. On the candle I added Glossy Dimesions to give it waxy look.
The paper on the frosting of the cupcake is from DCWV Glitter Spring stack *okie is still quite impressed with herself for using some of her pretty paper*. Here are two close up shots of the card.


For the second card I wanted something that could be used for any occ
 asion. I can easily add Happy Birthday, Congratulations, etc to the inside when I need to. I know the colors might look odd and believe me I would have never thought about using these colors together but I SSOO TOTALLYYYY CHEATED!! Someone had posted a website on the Cricut Messageboard that helps with colors. The website is Scraptitude and I highly recommend it if you are color challenged like me! They have color combinations for Close to My Heart and Stampin Up. If you click on the link you can choose which company you want to find colors for.
I used Plantin Schoolbook for everything but the tag, it came from Tags, Bags, Boxes and More. I added the strip of brown at the bottom on my own.
The sentiment is from my hostess set I got from Stampin Up and and the dots along the top of the card are also a SU stamp. I did use my Stamp-ma-jig to line them up correctly. I JUST LOVE LOVE LOVE THE STAMP-MA-JIG!! The little swirl at the bottom of the tag and the flourish at the top of the tag are stamps are from See D's Connetion Collection.
Here are a couple of close up shots.

Bots Birthday Bag – Cards, Stamps and Paper Crafts at Splitcoaststampers.com
http://www.spli
http://www.spli
|
| Photo Details | |||
| Poster: alliohran
|
MVP - Father's Day CAS – Cards, Stamps and Paper Crafts at Splitcoaststampers.com
http://www.spli
http://www.spli
kelly jo's stamp pad
http://kjsstamp
http://kjsstamp
color chef challenge #37
Color Chef Challenge #37
black
white
green
pink
black
white
green
pink

Card Recipe
Stamps- Treasure Life, For Every Occasion- CTMH
paper- black and white- CTMH
ink- sweet leaf and hollyhock- CTMH
other- cuttlebug branches embossing folder, EK Success 1 1/4" and 1" square punches
Big Pieces Spring Card – Cards, Stamps and Paper Crafts at Splitcoaststampers.com
http://www.spli
http://www.spli
|

 |
| SPRING CHICK [pic] |
Rain rain go away – Cards, Stamps and Paper Crafts at Splitcoaststampers.com
http://www.spli
http://www.spli
|

Simply Designing - Home, Floral, Seasonal Crafts & Designs: DIY
http://simplyde
http://simplyde
So SIMPLE Note Cards

I had a baby shower to attend a few weeks ago, so the night before I wrapped her gift up beautifully and realized I had forgotten to buy a card for her! Oops! Do you ever do that or is it just me?
So I got out my old scrapbook supplies and paper and went to town trying to make a cute card to match the gift.
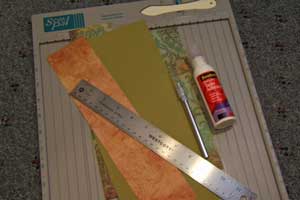
I really was so simple. I choose 2 different papers and cut one slightly smaller then the other.
I used a brown ink pad to darken up the edges both pieces of paper.
I used my grommet maker to make a hole for my flower on the top paper and attached the flower.
Then I attached both pieces of paper together and voila! Instant, cute note card!
I love it when I can come up with ideas that turn out cute and don't cost me a penny! (my husband also loves that last part :-)

Card Challenge Day 24 - Terrific Ten
At 365 Cards today, the challenge was to use TEN different patterned papers all on one card. What a great way to use up some scraps! I have never used that many patterns on one project before but I think this one turned out pretty nice with them. I ended up using 12 patterned papers and two plain colored cardstock along with the patterned ribbon! I think I am going to add the sentiment "Celebrate Life"! What do you think?

The SVG file for the balloons can be downloaded here.

Paper,Cricut,Glue..........Let's Scrap
http://scrappin
http://scrappin


Mommy Mel's Addiction
http://mommymel
http://mommymel
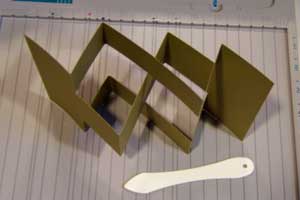
Accordian Tri-Fold Card
My first attempt at making the accordian type tri-fold card. Very easy to make and turns out so neat and different!
What it looks like when opened!

View from the top to show the uniqueness of how this card is made!

What it looks like when opened!
View from the top to show the uniqueness of how this card is made!
Labels: Card - Thank You
New Baby Card (for merryann68's swap) - Two Peas in a Bucket
http://www.twop
http://www.twop

appy monday! this week over at BBTB2 it's my turn to set our challenge. i just recieved a childs year an oh my this is a MUST have cartridge! for this challenge i chose either the girl or boy cut from page 36 of the users manual. man it was hard to choose there are just so many awesome images on this cart. be sure to head on over to the blog and see what awesome eye candy the rest of the dt has created for us. i am still astounded every week by their talent and creativity. for my simple simple card...i used the girl cut and added butterflies from a martha stewart punch. the beautiful paper is by memorybox (gossamer line) i added some colorbox fluid chalk and basic grey opaline pearls . for the inside i added a cute little saying that i thought of and a packet of seeds. an easy but sweet note card for that special friend. thanks so much for looking i appreciate all your sweet comments have a great day :) XXXshelly    _____________________________ http://www.cardsbyshelly.blogspot.com http://heather-bittenbythebug2.blogspot.com/ http://cricutcardzchallenge.blogspot.com/ http://craftycreationschallenges.blogspot.com/ http://papercutzchallenge.blogspot.com/ | ||
| ||


Okieladybug's Scrap N' More: Tri-Shutter card PS
http://okielady
http://okielady
Tri-Shutter .cut file and instructions
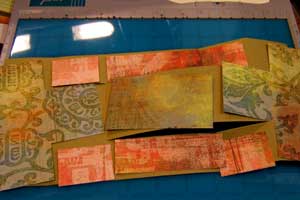
Here are the instructions for the Tri-Shutter card PS. I used Plantin Schoolbook for the cut file and also the Expressions. Since the card calls for a 5.5 x 12 inch piece of card stock for the base the paper doesn't cut all the way to the end, but it is easily clipped as seen in Step 2. I also added extra tabs for multiple or single card cuts. The mats are all labeled *okie hopes she did....she thinks she did*.
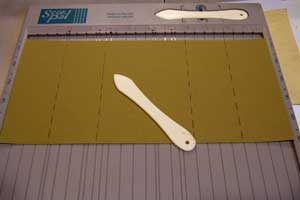
1. This is what you end up with once you cut your base. As you can see even the cut lines are there. Not sure if youc an see the score lines in the small picture but if you click the picture and make it bigger you will see that the score lines are there for you.
2. You will need to clip the ends of the card stock since the E only cuts 11.5 inches. But that is no big deal about getting it straight s ince it is just a small snip that you will have to do.
3. Once you cut your pattern paper this is components of the card you will have. I see now that I missed getting the middle rectangle in the picture, but it is in the cut file. The tabs are all labeled and there is PP1 and PP2 for patterned paper 1 and patterned paper 2.
4. Next you will want to score your card and then fold according to the picture. I know it might be hard to tell in the picture w here to fold but you will be able to tell more once you have it in front of you.
5. And here you see how the papers are placed. I inked my edges and ad ded brads before I placed the paper down permanently.
And this is my end product!! I added flowers, inked the edges, stamped flouris hes, Stickled the flourishes and I had to hand write the sentiment since I didn't have the sayings I wanted and I was too lazy to do it with the printer. I did use the Stamp Up Tag punches and Keytag punch and I used EK Success oval punches.
1. This is what you end up with once
 you cut your base. As you can see even the cut lines are there. Not sure if youc an see the score lines in the small picture but if you click the picture and make it bigger you will see that the score lines are there for you.
2. You will need to clip the ends of the card stock since the E only cuts 11.5 inches. But that is no big deal about getting it straight s
 ince it is just a small snip that you will have to do.
3. Once you cut your pattern paper this is components of the card you will have. I see now that I missed getting the
 middle rectangle in the picture, but it is in the cut file. The tabs are all labeled and there is PP1 and PP2 for patterned paper 1 and patterned paper 2.
4. Next you will want to score your card and then fold according to the picture. I know it might be hard to tell in the picture w
 here to fold but you will be able to tell more once you have it in front of you.
5. And here you see how the papers are placed. I inked my edges and ad
 ded brads before I placed the paper down permanently.
And this is my end product!! I added flowers, inked the edges, stamped flouris
 hes, Stickled the flourishes and I had to hand write the sentiment since I didn't have the sayings I wanted and I was too lazy to do it with the printer. I did use the Stamp Up Tag punches and Keytag punch and I used EK Success oval punches.
CherCroppin's Stamp Pad
http://chercrop
http://chercrop
Penny's Challenge; Happy Birthday to my Nephew!
 Hi there, and thanks for stopping by!
Since it's Wednesday, Penny has challenged us (and you) to create something using a chalking technique, and this is my submission...it's for my teen-nephew. I sure hope it's not too childish for him, LOL!
Now...I have to be honest...I cased this card off of Mary Fish (Stampin' Pretty)! I couldn't help it, I just LOVE this design!
I couldn't wait to also use my new papers from Cosmo
Stampin' Pretty - My Fun & Chic Stampin' Up! Boutique: March 2010
http://www.stam
http://www.stam
Envelope Envy Video Part Three: Embossed Flap
Here is one of my favorite ways to add "wow"--embossed envelop flaps that coordinate with my hand made cards! And it's lickety split simple. The third installment of my Envelope Envy Video Tutorial Series is ready to show you how:
CherCroppin's Stamp Pad
http://chercrop
http://chercrop
Dusty Durango ~ Just Because
 TGIF!!
Today's creation is 'just because'! The sketch is from this week's Wednesday Card Challenge over at Splitcoast Stampers, and I really like this layout...am sure I'll be using it again!
CherCroppin's Stamp Pad
http://chercrop
http://chercrop

Tri Fold Shutter Card Tutorial & Instructions by Bonnie Szwalkiewicz
http://www.spli
http://www.spli
Tri-Shutter Card
by Bonnie Szwalkiewicz
Special occasions call for special cards. This one will fit the bill!
Supplies
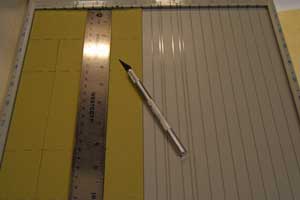
- One 5 1/2" x 12" piece of Cardstock
- Scor-Pal™ or other scoring tool
- Paper Cutter
- Patterned Paper
- Bone Folder
- Craft Knife
- Ruler
- Adhesive
Step-by-Step
-
Step 1
Place 5 ½” x 12" piece of cardstock horizontally in your Scor-Pal.
Score at 2”, 4”, 8” and 10”.
-
Step 2
Turn cardstock a ¼ turn.
Along the long edge, measure in 1 ½” .
Make a slit with a craft knife between the score marks at 2” and 10”. Repeat on the other long side.
-
Step 3
Fold card as pictured.
-
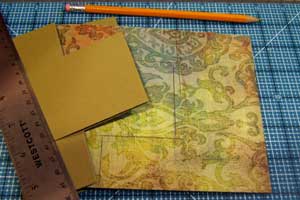
Step 4
Using card base as a template, trace the section with the T-shaped fold onto patterned paper.
Cut two of this shape.
-
Step 5
Trim 1/16” from all sides of patterned paper.
-
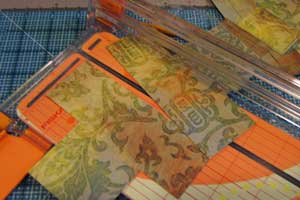
Step 6
Cut 4 pieces of patterned paper 1 7/8” x 1 3/8”.
Cut 2 pieces of patterned paper 1 7/8” x 3 7/8”.
Cut 1 piece of patterned paper 2 3/8” x 3 7/8”.
Dry fit all of the pieces, then adhere to card base.
-
Step 7
Now that the basic Tri-Shutter card is complete, go forth! Embellish & decorate.
If you are interested on how the Fan Fold Flowers were created, check this tutorial.

|
| |||||||||||||||||||||||||||||||||
| ||||||||||||||||||||||||||||||||||
| ||||||||||||||||||||||||||||||||||


Everyday Cricut
http://www.cric
http://www.cric
I was happy to see that many of you enjoyed the "leftover cards" - I find it very relaxing to make these. It also makes me feel "green" when I can avoid wasting all of the little bits and pieces.

Here is another batch of "leftover cards. I think my favorite is the "Eggs" card!

Another color blocking card with flowers and a butterfly embellishment from Creative Charms.

Remember the "thanks" card from yesterday? Don't throw away the negative image!

More color blocking....


Here is another batch of "leftover cards. I think my favorite is the "Eggs" card!

Another color blocking card with flowers and a butterfly embellishment from Creative Charms.

Remember the "thanks" card from yesterday? Don't throw away the negative image!

More color blocking....

 Click image(s) for a larger view. | This simple card is a great way to show a friend that you care.
Instructions
What You Will Need
Other Supplies
|
No comments:
Post a Comment