
Hap-Bee Birthday!
This is another easel card I made last weekend! I picked the little bee from the Pooh and Friends cartridge to cut with my Cricut, then added Glossy Accents over the whole thing. Just couldn't resist, so I added a wiggly eye to him too! The yellow flower is one from my stash I got a while ago in a big pack in the dollor section at Michael's, the white one is a Prima Flower. Added some faux stitching, some ribbon, a few brads I had hiding in my stash, and a computer generated sentiment for the inside.

Free Card Making Ideas, Instructions and downloads by Scrapbook Eden
http://scrapboo
http://scrapboo
Sweet Berries

Finished Card Size is 4.25" x 5.5"
Made using the following QuicKutz / other products
QK 2x2 Strawberries Die
EK Butterfly Punch
Sizzix Swirl Die
QK Font for "Sweet"
Corner Rounder
White, fuchsia and green cardstock
Best Creations Patterned Paper
Yellow Glitter Paper
sted by About Judy at 12:14 PM 4 comments 

I made these cards using files from Darcy's Designs. The files are called Bitty Blooms and Blooming Ribbons (these files comes with some bonus files too).
Card 1: 8x4 card, used the Blooming Ribbons file. Cut the file at 8 inches to fit the length of the card then I used Star Dust stickles over the cut.


Monday, January 25, 2010
Flower cards
Card 1: 8x4 card, used the Blooming Ribbons file. Cut the file at 8 inches to fit the length of the card then I used Star Dust stickles over the cut.

Card 2: 8x4 card, used Bitty Blooms file. Cut the 9 daisies of the same size and made 3 flowers. Layering them on top of each other with a pop dot in between the layers and added a 'bling' to the center. The leaves are actually cut from the four petal flower in the same file then cut apart.


Card 3: 4 1/4 x 5 1/2 card, used both Bitty Blooms and Blooming Ribbons for this one. Used the attached the ribbon svg unto a rectangle svg in Inkscape and used it for the base card. I added a strip of paper embossed with dots to make the card even. I cut the bloom at different sizes in 3 different polkadot paper and layered with pop dots in between the top 4 layers (6 layer total). Then added a 'bling' to the center.


Thanks Card: I embossed small pieces of paper with Sizzix and Cuttlebug embossing plates. The word "thanks" was embossed on Coredinations paper and sanded. The card was topped off with a three-layered Prima flower.

Sunflower Surprise Card
Front

Slightly opened

 Inside the card.
Back of the card.
Consumables:
Inks for the edges, sentiment stamp, popdot of two different thicknesses, ATG gun and Zig 2-way glue pen.
Card base:
Base: 5 1/2 X 8 1/2 cream color cardstock, fold at 2 3/4 and 7 inch marks.Inks for the edges, sentiment stamp, popdot of two different thicknesses, ATG gun and Zig 2-way glue pen.
Card base:
Inner Lining: 5 1/4 X 4 yellow cardstock
Front Panel: 5 1/4 X 4 ( - cut lengthwise at 5 1/4 X 2 5/8 and 5 1/4 X 1 3/8.
2 1/4 X 4 - cut lengthwise at 2 1/4 X 2 5/8 and 2 1/4 X 1 3/8.
Ribbon: about 6 inches.
1. Layer patterned paper and ink the edges and wrap the ribbon around both panels where both paper meet.
2. Adhere to the front of the card. HINT: When the card is closed it should look like one 5 1/4 X 4 piece of paper in the center of the card.
3. Ink the edges of the inner lining and adhere to the inside of the card.
Flowers:
Cricut Expression (because the FLIP function is used)
Everyday Paper Dolls Cart: Dark green cardstock for the grass cut at 2 inches, cut the bottom edge straight and cut a 2 5/8 and 1 3/8 from it.
Walk in my Garden Cart: Sunflower cut at 4 inches.
Yellow, green and glitter brown cardstock.
1. Cut 4 snflwr out of green cardstock, without removing the mat hit FLIP key and cut 3 snflwr.
2. Cut 4 snflwr-s out of yellow cardstock, without removing the mat hit FLIP key and cut 3 snflwr-s. Save the round pieces for your other projects.
3. Cut 7 snflwr-s out of brown cardstock. Save the flowers for your other projects.
4. Ink all the edges of the pieces and fit together. You should have 7 flowers 3 being 'mirror' images of the other 4.
Putting the card together:
1. Glue the first of the 4 flowers flush onto the larger side of the card, make sure to leave an overhang on the edge. Open the card, line up and glue one of the 'mirror flowers onto the set flower.
2. Cut the stems off one of the remaining flowers and its 'mirror'.
3. Close both sides of the card, line up the cut flower with the already glued flower and glue to the smaller front panel of the card. Open the card, line up and glue the 'mirror' flower to this flower. Hint: When the card is closed it should look as though there is only 1 flower on the face of the card.
4. Using 1/16 popdots attach another flower onto the smaller panel of the card make sure there is a small overhang. Open the card and glue its mirror image to it. Use popdots to attach the overhanging
portions to each other.
5. Use 1/16 popdots to attach the last flower onto the larger panel. Ensure there is no overhang of this flower. Hint: When the card is closed it should look as though there are 3 flower on the face of the card.
6. Stamp your sentiment on the wider portion of the grass. Pop up the grass on the card with 1/8 thick popdots and add to the card.
I hope you will try to make this card too, you can use any flower with this project. I would love to hear you comments. Please feel free to send me images of your completed Flower Surprise Cards, with your permission I will post them to my blog. I hope you'll enjoy making this project as much as I
Thursday, May 27, 2010
Baby Shower Invitations and Thank You Cards
I made these invitations and thank you cards for a friend, her sister was having her first child. I made 35 of each cards. I used my Cricut Expression and the New Arrivals Cartridge for both diecuts.


So Sweet Card, FREE Cutting File
Good morning all,
I am sharing this super cute card I made today! I used the Cindy Loo Cartridge to create the "Doily" background. I created the "So Sweet" title.

Here is a side view of the card to show dimension. You can't see it too well, but I glittered the whole doily with some Martha Stewart Glitter. I decided to "Kick It" old school style wit the glitter this time. I love my Stickles, but I just loved the texture of this glitter on the whole doily. It really gave it a nice effect.

Here is the inside of the card.

Here is a closeup of the inside top of the card. I cut another "doily" out of Cindy Loo and created the digi stamp sentiment.

Here is the bottom of the inside of the card. Ready for my personal sentiment to the recipient. I cut the cherries from the same title that I created.


Here's the recipe

FREE Cutting File: If you would like the FREE "So Sweet" title cutting file, just become a follower of my blog AND sign up for my newsletter. Then just send me an email at
melinda at scrapbookeden dot com
and I will gladly send it out to you :-). I have the file available in the following formats:
Hope you have enjoyed this. Please let me know with a quick comment, your thoughts on the "Recipe" I want to be sure to share not just the idea, but the "How to"
Don't forget to get your guess in for the Penguin Guessing Game. It closes out this Saturday!
Click HERE to check it out!
I am sharing this super cute card I made today! I used the Cindy Loo Cartridge to create the "Doily" background. I created the "So Sweet" title.

Here is a side view of the card to show dimension. You can't see it too well, but I glittered the whole doily with some Martha Stewart Glitter. I decided to "Kick It" old school style wit the glitter this time. I love my Stickles, but I just loved the texture of this glitter on the whole doily. It really gave it a nice effect.

Here is the inside of the card.

Here is a closeup of the inside top of the card. I cut another "doily" out of Cindy Loo and created the digi stamp sentiment.

Here is the bottom of the inside of the card. Ready for my personal sentiment to the recipient. I cut the cherries from the same title that I created.


Here's the recipe
- Finished card size is 6 x 6
- I used the Cindy Loo Cartridge - I cut two doilies out of white cardstock one at 5.75" for the outside of the card and one at 5.5" for the inside of the card.
- Cricut With SCAL or MTC (or just about any other electronic die cutting device). This is to cut out the "So Sweet Title" I created.
- Bazzill cardstock: White(Simply Smooth), Tomato(Red) and Raven(black)
- Copic Markers: Green(Colored in the cherry Stems).
- Basic Grey: Patterned Paper. (Cut three pieces: one at 5 and 7/8th" one at 5.75" and one at 5.5"
- Printed Out the Digi Sentiment I created.
- Colorbox Chalk Inks: Creamy Brown, Chestnut Roan, Maroon (Inked outer edge of outside doily and the white Outline of the title in Creamy brown for just the slightest grunge effect)Inked the patterned paper and inside white in the Chestnut Roan and the cherries in Maroon).
- Glitter: Martha Stewart coarse glitter( I covered the outside doily completely in this. It really gave it a great effect. Sorry the picture really doesn't convey this element).
- Stickles: Red and Lime Green (Used red on the red title letters and Lime Green on the Outside Cherry Stems)
- White Signo Pen

FREE Cutting File: If you would like the FREE "So Sweet" title cutting file, just become a follower of my blog AND sign up for my newsletter. Then just send me an email at
melinda at scrapbookeden dot com
and I will gladly send it out to you :-). I have the file available in the following formats:
- WPC For you Pazzle, Gazzelle and Funtime Software users
- SVG For you who use the Cricut WITH Scal or MTC software
- GSD For thos who use the Silhouette, Wishblade, Craftrobo
- KNK For you Klic N' Cut Users
- DXF and AI if needed for additional file conversion not covered!
Hope you have enjoyed this. Please let me know with a quick comment, your thoughts on the "Recipe" I want to be sure to share not just the idea, but the "How to"
Don't forget to get your guess in for the Penguin Guessing Game. It closes out this Saturday!
Click HERE to check it out!
Dinosaur Train Card
I made this card for my son's birthday. He just turned three years old. He loves trains all he talks about is Thomas last year I made him a Thomas card in SCAL. This year he also has a thing for dinosaurs. So I thought of combining both. I used the Create a Critter cart with my Gypsy, for the project. I think Create a Critter cart is a must have for parents with little ones.
Thomas on last year's card:

Dinosaur train card:


I used the Gypsy because I could hide portions of the images I did not want and to save paper. I hid the faces on the train and the sun, so that only the dinosaurs were smiling. Its also nice to hide other portions of the trains so that I didn't have to cut the same thing twice in two different colors.You can still cut the same card without the Gypsy though.
Sizes for the cuttings:
The card base is a folded 8 1/2 X 6 inch piece of cardstock
Patterned piece of paper is 4 X 5 3/4 inch
Palm trees (1 regular and 1 flipped) - 2 1/2 inches
Sun - 1 3/4 inches
Train - 1 3/4 inches, you will also need another train car cut at 2 inches
T-Rex - 2 1/2 inches
Brontosaurus - 2 1/2 inches.
Ink the edges for more definition.
Glue the trees and the sun flush onto the card but use pop-dots to pop up the train and dinosaurs.
I am sharing a quick card I made. Perfect for Father's Day. I think I will be giving this one to my brother.
So, as far as "Cricut"ing goes, there is only one element on here from our "bodacious bug". The branch die cut is from the Serenade cartridge. I cut it in brown cardstock and then put some Cinnamon Stickles on it. I designed the sentiment. That is the FREE digi stamp I referred to. Just sign up for my newsletter and I will send the link to download it in the newsletter. If you are reading this post after 3pm today, then just send me an email at:
melinda @ scrapbookeden (dot) com.
(Be sure to remove spaces and put a dot instead of spelling out dot-those naughty spammers :-(
For the rest of the card, I cuttlebugged the tan paper, ink distressed it. You really can't see in the picture but I inked the brown and moss paper edges with some gold. That gave it some nice character. Anyway, hope you like it. Quick, easy and ready to roll!

You might also like:

Sorry it's been so long since I've posted!
This is a project for an upcoming class. It's essentially the same as my previous Fox & Friends version but using about a 1/2 sheet of Print Patterns DSP. It holds six 3"x3" notecards and envelopes. The card design was cased from a very talented fellow demonstrator- Mary Fish. Thanks for the inspiration Mary!
I used the Ruby Red DSP which was in the Level 1 hostess pack from the 2009-2010 catalog. I also used the Fancy Flower Extra Large, Modern Label and 1-1/4" circle punches and the matching movers & shapers die to layer the Modern Label punchout. The Trendy Trees stamp set for the middle of the flowers.
Concord Watercolor Trio
August 4th, 2010
This design is by Gretchen Baron.
Watercolor Wonder stamp set; Concord Crush Inkpad, Cardstock & Ribbon; Very Vanilla Cardstock; Lap of Luxury DSP; Large Oval and Scallop Oval punches; Vintage Wallpaper Textured Impressions Embossing Folder.
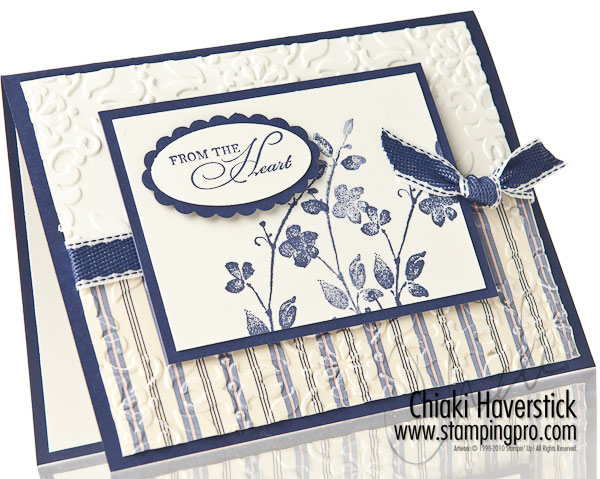
Pink Aviary
August 7th, 2010
Yet another cute card using the Aviary and Tiny Tags stamp sets. I received this idea from Susan Shintaku at convention and made a couple of minor tweeks.
Christmas ’09 Again
October 31st, 2010
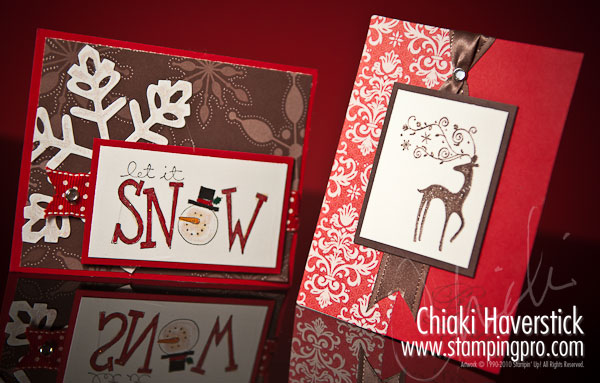
A couple more samples from last year's Christmas card class. The DSP is retired but the Stamps and cardstock colors are still available so they will be easy to replicate.
Share and Enjoy:
I Stamp, I Sew
http://lauragli
http://lauragli
Color Dare 34

I just love the Color Dare colors for this week!
Blush Blossom
Certainly Celery
Chocolate Chip
I knew this had to be a baby card, so I reached for one of my favorite sets, Bundled in Love. I used two different Cuttlebug embossing folders to give the card some depth. My corner rounder and eyelet border punch add a delicate touch. I sponged the edges of the image layer with Chocolate Chip and added the green rhinestone brads for a little bling. The Certainly Celery ribbon finishes off the project. Hope you like it!
You can see all the other great design team entries here:
I Stamp, I Sew
http://lauragli
http://lauragli
Wednesday's Color Dare 37

It is Wednesday again and time to play the Color Dare! This week we were to use:
Elegant Eggplant
Pumpkin Pie
Creamy Caramel
These colors just screamed--Falling Leaves!!!
I really have fallen in love with this set. I used my new Finial Press embossing folder and sponged the layer with Creamy Caramel. I also sponged the edges of the leaf circles. Then, I used my new favorite product from Stampin' Up--Shimmer Paint. For this project I used the Champaign Mist. It adds just a little sparkle! Tie on the sweet Pumpkin Pie striped grosgrain ribbon and the Grateful sentiment punched from the Word Punch and layerd on a piece of Creamy Caramel punched with the Modern Label punch. Wa-la--a fall card! Hope you like it!!

Joined: 9/19/2010 Status: offline | This is my second card I made with my new Cricut machine. This Cindy Loo cartridge is super cute and fun! I added an embossed background with my Cuttlebug folder then brushed the raised areas lightly with Pearl Paint. TFL!   Attachment (1) Attachment (1) _____________________________ |
ya'll have been super busy! I can see now it's going to take more than a day or 2 to get caught up! I've been seeing all of these super cute cards made with Cricut Create A Critter I finally broke down and got it. It was waiting for me when I got home and I just had to do something with it. You know how I love shaped cards, here is a card I made with it using Design Studio---
 Here is the recipe---
Card Size: 4.5"x5"
Cricut: Create A Critter (cut at 4.5), Design Studio
Accessories: Ribbon, Heart Charm, Craft Ink
Base Cardstock: Cordination
Patterned Paper: Digital Paper Printed on Stampin' Up Kraft Paper
 Here is the recipe---
Card Size: 4.5"x5"
Cricut: Create A Critter (cut at 4.5), Design Studio
Accessories: Ribbon, Heart Charm, Craft Ink
Base Cardstock: Cordination
Patterned Paper: Digital Paper Printed on Stampin' Up Kraft Paper
10, 2010
Did Someone Say Turkey?
Good Morning Everyone...Thanks so much for stopping by! Here are a couple turkey shaped cards I made using Cricut Create a Critter and Design Studio. I had so much fun making these little guys and even though the picture doesn't capture the true dimension there are 6 or 7 layers and with each layer they took on a whole new personality--- Here's The Recipe---
Card Size: 5.25" x 4.0"
Cricut: Create A Critter (cut at 3.75)/Design Studio
Cuttlebug: Swiss Dot Embossing Folder
Quick Kutz: 2x2 Witch Hat (for buckle on hat)
Accessories: Ribbon, Brad, Craft Ink, Foam Pop Dots
Base Cardstock: Coredination
Patterned Paper: Unknown (head and body from my scraps)
Other Paper/Cardstock: Gold Mirror (buckle on hat)
 Here's The Recipe---
Card Size: 5.25" x 4.0"
Cricut: Create A Critter (cut at 3.75)/Design Studio
Cuttlebug: Swiss Dot Embossing Folder
Quick Kutz: 2x2 Witch Hat (for buckle on hat)
Accessories: Ribbon, Brad, Craft Ink, Foam Pop Dots
Base Cardstock: Coredination
Patterned Paper: Unknown (head and body from my scraps)
Other Paper/Cardstock: Gold Mirror (buckle on hat)
HuxtersHouse
http://huxtersh
http://huxtersh
BANNER CUT CHALLENGE


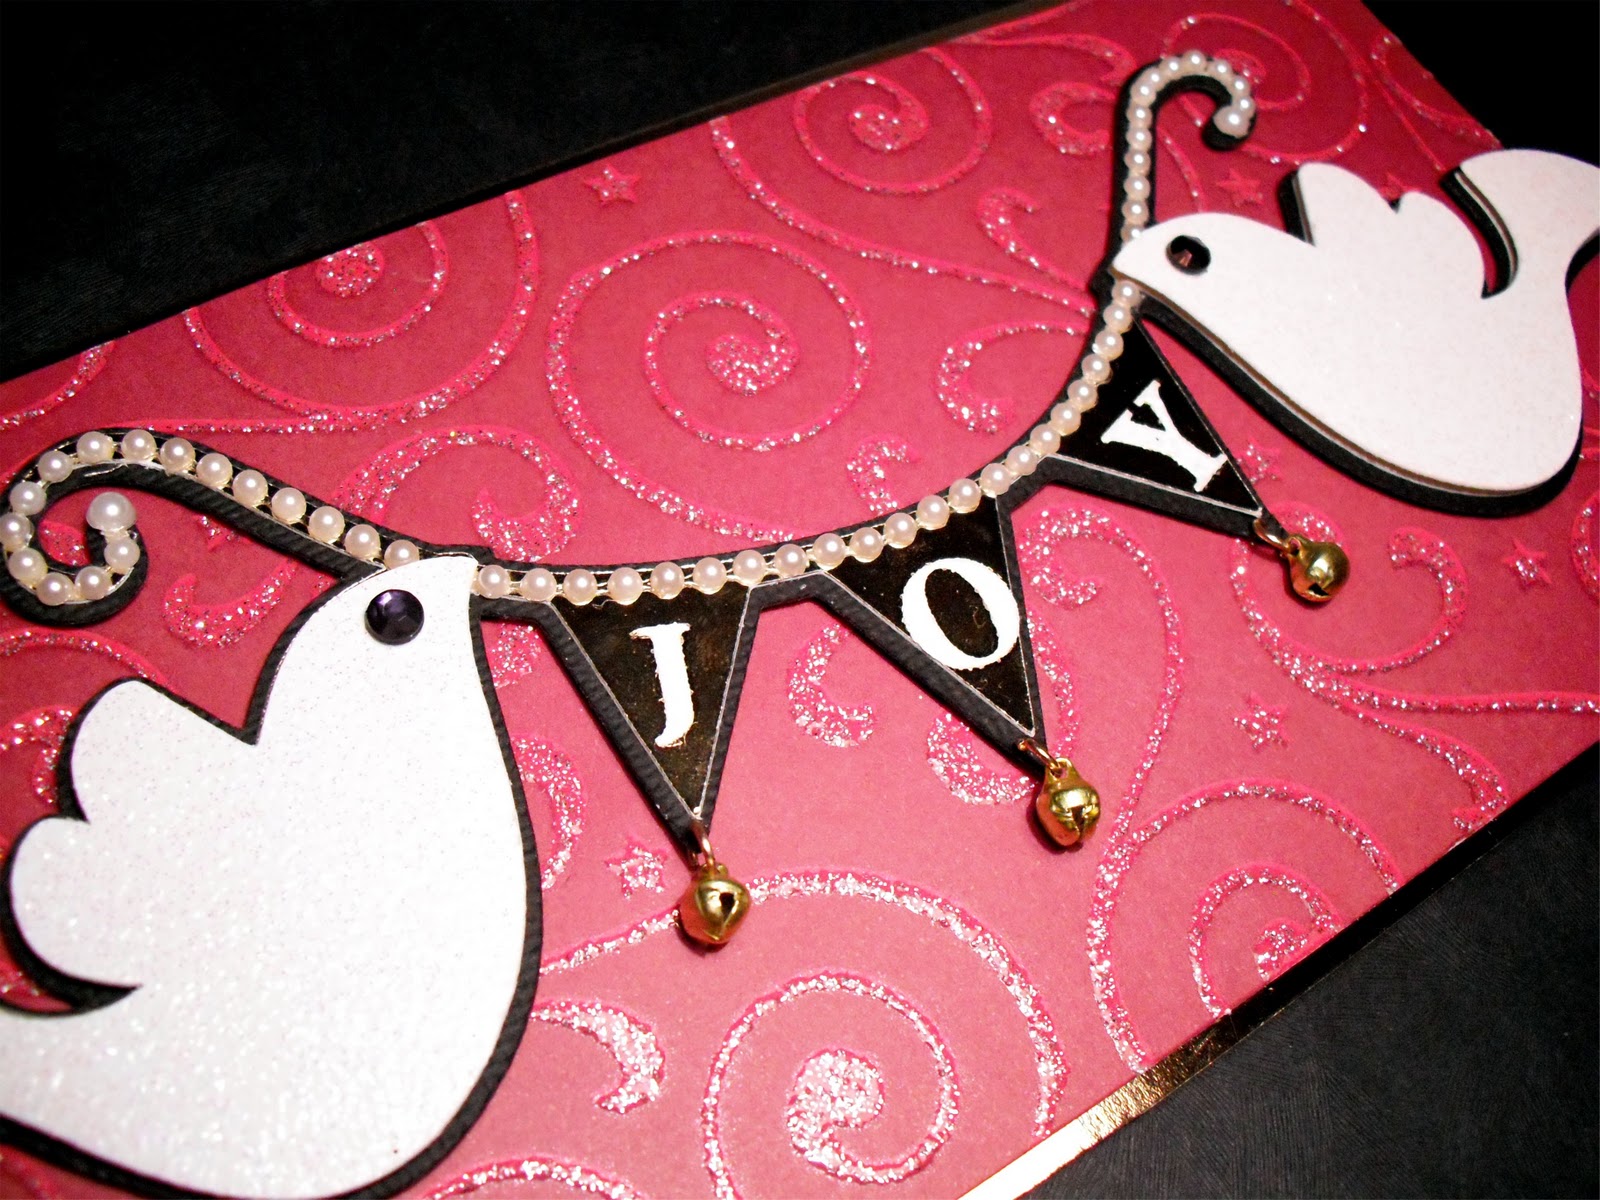
Good evening
Over at BBTB2 this week the wonderfully talented Beth from the DT chose the banner from Country Life cartridge . I don't have this cart so I chose the banner cut from Give A Hoot which has these lovely birds holding up a small banner and thought they would make a nice Christmas card. My card is very simple as I just used the cut as is, shadow ,base and layer. The card is DL in size (8 1/2x 3 1/2") and the base card is gold mirri card. I cut a layer of red glitter swirl card from DCWV Christmas Glitter card and pop dotted on to the base. My cuts are made at 2 1/2" as I like the 'off the card' look shadow in black, base in gold mirri and the birds are cut in white glitter card and pop dotted . I added pearls to the top of the banner,some black gems for eyes, white glitter letters and finally dangled some tiny bells from jump rings at the bottom of each of the banners (this was the harderst part of this card as I had to make the tiniest of holes to thread!).
As you know it's month end so some of my DT sisters are doing a blog hop so make sure to pop over to BBTB2 and follow the hop for some prizes along the way and feast your eyes on the gorgeous projects my DT sisters have created this week and as always we love to see your take on the challenge too!
Juliexx
SOS - Handmade Cards by Jeannie Phillips - How to Video
Designed by Jeannie Phillips ~ Southside, Al
Click on any picture to enlarge.

There is a instructional VIDEO at the bottom of this post.
The Gypsy File is available for this card by email. Just copy and paste this email to your personal email account winacard@gmail.com and let me know which Gypsy file that you are wanting.
I am so, so, so excited about this card… I have played with my Cri-Kits enough to be able to incorporate them into my kind of designs… so this card was so fun to make… I use by Cri-Kits pens for the background and for the flag… I am so excited about how this turned out…and it gives the illusion of even more depth. I so hope that you like it too!!… I will be sending this to Dru at Cri-Kits to take with them to the CHA Show in Chicago… how fun is that… too bad I can’t fold myself up in the card… I cherish your comments and thank you so much for looking!
CRICUT, GYPSY & CRI-KITS Pens
(Sorry, There are no Cricut instructions for this card.)
Layer 1 (all cut pieces) Cut this layer out last.
Give a Hoot
Boat and all it’s layers cut @ h 2.95.…set the height and the widths will be right.
Life is a Beach
Waves cut @ w 4.78 x h 1.25.. To get this size unlink the width and height…. Cut three of these…two you will weld to rectangles from George…
George
Rectangles for the waves.. Shorter one w 4.75 x h 1.20.. Unlink the width and height and set real dial size for these cuts …. Taller rectangle w 4.75 x h 1.23... You will weld these rectangles to two of the waves.
Rectangle for background piece cut @ w 4.75 x h 3.50... You will unlink the width and height for these cuts and set real dial size.
Layer 2 (using the black Cri-Kits pen) cut/draw this layer first. Be sure and re-link the width and height and turn the real dial size off.
Indy Art
Skull and Cross bones cut @ w 0.50 x h 0.38
All Mixed Up
“S” cut @ w 0.28 x h 0.50
“O” cut @ w 0.29 x h 0.50
“S” cut @ w 0.20 x h 0.36
* When this layer finishes cutting/drawing choose add to design …do NOT choose unload mat… change pens to blue.
Layer 3 (using blue Cri-Kits Pen)
Create a Critter
Layer 4 (Using Yellow Cri-Kits Pen)
Cloud cut @ w 1.98 x h 1.13
* When this layer finishes cutting/drawing choose add to design …do NOT choose unload mat… change pens to yellow.
Gypsy Wanderings
Sun cut @ w 2.08 x h 2.27
* When this layer finishes cutting/drawing choose add to design …do NOT choose unload mat… change pen housing to blade housing… cut layer one.
*Important put a piece of paper under the housing each time you change it… and before you put the pens in scribble on a scrap piece of paper to get ink flowing.
Card base is 4 ¼ x 5 ½, Frame Piece 4 x 5 ¼ , Background piece 3 ½ x 4 ¾… these cuts are on the inside and outsides of my cards… Sentiment piece 2 ¾ x 4 inside only….. I cut all of these with my paper trimmer.
There is now a link at the bottom of each post where you can show off your recreation of my cards… with a link back to your card on your blog, or the Cricut Message Board or a photo storage place like Photo Bucket…. I would love it if you share your recreations with me! It just makes me happy!! Thank you so, so much! Hugs


A Little Time: cards
http://heatherl
http://heatherl
6 (Happy Birthday)
For Bitten by the Bug this week, Regina asked us to use the present cut from Pooh and Friends. I also used this great Happy Birthday background stamp from The Cutting Cafe.

The "6" is from Alphalicious.
All cardstock is Prism. By the way, I was asked to be Guest Designer in October for Prism Cardstock. I LOVE their cardstock. If you have never tried it, you must. Besides all the beautiful colors, it also has a subtle texture that you can still stamp perfectly on it.

The "6" is from Alphalicious.
All cardstock is Prism. By the way, I was asked to be Guest Designer in October for Prism Cardstock. I LOVE their cardstock. If you have never tried it, you must. Besides all the beautiful colors, it also has a subtle texture that you can still stamp perfectly on it.
A Little Time: cards
http://heatherl
http://heatherl
Special Event
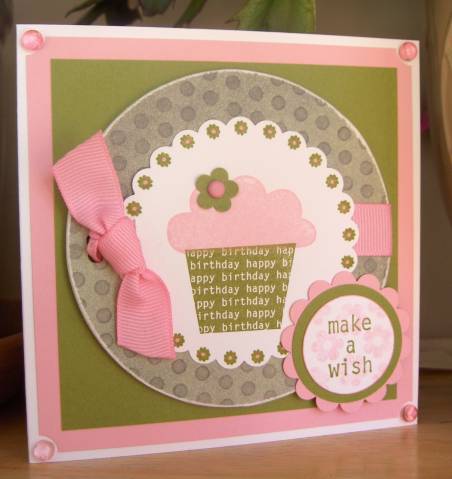
This week at Bitten By The Bug 2, Carole asked us to use the cupcake cut from Celebrations. Here's my take on it:


A Little Time: cards
http://heatherl
http://heatherl
Happy Birthday card
At Bitten by The Bug, we were to use the Cake2 cut from Sweet Treats.
You win some you lose some....I just don't like the way this turned out.


You win some you lose some....I just don't like the way this turned out.

You might also like:
A Little Time: Hoppy Hello - Blog Hop & Candy
http://heatherl
http://heatherl
Hoppy Hello - Blog Hop & Candy
Hello, hello! This is the first BBTB2 Blog Hop! We were asked to use the cute rabbit from the Winter Woodland cut. Here is my example:


I used UTEE on the dragonfly, so it really looks like a plastic charm. (I didn't even realize Doodlecharms had that envelope on it.
Friday, June 25, 2010
Bloom, Tulip Easel Card Cut File
Hi Everyone, well my birthday passed and I received some wonderful gifts, a gypsy which comes with Gypsy Wandering and Gypsy Fonts and since it was an HSN bundle it came with Destinations too, plus two lite cartridges, Bloom and Lacy Labels. For this card I used the Bloom Cartridge, it's such a great cartridge I highly recommend it.
I welded two 4 7/8 shadow tulip shapes together in Design Studio, (I wanted it to be slightly smaller then the actual front tulip). After cutting it out I folded it in half, the tulips should line up. I measured from the bottom of one side 2 1/4 and folded, this is where you will attach the front full layered tulip. For the front full layer I cut out all cuts of the tulip at 5". You can find the DS cut file here

Here is a side view of the card, you can see how the finished tulip is attached to the card.

And here is the front view not opened up.

I welded two 4 7/8 shadow tulip shapes together in Design Studio, (I wanted it to be slightly smaller then the actual front tulip). After cutting it out I folded it in half, the tulips should line up. I measured from the bottom of one side 2 1/4 and folded, this is where you will attach the front full layered tulip. For the front full layer I cut out all cuts of the tulip at 5". You can find the DS cut file here
Here is a side view of the card, you can see how the finished tulip is attached to the card.
And here is the front view not opened up.
Wednesday, March 31, 2010
A Child's Year, Cartridge Challenge
Hi Everyone, this weeks Cricut Cartridge Challenge is A Child's Year, this is such a great cartridge I love the cuts on it. Here are two cards have have done so far, hopeful I"ll get some more done.

I used the cuttlebug's distressed stripes folder for the background behind the boy and on the love. The cloud paper is from Stampin Up's Welcome Neighbor Designer Series Pad, love that paper.
I used the cuttlebug's distressed stripes folder for the background behind the boy and on the love. The cloud paper is from Stampin Up's Welcome Neighbor Designer Series Pad, love that paper.
Saturday, April 3, 2010
ACY Best Friends Cut File
Hi everyone, I made another card for the Cricut Cartridge Challenge using A Child's Year. Created the card cutout in Design Studio, welded the boy and dog image to one of the card cuts. You just score 4.25" in from the left hand side for the card fold. For the sun I just used the inside piece of the tag and pop dotted a 1" circle on top of it. I used a white gel pen to outline around the best friends cut. I've added the cut file under the pictures. I used the cuttlebug embossing folder distressed stripes for the front.


Download http://www.mediafire.com/?immijmwxgnt
Download http://www.mediafire.com/?immijmwxgnt

| |||||


| |||||||
 RE: X-Post - Heritage Lady Cameo Mother's Day -


This is a card I made for a challenge using a vintage typewriter as inspiration. Printed words are from a book I used in a Business class way back when. Inside of card reads: OLD'S COOL! Happy Birthday. Typewriter is from Heritage.

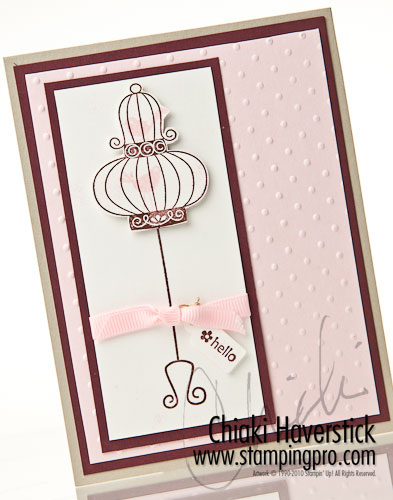
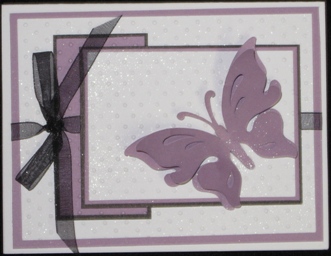
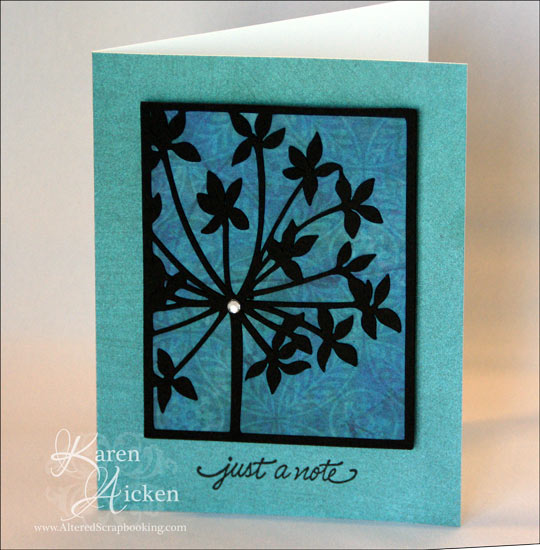
Y'all....if is doesn't soon get above freezing in Alabama, I'm gonna be a big ole icicle!!! I am not liking this at all.....if there was some snow to look at, I wouldn't mind...but just this cold is killin my old bones and my feet...ohhhh I think I need some of those hand warmers that Dan uses when he goes hunting, to slip down into my socks.I know the power bill is going to be through the roof this month!!Anyway,I have been busy trying to make a few cards for all these January babies and I created this one, for a friend of mine.I'm not so sure I like it, but its the best I could do with chattering teeth and frozen toes !! I know you feel my pain, Donna ! lol I used Serenade for the cage, cut 2 times at some crazy sizes I fiddled with.The lil tree limb and swirls are from the same cart.The bird is from the Gypsy font cart.Did a lil inkin and poppin and embossing.Added the ribbon and button and called this one done!! Oh yea, added some 3d paint....its those lil aqua dots. Well,this bird is off to put on an additional pair of fuzzy wuzzy socks.Thanks so much for stopping by!!!!! Stay warm!! 
_____________________________
_____________________________
Okieladybug's Scrap N' More: Birthday
http://okielady
http://okielady

Cuttlebug #2 Birthday by notimetostamp - Cards and Paper Crafts at Splitcoaststampers
http://www.spli
http://www.spli
|
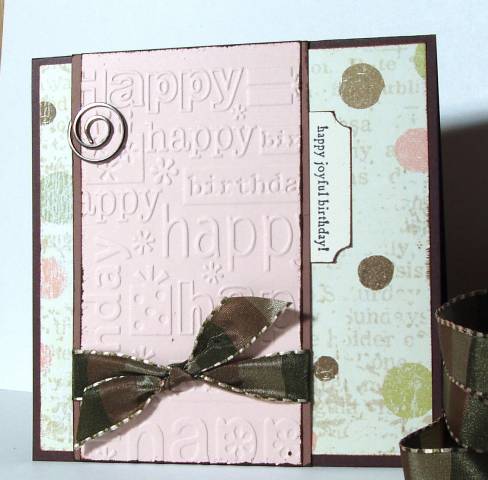
 Photo Details Photo Details |
WSC27 Shelby's 10th Birthday by Willow01 - Cards and Paper Crafts at Splitcoaststampers
http://www.spli
http://www.spli
|
ACM – You Are Seriously Awesome
by Kristina Werner on September 27, 2010in Cards, Make a Card Monday

Hi all! Sorry for the late posting. But hey! It’s still Monday where I live. :)
Okieladybug's Scrap N' More: Birthday
http://okielady
http://okielady

Okieladybug's Scrap N' More: Birthday
http://okielady
http://okielady

Okieladybug's Scrap N' More: Birthday
http://okielady
http://okielady

Okieladybug's Scrap N' More: Birthday
http://okielady
http://okielady

Okieladybug's Scrap N' More: Birthday
http://okielady
http://okielady


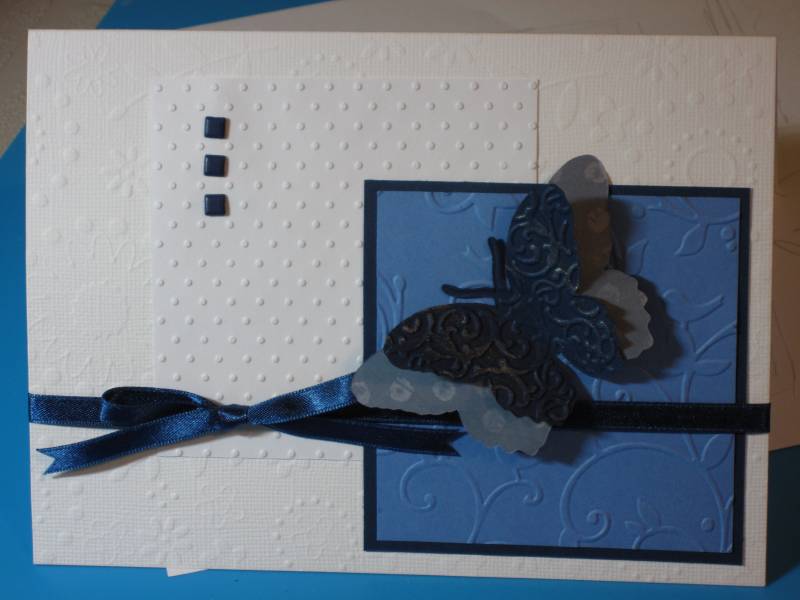 |
| Butterfly Happy Birthday |
| Photo Details | |||
| Poster: NSBluejay
|
 |
| 50th Birthday Party Invitation |
| Photo Details | |||
| Poster: jwilson1364
|
Chinook's Black and Blue Birthday Card by Chinook - Cards and Paper Crafts at Splitcoaststampers
http://www.spli
http://www.spli
|
| Photo Details | |||
| Poster: Chinook
|
ALL ABOUT MOM - MUM HUGE PRINTABLE STAMP SET..
This set features 41 images.....with a variety of different sentiments pertaining to just mom - mum's: Mother's day, birthday, world's greatest....and more...


Price for ALL ABOUT MOM: $12.99
All Designs By: Regina Easter...see my blog for more pictures
Stunning Designs by the Cafe Team:
Price for ALL ABOUT MOM: $12.99
HAPPY BIRTHDAY DAD...HUGE CIRCLE PRINTABLE STAMP SET
This huge HAPPY BIRTHDAY DAD circle printable stamp is approx. a little smaller then 4.5 inches...Great for adding to layouts....and are the perfect size to go over the top of the CIRCLE SHAPED CARD....this set comes with 6 Sentiments that will punch out perfectly with a 3 inch punch or you can cut them out in the shape of a square and add to the middle of the HUGE CIRCLE.


Price for HAPPY BIRTHDAY DAD huge circle printable stamp:
Design team projects: Click on designer's name to go to their blog.
More design team projects:
Price for HAPPY BIRTHDAY DAD huge circle printable stamp:
These 2 huge HAPPY BIRTHDAY TO MY DAUGHTER - SON circle printable stamps are approx. a little smaller then 4.5 inches...Great for adding to layouts....and are the perfect size to go over the top of the CIRCLE SHAPED CARD....the daughter set comes with 6 Sentiments and the son set comes with 7 Sentiments .... all will punch out perfectly with a 3 inch punch or you can cut them out in the shape of a square and add to the middle of the HUGE CIRCLE.
HAPPY BIRTHDAY BACKGROUND PRINTABLE STAMP
This HAPPY BIRTHDAY BACKGROUND PRINTABLE STAMP.. is at least 8 by 7 inches....PERFECT for scrapbook pages and for matting on your cards or using on the templates/cutting files...the font on this background stamp is very small...(please note, this is a very large file)

Designed by: Regina Easter
This card also uses the HAPPY BIRTHDAY 40 WAYS PRINTABLE STAMP SET.
Here is a close up of the font


Designed by: Regina Easter
This card also uses the HAPPY BIRTHDAY 40 WAYS PRINTABLE STAMP SET.
Design Team projects:
Price for HAPPY BIRTHDAY BACKGROUND PRINTABLE STAMP: $1.25
printing...(SEE THIS LINK ON PRINTING JUST ONE IMAGE).


Designed By: Regina Easter
Designed By: Amy Tsuruta Designed By: Kim Stewart
More Design Team Projects:
CIRCLE SHAPED CARD....this set comes with 6 Sentiments that will punch out perfectly with a 3 inch punch or you can cut them out in the shape of a square and add to the middle of the HUGE CIRCLE.

Price for FOR MY HUSBAND ON HIS BIRTHDAY SET: $1.99
Price for FOR MY HUSBAND ON HIS BIRTHDAY SET: $1.99
HAPPY BELATED BIRTHDAY....HUGE CIRCLE WORD PRINTABLE STAMP SET
This huge HAPPY BELATED BIRTHDAY circle printable stamp is approx. a little smaller then 4.5 inches...Great for adding to layouts....and is the perfect size to go over the top of the CIRCLE SHAPED CARD....this set comes with 6 Sentiments that will punch out perfectly with a 3 inch circle punch or you can cut them out in the shape of a square and add to the middle of the HUGE CIRCLE.


Danni Reid

Price for HAPPY BELATED BIRTHDAY: $1.99
Design team projects: click on each of the designers names to go to their blogs:
Danni Reid
Price for HAPPY BELATED BIRTHDAY: $1.99
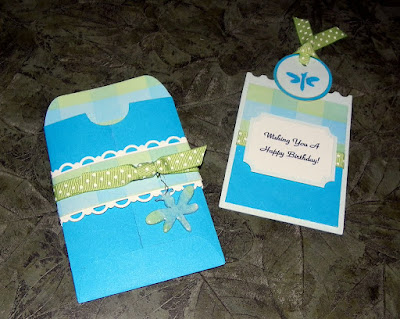
CUPCAKE SHAPED CARD INVITE SET TEMPLATE - CUTTING FILE
This CUPCAKE SHAPED CARD INVITE SET template - cutting file...features everything you need to make cupcake invites or other cupcake shaped cards:
1 ENVELOPE6 OUTSIDE BORDER GREETINGS
2 INSIDE INVITE GREETINGS
1 BIG CUPCAKE SHAPED CARD to use all my itself
1 SMALLER CUPCAKE to go on top of the OUTSIDE BORDER GREETINGS...Plus the pdf's for printing out the cupcakes are set up with 4 on a page for mass producing.....the overall size of the cupcake is approx. 4.5 by 5 inches.
There is also a pdf sheet with the inside greetings already on the cupcake shaped card....


Designed By: Regina Easter
Design Team Projects:
Michele Kovack
Here are a few of the pictures from the set...

1 ENVELOPE6 OUTSIDE BORDER GREETINGS
2 INSIDE INVITE GREETINGS
1 BIG CUPCAKE SHAPED CARD to use all my itself
1 SMALLER CUPCAKE to go on top of the OUTSIDE BORDER GREETINGS...Plus the pdf's for printing out the cupcakes are set up with 4 on a page for mass producing.....the overall size of the cupcake is approx. 4.5 by 5 inches.
There is also a pdf sheet with the inside greetings already on the cupcake shaped card....
Designed By: Regina Easter
Design Team Projects:
Michele Kovack
Here are a few of the pictures from the set...
the last two pictures are the INSIDE INVITE GREETINGS


HAPPY BIRTHDAY TO YOU..PRINTABLE STAMP SET
This stamp set features the HAPPY BIRTHDAY TO YOU song...There are 9 printable images in the set....It also features blank spaces to enter a person's name and age.

Price for HAPPY BIRTHDAY TO YOU printable stamp set: $1.25
Designed By: Regina Easter
This project also uses the CUPCAKE BOX
Design Team projects:
Charlene Driggs
Shelly Skala
Penny Shuberg
click on pictures for a bigger view
Price for ALL OCCASION TAG SET: $4.99
Each is sold individually


Designed By: Regina Easter - This project also uses the HUGE HAPPY BIRTHDAY WORD CIRCLE & b SHAPED CARD SET

Designed By: Regina Easter - This project also uses the NESTING BOXES & ALL OCCASION CIRCLE WORD SET 1
Designed By: Regina Easter - This project also uses the HUGE HAPPY BIRTHDAY WORD CIRCLE & b SHAPED CARD SET
Designed By: Regina Easter - This project also uses the NESTING BOXES & ALL OCCASION CIRCLE WORD SET 1
Design Team Projects:
ALL ABOUT BOYS PRINTABLE STAMP SET...
This ALL ABOUT BOYS printable stamp set features 55 images...
CLICK ON PICTURES FOR A LARGER VIEW


Price for ALL ABOUT BOYS printable stamp set: $12.99
Designed By: Tracy GoughTracy also used the ASSORTED CELEBRATION CIRCLE WORDS
The bottom image is the border printable stamps.
Price for BIRTHDAY NUMBER CANDLE SET: $1.99
The Cutting Cafe': .99 CENT SPECIALS
http://thecutti
http://thecutti
Father's Day Card
Well, if any of you know me, you know that I always wait for the last minute to do anything. Yes, including making Father's Day cards for my dad and my two father-in-laws. :) Yes, I'm blushing. I can't help it! I do it all the time! Seems like I have no problem making a card unless I really need to. Well, I wanted to do something simple since they are guys and they won't appreciate ribbons and bows and such.

I used Give a Hoot to cut the moose out at 3 1/2". I don't suggest trying to cut in any smaller. I think the detailing starts to get a little sketchy. :) I used all SU papers, PTI die and stamp. Chocolate Chip ink was used as well as the tea dye duo from PTI.

Simple. Manly. Success? I think so.

I used Give a Hoot to cut the moose out at 3 1/2". I don't suggest trying to cut in any smaller. I think the detailing starts to get a little sketchy. :) I used all SU papers, PTI die and stamp. Chocolate Chip ink was used as well as the tea dye duo from PTI.

Simple. Manly. Success? I think so.
Cute as a bug!
Hi everyone! I hope you're all having a good weekend so far! Today I have a card for you using the Stretch Your Imagination cartridge. I used the card feature for this cute little bug and cut it at 6 1/2" along with the black frame which is also cut at 6 1/2". Then I cut the corresponding layer at 4 3/4". The layers aren't sized to match the top of the card, but to match the actual plain cut. So, I just measured the stalk of grass on the card and cut it out, hoping it was the right size, and it was! I changed it up a little by punching a scalloped edge on the right side of the front of the card and layering it with a black scallop. I used the Stampin' Up! stamp "Cute as a bug!" from the set Bugs & Kisses. I cut out all the words separately and popped them up with some dimensionals. I added some rhinestones and pen stitching. Maybe I think maybe I got a little carried away with the details on this card, but sometimes I don't know when to stop, lol! Thanks for looking! :)


Happy Birthday Note Card!
Hi everyone! I just have a simple Happy Birthday note card for you today.
I used Create a Critter for the word "Birthday". It's the shift function on the phrase key, and it's cut at 3/4" on real-dial size. The stamp sets I used are from Stampin' Up! and they are Sweet Scoops and Rough Type Alpha.
Thanks for looking! :)
I used Create a Critter for the word "Birthday". It's the shift function on the phrase key, and it's cut at 3/4" on real-dial size. The stamp sets I used are from Stampin' Up! and they are Sweet Scoops and Rough Type Alpha.
Thanks for looking! :)
Just Dream...
I everyone! Today I have a butterfly card for you. I used Wild Card for the card base, which is cut at 3 3/4", and I used Indie Art for the butterflies, which are cut at 2" and 1 1/4". I sprayed some of Stampin' Up!'s new Smooch Spritz (Log Cabin) on the card base and then adhered a black circle over the top, so only the spritzed, scalloped edges were showing, and then I just stitched around the circle with a Signo white gel pen. Then I inked the edges of the butterflies and glued only their bodies to the front, so that their wings could move freely. Then finally, I stamped Just Dream on the front with some Whisper White Craft Ink. Thanks for visiting! :)


Mouse & Cheese Basket!
Hi everyone! Hope you're having a great Friday, it's almost the weekend, wahoo! Today I did something a little different, I made a basket! I used Create a Critter for the mouse and cheese. The mouse is cut at 4" and the cheese is cut at 3 3/4". On the sides of the basket I used the circles that were left over from the top layer of the cheese cut and glued those on and then used a white gel pen to draw stitch lines around the outer edges. I also did the stitch lines on the handle as well. The handle is punched on both sides with the Stampin' Up! Scallop Border Punch and then layered with a strip of black and two tiny strips of pink on either side of the black. All handle pieces are 11" long. For the basket, I took an 8.5" x 11" piece of black cardstock and scored at 2 3/4" in on all four sides. Then I cut on the outside score lines that are parallel to the shortest side, so that I would have flaps to fold in and glue. After that, just glue the cheese on each end, pop up your mouse with some dimensionals, and you're all done! Thanks so much for looking! :)


Gypsy Cupcake!
Hi everyone! Today I have a Gypsy card for you! The most recent update is awesome, they added a hide contour feature! I made the green background for this card using Gypsy Wanderings. I lined up a bunch of little circles to make the shape on the bottom, right hand side. I also used my Gypsy for the cupcake. I used a ruler and a Chocolate Chip Stampin' Write Marker to make 2 lines down each side of the green piece as well. For the sentiment I used Sweet Scoops and two Stampin' Write Markers to color it, so that "sweet" was in pink.
Thanks for looking! :)


I got the inspiration for the card from a card map from www.pagemaps.com. Feel free to join in if you'd like. Just post a link to your card in the comments! :)
Here is the one I used:

Thanks for looking! :)


I got the inspiration for the card from a card map from www.pagemaps.com. Feel free to join in if you'd like. Just post a link to your card in the comments! :)
Here is the one I used:

Thanks a Melon
Don't you just love that saying? Thanks a Melon? :) Yep. I sure do. This card is so bright and cheery. Reminds me of juicy watermelon and summertime. Maybe for someone who helped with the yard? Or invited us over for a BBQ? I don't know just yet. hehe. But I know it will come in handy.
The card is from Just Because Cards and was cut at 5 3/4". I cut all the layers with scraps I had lying around. It was so easy to put together. Can I just say how much I love this cartridge? I really do. I ran "Thanks a" through the Cuttlebug for some added texture and inked the edges of everything.
Thanks for stopping by and have a goodie!

Father's Day Card
I used Give a Hoot to cut the moose out at 3 1/2". I don't suggest trying to cut in any smaller. I think the detailing starts to get a little sketchy. :) I used all SU papers, PTI die and stamp. Chocolate Chip ink was used as well as the tea dye duo from PTI.
Simple. Manly. Success? I think so.
Hi There - Using Walk In My Garden Cartridge
I made today's card using the "Card Feature" on the Walk in My Garden Cricut cartridge. It was cut at 4" along with all coordinating pieces with PAPER SAVER on.
I ran the front of the card through the Cuttlebug using the Swiss Dots folder for some added interest. Papertrey Ink's ribbon was used. All paper was scraps. Don't you love making something out of your scraps?! I do. Then I don't feel like I'm wasting so much.

I ran the front of the card through the Cuttlebug using the Swiss Dots folder for some added interest. Papertrey Ink's ribbon was used. All paper was scraps. Don't you love making something out of your scraps?! I do. Then I don't feel like I'm wasting so much.

LOVE
Thanks for looking!
-Winner of the Create a Critter giveaway is coming soon!-


Whatever!
Hello everyone! Today I used another cartridge that I just got, Graphically Speaking! It has some really cute stuff on it! Can you believe all these classics that I've been missing out on? Lol! This is more of a masculine (boy) card, so I stayed away from anything frilly or sparkly...which is hard for me to do. I cut the smiley face at 2 3/4" and the "whatever!" at 3/4". Doesn't the smiley look like the Wal-Mart guy...but with hair? Haha! I used the Tiny Bubbles embossing folder on the blue background and finished off with some faux stitching.
Thanks for looking! :)


Thanks for looking! :)


Labels: masculine card, cuttlebug, smiley face, graphically speaking, boy
Thinking of you.
Hi everyone! Today I have a 4 1/4" x 4 1/4" square card for you. I used Graphically Speaking for the flower, but instead of using the cut, I used the negative image that it left behind. The flower itself was cut at 2 1/2" and the whole white piece is cut at 3" x 3". I used the Stampin' Up! A to Z mini background stamp for the letters behind the flower and Teeny Tiny Wishes for the "thinking of you" sentiment. I used the Word Window Punch to punch out the sentiment, and just cut off one end so it would line up evenly with the side of the white piece. The card base is embossed using the Stampin' Up! Square Lattice Embossing Folder. I finished it off with a button tied with some twine!
Thanks for looking! :)


Thanks for looking! :)


Monday, June 28, 2010
So Cool!
I've definitely been in a summery mood lately. I'm loving all of this warm weather! We've been camping and it was SO HOT! I thought I'd do a card to "cool off". :) I used Once Upon A Princess for the ice cream cone and the gem behind it. Cutting was a little tricky with this one. I selected 4" for my cut because I wanted the entire thing to be that tall. Little did I know I'd end up with a 4" cone! So I fiddled a bit and ended up cutting everything at 2". I think it's perfect. Thanks for stopping by and I hope this one gets you in the summer mood too! :) Have a goodie!


Friday, June 25, 2010
Friend Tag
Hi everyone! Today I wanted to try something I've never done before, and that's to make a tag. I see so many people make such pretty, vintage tags and I've always wanted to try one. So, this is my first attempt! I used Accent Essentials to cut out the flower petals and then distressed them. I crumpled, inked, inked some more, stamped and sprayed them with Vanilla Shimmer Smooch Spritz. After that I glued them all together and put a button in the center. The butterflies are cut from Stampin' Up!'s Beautiful Wings Embosslit die. I inked them and sprayed them with Smooch Spritz as well, then I glued just the center of their bodies down, so it would look like they were flying. I used Old Olive Satin Ribbon for the top of the tag and left a loop so it can easily hang somewhere. To finish it off I just added a few rhinestones. I really enjoyed making this tag so I will definitely be doing more in the future!
Thanks for looking! :)


Thanks for looking! :)


Thursday, June 24, 2010
Thanks for Owl You Do


For today's card I wanted to do something super simple. I think that my problem a lot of the time is not knowing when to stop. I just keep adding and adding until it's a jumbled mess. I tried to keep everything to a minimum. I stamped the base of the card using Papertrey Ink's Background Basics stamp set in Woodgrain with Versamark. Love it! I cut the owl out at 3 1/2" and used designer paper for the belly, feet, and beak. I used SU! stamp set for the cute little saying and punched it out with the Word Window Punch. Finished the baby off with a little ribbon from WM and tied twine to hold it in place. A little white gel pen stitching and I'm done!
Sorry the pictures are so bad. I made this about 2 in the morning and the lighting was horrible. :) Promise next time it will be better. Have a goodie!!
No comments:
Post a Comment