
Here's a little card I made based on one of my favorite web images...

The fairy princess is from A Childs Year.
The background paper is from the DCWV Tattered Time paper stack.

Here's the image that was my inspiration.
Labels: fairy, princess, a childs year
I always want to add bows, bling and other frilly things, lol. Technically I DID add a bow, but it was out of earthy looking linen thread, lol. I cut this cute dinosaur from Create a Critter at 4". I should have cut him a little smaller, but I think he's ok, dinosaurs are supposed to be big, right? I got the sentiment from a retired Stampin' Up! hostess set called Picture This and cut it out in the shape of a speech bubble. I did some of my usual gel pen stitch lines to finish it off.
Thanks for looking! :)


Thanks for looking! :)


Labels: dino card, create a critter
Teacher Appreciation Basket
I made this basket for my daughter's 3rd grade teacher for Teacher Appreciation Day.

I got the basket from Michael's for only $3.50, added some ribbon I already had, placed some craft foam in the bottom, covered it with some leftover Easter grass, put in some Granny Smith and Pink Lady apples, and last made the sticks.
I used these Cricut cartridges:
George and Basic Shapes for the star cut @ 3
Cricut Sampler for the Thanks cut @ 3
A Child's Year for the 2 apples cut @ 3
Doodlecharms for the watermelon cut @ 3
Locker Talk for the A+ cut @ 1 3/4
Graphically Speaking for the chalkboard cut @ 3 1/2
Celebrations for the banner cut @ 4
Wild Card for the #1 Teacher cut @ 6
Alphalicious for the You're the Best cut @ 2
Too many carts I know but I think the end product turned out pretty good. I learned from doing this project that in the future to use less carts. Using this many carts was very time consuming!


Here's the Basket and the card together!

Labels: teacher appreciation
 Recipe: Cricut Cartridge Indie Art - Butterfly
 Opposites Attract - LOVE
Scalloped Circle Mount - Easter 2010
Cuttlebug Embossing Folder - Swiss Dots
I cut the Indie Art butterfly in four sizes, distressed the edges, embossed the 4 cuts and layered them. Topped it off with a pink heart jewel.


Labels: butterfly card, indie art, opposites attract, easter 2010, cuttlebug

Cricut: A Child's Year (Boy Fishing)
Winter Woodlands (Joy)
Mickey Font (Boy)
Paper: Pattern Paper with Square Framework
Cuttlebug Embossing Folders
Labels: boy, fishing, a childs year, winter woodlands, mickey font, cuttlebug
I Absolutely Love It!

Circle stickers make great flower centers. Choose your favorite circle sticker and embellish around it to make a one-of-a-kind thank you card for any occasion.
Designed by Dee Gallimore
Hello

Cheery print paper motifs, flowers, ribbon and pleated frills on this friendly greeting are just the ticket to pave the way for a bit of lively "girl talk." This e-pattern was originally published in the January 2010 issue of CardMaker magazine.
Size: 5 1/2" x 5 1/2".
Size: 5 1/2" x 5 1/2".
Happy Day! Gatefold Card

Spread a little sunshine with this blossoming gatefold card. So easy to make, and bursting with good cheer! This e-pattern was originally published in Fabulous Folds for Card Making.
Size: 5" x 5".
Size: 5" x 5".
 | |
| I loved creating this dinosaur from Create a Critter cut at 2.80w & 2.68 h. It is so easy to create on my gypsy since I had been working on creating this card for a few days. Other items used: *Gypsy wanderings used for the frame that Dino sits on and then embossed using the Cracked embossing folder from Tim Holtz from Sizzix. ** Cuttlebug set of Animal prints was used to emboss the tail and the top body of the dinosaur. I used peachy Keen stamps from critter faces set A med. ** I also used cardstock from Ctmh: kiwi (deleted now) , orange and clover meadow. Bamboo Ink from ctmh used on the edging of card. I love inking around edges!! ** the twine is also from CTMH. ** oops.. fogot which cartridge the leaves came from.. My gypsy is not near me (how dare I .. lol) ** The saying on the outside of the card is one my hubby thought of when I told him I was making a birthday card.. Cute huh!! ** the inside of the card saying is from CTMH D1111 card sentiments. I hope you have enjoyed this card. It is for a card swap with our Swarm ladies. |

Labels: dino card, create a critter, cuttlebug

I cut the grass and flower stems from Straight From the Nest at 5-1/4"h (true size). The flowers are from K an Company. The butterfly is from Create A Critter at 1" and the lady bug is from Walk in my Garden at .75". I stamped my sentimnet on a CAC cloud....I forgot to write down the size on this one. These cute stamps sets are available now so head on over to Scrappy Moms to order yours.
Labels: butterfly card, flowers, lady bug, spring, create a critter, wimg, straight from the nest
Cricut Cardz Challenge #66 - Border Feature
Hi everyone! I haven't posted in a while, we've been out of town since last Wednesay for a family wedding. We had a wonderful time. It's time for another Cricut Cardz Challenge....this week our challenge is to use the border feature from any cartridge plus the colors blue, yellow and white.


Labels: birds

Labels: baby card, circle card, umbrella
Supplies:dgvvdfgdfgvfdgfdgggfddgvfdgdfgfdgfddgffdx gfdxgdfxgfdxggggfdxgfdxgfdxxxxxxxxxxxxxxxxxxxxxxxxxxxxxxxxxxxxxxxxxxxxxxx
 gfdxgdfxgfdxggggfdxgfdxgfdxxxxxxxxxxxxxxxxxxxxxxxxxxxxxxxxxxxxxxxxxxxxxxx
Labels: crochet flower, bakers twine, just because card


Labels: dino card, shape card
The Creative Pointe: SVG File: Zebra Heart
http://creative
http://creative
SVG File: Zebra Heart
Zebra Heart Card

Labels: heart, zebra
. For my card today I used an older Quickutz die I had in my stash to cut the puzzle. The frame was cut using my Cricut and the Elegant Frames cartridge. I cut the flowers using the Mother's Day Bouquet cartridge, and the key from the French Manor cartridge. I did lots of inking and glittering.......and added a bit of seam binding and rhinestones. The word, hope, was stamped from an old magnetic stamp set I had in my stash by Making Memories. It was stamped directly on vellum with Versamark. I embossed it in black. 
 And how about a little blog candy? I have a brand new

 And how about a little blog candy? I have a brand new
 Labels: hope card, puzzle, scallop edge

This is another project that is currently featured in My Pink Stamper's new gallery. (Woohoo!) I used this favor box to hold a sugar cookie for Easter, but it would also make a really cute favor box for a birthday or shower.
You can't tell from the pictures, but I made the favors double-sided. If I was doing it again - I would have only cut the flower's base for the back and called it a day.

Here are the materials used -
Everything is cut at 3"
- Flower 2 Favor box (Sweet Treats)- used DCWV Flower Shower Stack
- 5 pink flowers cut using the blackout feature (2 for each side of the favor and one for the tag)
- 2 orange flower layers
- 2 yellow centers - used DCWV Citrus Stack
- 1 flower cut using the shadow feature (for tag) - used DCWV Citrus Stack
- 1 leaf - for the tag (Accent Essentials)
- Cuttlebug's Swiss Dot A2 embossing folder
- Dew Drop Tsukineko Inks
- Pop Dots
Labels: favor box, flowers, sweet treats, cuttlebug, accent essentials
Creative Craft: Gift Bag Set

This is kind of "cheat" project, but by "cheat" I really mean no-brainer. I made the Mother's Day card on Saturday for a National Scrapbook Day challenge and I decided to embellish a plain gift bag with the same images to make a matching set. I even used scraps of paper! (One day that scrap drawer might be more manageable.)
If you missed the card's post, you can check it out HERE.
Materials Used:
- Mats cut at 4 x 8 and 3 1/2 x 8 - Paper is from K& Company's "Handmade" Specialty Paper pad and DCWV Sweet Stack - attached using "red tape"
- Bird cut at 2 1/2" from Create a Critter - attached using Pop Dots
- Scalloped circle cut at 3 1/2" and 3 3/4" from Create a Critter - attached using Pop Dots
- Martha Stewart Glitter Glue Pen - Tourmaline
- Ric-Rac from my scraps

National Scrapbook Day: MPS Challenge #1

Robyn at My Pink Stamper is hosting challenges all day today in honor of National Scrapbook Day, so I will be posting all day (and probably some tomorrow too - because I doubt I can get all of them done in one day). The first challenge is "Mother Dear, I Love You So," and my card is for my husband's grandmother.
Materials Used:
- Card cut at 8 1/2x11 (4 1/4x5 1/2 folded) - DCWV Flower Shower Stack
- Mat cut at 4x5 1/4 - K&Co. "Handmade" Specialty Paper
- Accent Mat cut at 1 1/2x5 1/4 - DCWV Sweet Stack
- Bird cut at 2 1/2" from Create a Critter - attached using Pop Dots
- Scalloped circle cut at 3 1/2" and 3 3/4" from Create a Critter - attached using Pop Dots
- Martha Stewart Glitter Glue Pen - Tourmaline
- "I Love You" stamp from My Pink Stamper's Simply Sweet Occasions Set
- Ric-Rac (from my scraps, but I know I originally bought it from Joann's)
Labels: gift bag, birds
Creative Card and a Quick Site Update

the card...if you follow this blog, you may remember that I made a 40th birthday card for my brother-in-law as one of the National Scrapbook Day challenges. Well...I really didn't like it (in fact I hated it) so I decided that I could do better. Masculine cards may not be my strongest suit, but I thought it deserved another try. I cut out the car three times from the Paper Doll Dress-up cartridge to create my own "layers." It ended up looking really flat even with the different layers. Since glitter didn't seem very masculine, I decided to try "stitching" around the car to give it a bit more interest. I did have to add a bit of glitter to the flames on the 4 and 0 - only because I had my white pigment ink pad next to me on my work surface and I inadvertently flipped it over on top of one of the numbers. Oh well - a little glitter never hurt anyone.
Materials Used:
- Card cut at 5 1/2" from George and Basic Shapes
- Car cut 2 3/4" (three times to create layers) from Paper Doll Dress-up - attached using pop dots
- "4-0" cut at 1 1/2" from Sweet Treats - "4" attached with pop dots and "0" attached with zig 2-way
- Red waxed thread - no idea - it was my mom's
- "Celebrate Today" from My Pink Stamper's "Simply Sweet Occasions" set
- Tsukineko pigment ink - white
- Sakura Gelly Roll Pen - white
- Martha Stewart Glitter Glue - garnet
Labels: car card, 40th, birthday card
Creative Card: "Thanks!"

My birthday was over the weekend, so I have a few thank you cards to write. I went through my card stash on Monday and realized that I didn't have any thank you cards (what???). I decided to "scrap-lift" an idea I saw on Tammy's blog - Scrappy Critters. (Thanks Tammy!) I think I will make a few of each of these to send out.

Materials Used:
- Standard A2 card
- Embossed the front of each using the Cuttlebug "Birds and Swirls A2 Folder" and "Stylized Flower A2 Folder"
- "Lime Tree" cut at 4.75" from Cherry Limeade
- attached with pop dots
- "Flower" cut at 4.75" from Cherry Limeade
- attached with pop dots
- saved the flowers from the center and used them to accent the sentiments
- Used scraps of paper to mat the sentiment
- Sentiment from Scrappy Moms Everyday Greetings set
- Tsukineko Pigment Ink: Pearlescent Ivy and Coffee Bean
- Color Box Liquid Chalk: Dark Peony and Rouge
- Sakura Gelly Roll Pen - White
Labels: thank you, tree, flowers
Creative Card: "There's a Scare in the Air!"

These little owls are all dressed up and ready for Halloween, but there not really very scary. I have been on another Create a Critter kick lately, so I decided to use the owls...again. I'm not really sure how to best explain how I created the ghost outfit for the owl on the left (you could tell that he was a ghost, right?), so I decided to take a picture of the image on my Gypsy. It was really easy and I just used a few hearts from George and Basic Shapes to create the jagged edge of his costume.


Materials Used:
- Standard A2 Card Base
- Mat 4 x 5 1/4" - K and Company "Handmade" Specialty Paper
- Branch is cut at 5" using fit to length from Straight from the Nest
- (2) Owls cut at 2.25" from Create a Critter
- (2) wings cut out at 1.24" from Create a Critter
- attached with pop dots
- "Witches Hat" cut at 1.24" from Pooh and Friends
- Sentiment from Scrappy Moms "A Haunting We Will Go" set
- Sakura Gelly Roll Pen - White
- Martha Stewart Permanent Pen - Chesnut
- Buttons from my stash

Labels: owls

I am having a major case of "mommy-guilt" today stemming from an atomic meltdown at a certain someone's Little Gym class. My short-term cure for a case of "mommy-guilt" is to craft during nap time. To challenge myself because I couldn't seem to get out of my head and think of something creative on my own - I decided to try Peachy Keen's sketch challenge. I've done a few scrapbook sketch challenges, but never a card, so it was fun to try something new. Here's a look at the sketch; how do you think I did?
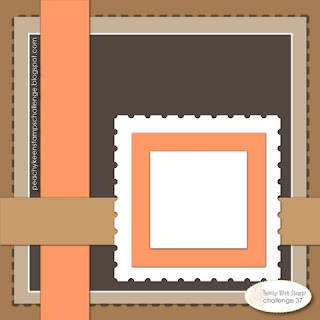
You still have until Sunday, October 3rd to particpate, if you are interested. Click HERE for more details!
Materials Used:

- Easel Card: 4 1/4 x 4 1/4
- Mat trimmed to 4 x 4
- Smaller Mats trimmed to 2 1/2 x 2 1/2 and 2 1/4 x 2 1/4
- attached using pop dots
- Scallop Border cut at 4" using "Fit to Length" from Straight from the Nest
- Party Hat cut at 2 1/4" from Straight from the Nest
- attached using pop dots
- Peachy Keen Princess Face Stamp (to make the face fit my party hat - I inked and stamped one part at a time)
- Sentiment from Scrappy Moms Stamps Sweet Somethings set
- 7/8" grosgrain ribbon
- 3/8" satin ribbon
- Sakura Gelly Roll Pen - White
- Sharpie Fine Point Pen - Black
- Gems - $1 Section at Target

Labels: birthday card, party hat, straight from the nest, peachy keen
Materials Used:

- Standard A2 Card Base
- Mat 4 x 5 1/4 - MS Patterned Paper
- Balloons and Clouds from Best Friends
- Sentiment from Scrappy Moms A Pinch and a Dash set
- EK Success Corner Rounder Punch
- Tim Holtz Distress Ink - Frayed Burlap
- Sakura Gelly Roll Pen - White
- Sakura Micron 03 Pen - White
Labels: birthday card, balloons

Labels: flowers, cuttlebug
SO KIND - Cuttlebug Challenge Be Inspired # 41

 {Click on images to enlarge}
Hello everyone...today at CUTTLEBUG CHALLENGE we are showcasing the NEW Victoria Embossing Folder... it is delightful and for the challenge we where asked to do a project. You must go to CUTTLEBUG CHALLENGE to see the AMAZING project the other team members came up with... you can pack up with great ideas...
Since Summer started and my child is off from school, he has been going to Camp and my dear neighbor drives him and her daughter back and forth every day, cause it is just a couple of blocks away from her work... she also keeps him with them until Kenny or me come back from work... so I wanted to tank her and pamper her with something handmade...
I got some delicious Ocean Breeze body lotion, powder, hand lotion and other stuff and made this bag using my Expression and the Cuttlebug. I am giving it to her along with a card I will be making later on today...
Supplies:
Cardstock: CTMH
Cuttlebug: Victoria Embossing Folder, word from With Gratitude A2 Combo and all the sea shells are from Seashells & Net Cuttlebug Die cut on naked chipboard and colored with Copic markers.
Cricut Expression: Tags, Bags Boxes & More to cut the bag at 9".
Ribbon: Offray.
Wooden Swirl and Pearls: Kaiser.
Other: Stitching, distress tool and glue gun.
Labels: gift bag, cuttlebug
ALOHA - CPS challenge # 131
 {Click on image to enlarge}
I did this card for CPS challenge # 131 using the scraps from my last layout (in the post before this one). I saw this sketch and liked it very much so I grabbed one of my new Cricut cartridges and came up with this card in less than 10 minutes. Hope you like it.
Supplies:
- Bazzill Cardstock.
- SEI (use the reverse of the lo scraps) and Bo Bunny.
- Cricut Life is a Beach cartridge, big flower cut at 3" and title cut at 1.5".
- Tim Holtz Red Brick distress Ink.
- Stickles Lime Green.
- Other: ATG, sewing machine, pod dots, sponge daubers, xyron
Labels: flowers, hawaii
REACH FOR THE STARS

One more simple and easy card using Create a Critter Cricut cart. Did you know that Peachy Keen Stamps made a set to match this up??? I just got them and they are gorgeous gotta go and try them on...and will post them soon. I love how this one came out... What do you think?
Supplies:
Cardstock: Bazzill and CTMH
Cuttlebug: Stars Embossing Folder.
Ink: Tim Holtz Tea Dye.
Pearls: Kaiser.
Labels: stars, giraffe, cuttlebug, create a critter, peachy keen

Supplies:
Cardstock: Abbey Road & Bo-Bunny.
Cricut: George for the hearts cut at 2" &2.5".
Stamped Sentiment: My Pink Stamper "Love-alicious"
Pearls: Kaiser.
Chalk: Dew Drop VersaMagic chalk ink "Pumpkin Spice".
Other: Doodling, stitching, Glue Gun, ATG & pop dots
Labels: heart, george and basic shapes
HAPPY BIRTHDAY 2U - Greeting Card
Hey there! I was able to make this lil card tonight for the challenge at Cooking with Cricut. It is the first time I play here, as a matter of fact, I never paid attention to it cause I thought It was really "cooking" as of the "Cricut Cake" lol.... so here is my birthday card... hope you like it. ha! and I made it all with scraps from my layout posted yesterday.
Hola! Hoy pude hacer esta tarjetica para el reto de Cooking with Cricut. Nunca le había puesto atención a ese blog, porque pensaba que era para retos usando el Cricut Cake. lol... Aquí l@s dejo con mi tarjetica y espero que les guste. Y se me olvidaba decirles que utilizé pedacitos de papel que me quedaron de el último layout que hice y que subí a mi blog ayer.

Supplies:
Cardstock: CTMH White.
Patterned Cardstock: Bo-Bunny.
Cricut: Birthday Bash Cartridge cut at 4".
Cuttlebug: Happy Birthday Embossing Folder.
Ribbon: Offray.
Other: ATG, pop dots and doodling.
Labels: birthday card, balloons, cuttlebug, birthday bash

Supplies:
Cardstock: CTMH White Daisy.
Designer Paper: Close to My Heart and Bo-Bunny Back to Backs
Cuttlebug: Love Language embossing folder.
Punch: Martha Stewart.
Cricut: Gypsy Wonderings for the hearts cut at 1". Walk in My Garden for the flower stem cut at 2".
Other: ATG, bibbon, pop dots, white gel pen, black pen, machine stitching, creative memories corner rounder.
Challenges:
Labels: heart, flowers, cuttlebug, gypsy wonderings, wimg
Hi there! This is a little card I did tonight using the sketch from CPS. It is a very easy one and I love them that way. Isn't that lil worm from Cricut Create a Critter cartridge just soooooo super cute? I am in love with it... :)
Hola! Esta tarjetica la hice usando el boceto de CPS. Esta facilito, como me gustan a mi. Qué tal les parece el gusanito de el cartucho Create a Critter de Cricut? Estoy enamorada... :)

Supplies:
Cardstock: scraps from many brands.
Cuttlebug:
Spellbinders: Nestabilities.
Cricut: Create a Critter cut at 2.5".
Sentiment: Made by me using Photoshop Elements.
Rhinestones: Kaisercrafts.
Stamps: Peachy Keen Stamps.
Other: ATG, doodling, stitching, pop dots.
Labels: worm, create a critter, cuttlebug, peachy keen


Cricut Expression, Cricut Design Studio, Cricut Doodlecharms Cartridge, Cricut Simply Charmed Cartridge, Bazzill 'Berry Blush', 'French Vanilla', 'Parakeet', 'Piglet' Cardstock, K&CO 'Lovely' Specialty Paper, Craft Boa Pink Feathers, Dew Drop, Stickles 'Eucalyptus', DMC Floss, One Year Older WordArt by VKA Designs, Misc - Button
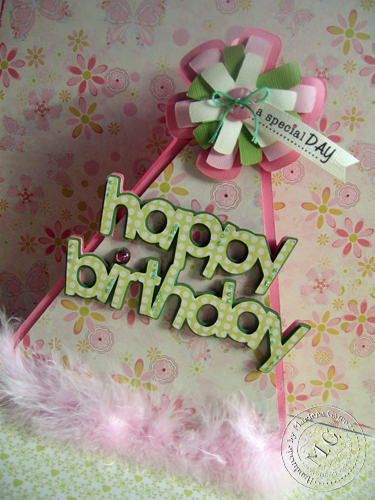
Its Monday and that means its time for another Fantabulous Cricut Challenge Me Monday! This week Challenge Me Monday #52 is all about BIRTHDAYS! All you have to do is create a card or project based with a BIRTHDAY theme.
I think FCCB's Challenge Me Monday #52 - BIRTHDAYS is perfect for this month of March. It seems to ME - my personal opinion - that there are more people with a March birth date than any other month. My dad's birthday was on March 5th, my birthday was on March 14th, and Robin's birthday - founder and creator of Fantabulous Cricut Challenge Blog - is TODAY! So if you get a chance, go on over to her blog, Robin's Creative Cottage and wish her a VERY Happy Birthday!
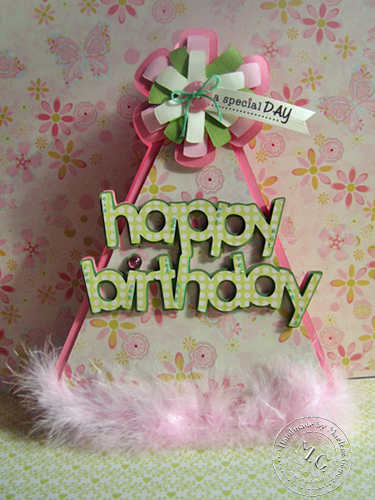
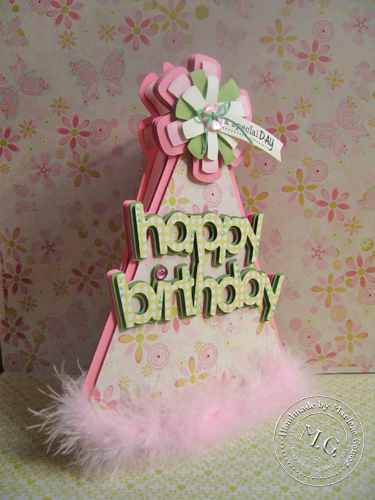
Since I've been in "Party Mode" since the month started I decided to create a Shaped Card with TONS of layers. The card measures a whooping 8 3/4" high! The party hat is from the Cricut Doodlecharms Hat, the "happy birthday" is from the Simply Charmed Cartridge and was all welded together using the 'Shadow Feature' with Design Studio.
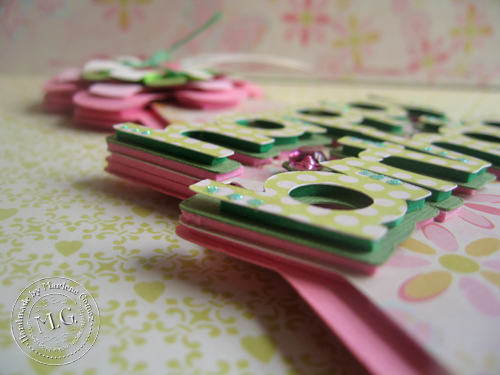
It has a total of 5 layers. In between each layer I used my home-made dimensionals. You can barely see them since I used the foam of the same color as the previous layer. This way the dimensionals aren't so distracting when viewed from the side.
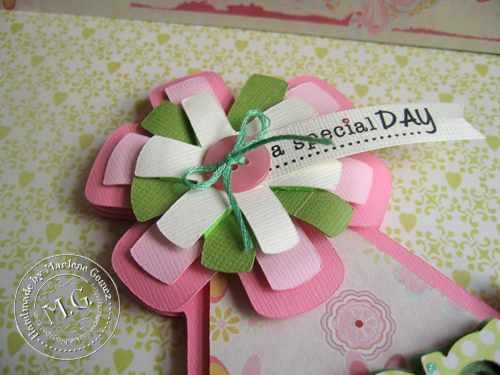
For the "Pom Pom" of the hat I used 4 different sized layers. I started out with an 8" shadowed 'hat-s'(dark pink), then layered on a 8" 'hat-s'(light pink), then a 7" 'hat-s'(green), and finally a 6" 'hat-s'(vanilla), hiding the hat portion with DS. Added a green threaded button to the center and sentiment banner. The sentiment is from the Another Year Older WordArt collection by Verena Karolyi. Confused? No worries. I have included everything into a CUT File available via comment request below.

I incorporated Fun 'n' Flair's VERY FIRST Fun Friday Challenge into this card - just use any Cricut Cartridge of your choice and use the color Pink.
I felt the card needed some BLING - after all it is for a BIRTHDAY - so I added a few touches of 'Eucalyptus' Stickles to the 'happy birthday' sentiment. I also replaced the dot of the "i" for a pink Dew Drop. To the bottom of the "Birthday Hat" I added some pink feathers I picked up from AC Moore.
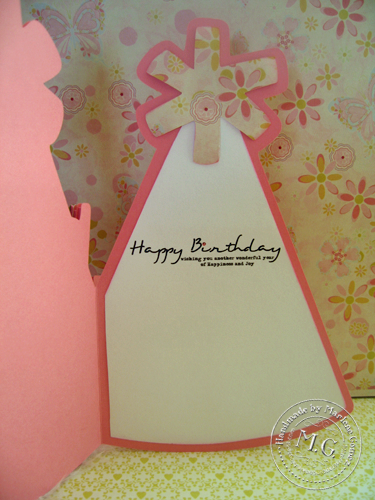
The inside of the card uses another sentiment from the Another Year Older WordArt collection by Verena Karolyi.
Now it's YOUR TURN! Head on over to the Fantabulous Cricut Challenge Blog and see all the other great inspriation provided by the rest of the DT. Don't forget to link up your BIRTHDAY card or project by Sunday, March 27th at 11:59 EST for your chance to win or be part of the Top 5!
Birthday Hat CUT File
Items Needed:
*Cricut Expression & Design Studio
*Cricut Doodlecharms Cartridge
*Cricut Simply Charmed Cartridge
Labels: birthday card, shape card, party hat, doodlecharms, simply charmed

Labels: flowers, cuttlebug, create a critter
"Let's Celebrate!" Blog Hop

Happy New Year and welcome to the "Let's Celebrate!" Blog Hop hosted by Joanna from Scrap-making! If you are hopping along with us today, you should have arrived here from Kim's blog: My Craft Spot. I have the entire blog hop list towards the end of this post!
I am so excited to be able to help Joanna celebrate her blog's one year anniversary and her birthday! Not only is Joanna unbelievably talented and super sweet - she is also one of the busiest bloggers that I know. She is on so many design teams and ALWAYS manages to come up with the most amazing projects! So...happy happy birthday and anniversary Joanna!
I designed my birthday themed project with Joanna in mind - I love all of her super cute owl themed projects, so I decided to come up with a little owl themed party. I am planning on doing something similar for my daughter's birthday later this month!

Party Hat
- Circle cut using "fit to page" function on the Cricut Expression & a 12 x 12 piece of cardstock. Cut the circle in half and use double stick tape to make your hat
- Fringe - accordion fold a sheet of tissue paper and "fringe" the edge. I used the Martha Stewart Fringe scissors. I attached it to the inside of the hat using double stick tape. I used a leftover portion of fringe to make the little topper.
- Scalloped Circle sized at 3.5" from Sweet Treats
- Owl sized at 2.75" from Hoot and Holler

Favor Box
- "Nut Box" sized at 6.76" from Tags Bags Boxes and More. I attached a ribbon handle and then added the fringe using double stick tape.
 |
| I accidentally bought translucent embossing powder, so I stamped the sentiment in white pigment ink and then embossed it using the translucent powder. (I will be heading to Michael's to get WHITE embossing powder tomorrow!) "Have a Hoot" from Scrappy Moms "Amusing Animals" set |
 |
| More fringe...yes, I am clearly obsessed! "Thank You" from Scrappy Moms "Simple Sentiments" set |
Labels: owls, gift bag, party hat, favor box, sweet treat, hoot & hollar, tags bags boxes, peachy keen
Happy Birthday Card

I love this card - in fact I am going to have a hard time giving it away. I may have to save it for someone that I know appreciates pretty cards. ;) Just a joke...sort of. I used the very very cute "Fly Away with Me" Stickerz Set from EAD Designs. The BEST part about these stickers (besides the fact that they are really cute) is that you can reposition them. Say for instance, that you put the "happy birthday" on the right hand side of the card, but then decide the card needs something else - you can do that without ripping up the entire card.
 |
| I don't normally embellish the inside of cards, but this one needed a little extra something! |
 |
| I added a little gift card "holder" to the inside of the card. |
Materials Used:
- Card Base: 4 1/4 x 11" scored at 3" and 8"
- (4) Patterned Paper: 4 x 2 3/4" - 2 for the inside of the card & 2 for the outside
- "Fly Away with Me" Stickerz Set - EAD Designs (kites, hot air balloon & happy birthday)
- To "color" the kites and hot air balloon, I used scraps of patterned paper & just trimmed around the sticker.
- "Just for You" sentiment from Scrappy Moms Simple Sentiments set
- Buttons - to create the closure I sewed the larger button to the card (the stitches get covered up by patterned paper on the inside of the card) and then threaded twine through a smaller button and attached it to the card using a glue dot. To create the loop to keep the card closed, I just knotted the twine.
- Sakura Gelly Roll Pen - White
- Corner Rounder Punch
Labels: gift card holder, balloons, birthday card
Party Plans - Part 1

If you "like" me on Facebook, you may remember that last week I asked if anyone would be interested in a video or a UStream class detailing some of the Cricut crafts and other things I am working on for my daughter's party. I think 7 people said that they were interested, so I was a little nervous about doing a UStream, but I was motivated to film a video. :) Plus, I have spent the last couple of afternoons working on stuff for the party, so I will get a few blog posts out of it...bonus!
Today's video focuses on the invitation, party favors (favor bag pictured above) and the party hats. Nicole was VERY specific about wanting party hats. I tried to convince her to let me make Minnie ears like THESE for her party, but no...it has to be hats.
I say this in the video, but keep in mind that while I am doing a Minnie party, you could easily change up the color scheme and "icon" to customize the ideas for your own party.
Here's some that I came up with:
Baby Shower
Brown/Pink or Brown/Aqua with a bottle or stork in place of Minnie. I saw lots of cute polka dot party goods at Hobby Lobby and online in those two color schemes.
Bridal Shower/Bachelorette Party
Hot Pink/Zebra with a high heel or martini glass. I've also seen lots of zebra print party goods from plates to tissue paper. (Can you tell that I made a lot of stops in my quest to find all things black, white and red?)
Pirate Birthday
Black, Red and White could stay, but you could switch out a pirate hat for Minnie. I also saw lots of Pirate related items.
Ok...I could go on and on, but you get the idea! Hope you enjoy the video!

Materials Used:

- "Minnie Monogram:" Scalloped Circle is sized at 2" from Birthday Bash, Mickey Head sized at 1.5" from Mickey Font and the bow is sized at .48" from Mickey and Friends
- Party Hat: Circle sized at 11.35" using my Gypsy and George and Basic Shapes
- Favor Bag sized at 6" from Once Upon a Princess (You can fit two on one page of 12 x 12 paper)
- I added a tag with a first initial, so I each partygoer will get the correct personalized bracelet. Scalloped circle sized at 1.5" from Birthday Bash, Mickey Tag Font sized at 1.10" and the bow is sized at .46" from Mickey and Friends
- Ponytail Streamers: You can see the video HERE!
Labels: mickey, gift bag, once upon a princess, birthday bash, mickey font, mickey and friends, george and basic shapes, mini monogram

Welcome to another Scrappy Moms Sneak Peek Week! Just in time for Valentine's Day, Melanie and Tammy are releasing "Love Notes." There are 20 sentiments and two heart stamps. This set is adorable and is available for pre-order on the Scrappy Moms site!

Materials Used:

- Welded the wagon and lamb from Create a Critter using my Gypsy (used the shadow feature).
- Lamb is sized at 3.35" from Create a Critter
- "Wool" is embossed using the Cuttlebug A2 Swiss Dots folder
- Face: is comprised of two PKS stamps - Princess Faces and Critter Faces
- Wagon is sized at 1.75" from Create a Critter
- Embossed using the Sizzix Love Set folder
- Sentiments: Scrappy Moms Stamps "Love Notes" Set
- Baker's Twine
- Adhesive Gems - Michael's
- Sakura Gelly Roll Pen - White
- Sakura Pigma Micron Pen 03 Black
Labels: shape card, lamb, bakers twine, create a critter, cuttlebug, peachy keen
My Funny Valentine"

Happy Saturday and welcome to another day of Scrappy Moms Sneak Peeks! I had so much fun decorating a gable box last week that I decided to make another one for Valentine's Day using the "Love Notes" Set from Scrappy Moms. Of course this would be perfect to use as a gift box, but I think it would also make an adorable Valentine's mailbox for a little one to take to school.

Materials Used:

- Gable Box (Target $1 Section - they have them in white, kraft, red and white with red hearts)
- (2) 4 x 12 pieces of patterned cardstock scored at 2" and 8"
- (2) 2 1/2 x 12 pieces of cardstock
- EK Success Dotted Scallop Punch
- Cuttlebug Swiss Dots embossing folder
- (2) 2 x 4 pieces of cardstock (to "bridge" the gap on the sides of the box
- (3) Tag sized 3.75" from Twinkle Toes
- Dog sized at 2.5" from Sweethearts
- (2) Hearts sized at 2.75" from Sweethearts
- Sentiments (My Funny Valentine, Hugs & XOXO) from Scrappy Moms "Love Notes" Set
- Patterned Paper - K & Company - Kelly Panacci Valentine
- Tim Holtz Distress Ink - Walnut Stain
- Sakura Gelly Roll Pen - White
- Sakura Micron Pigma Pen - 03 Black
- 3/8" Grosgrain Ribbon - Michael's
- Tulle Ribbon - Michael's

Labels: gable box, dog, cuttlebug, sweethearts, twinkle toes, peachy keen

Welcome to a new month of Scrappy Moms Terrific Tuesday Challenges! This week we are using the Simply Charmed Cricut cartridge. If you don't have that cartridge, do not worry - you can still play along by using a similar cut from a different cartridge. (Smiley Cards and Doodlecharms would would work really well!) I chose to make a card, but you can submit ANY kind of project you would like.
Materials Used:

- Card Base - standard A2
- Blue Polka Dot Mat - 3 3/4 x 4.75"
- Pink Mat - 2.25" x 4.25"
- Notebook Paper is sized at 3.25" from Simply Charmed
- Pencil is sized at 3.20" from Simply Charmed
- Sentiment is from the "Charmed Life" set from Scrappy Moms Stamps
- Baker's Twine is from Scrappy Moms Stamps
- Button - from my stash
- EK Success Corner Rounder Punch
- Sakura Gelly Roll Pen - White
- Sakura Pigma Micron Pen - 03 Black
- Tim Holtz Distress Ink - Walnut Stain
- Peachy Keen Stamps - Princess Face Stamps
Make sure to head over the Scrappy Moms site to see some more projects from the Design Team! I have another layout to show you on Friday that features LOTS of images from Simply Charmed if you need some more inspiration! (If you "like" my Facebook page, you might remember a sneak peek I gave you last week.)
Labels: simply charmed, notebook paper, bakers twine, peachy keen, pencil
Hip Hippo Hooray!

Welcome to the 3rd Scrappy Moms Stamps Terrific Tuesday Challenge! The challenge this week is to come up with a project using Create a Critter! (Don't worry - if you don't have Create a Critter, just choose any animal from any Cricut cartridge.) I hope you will all play along with us!
I decided to make a shape card. I have always loved the little hippo from Create a Critter, but I've never used it. Once I found the "Hip Hippo Hooray!" sentiment in the Scrappy Moms newest set "Furry Friends," I knew I had to use this little hippo. Hope you like it!

You can find the "Furry Friends" set and LOTS more at the Scrappy Moms Stamps site!
Hope you are having a great Tuesday!
Labels: shape card, hippo, bakers twine, create a critter
 |
| Moon: Paper Doll Dress-Up, Bunnies: Winter Woodland & Patterned Paper: Nursery Tails |
Labels: bunny, moon, paper doll dress up, winter woodland, nursery tails
Sneak Peek: " You Color My World!"

I have another sneak peek for you today! This time I am focusing on the Kids Incorporated set! (Did anyone else watch Kids Incorporated in the 80's??? I loved it.) I have been wanting an excuse to use this super cute crayon box from Simply Charmed and when I saw this sentiment - I knew I would have a perfect excuse!
Quick hint...I don't know if anyone else has this happen when heat embossing, but every now and then there were will be teeny tiny "holes" where I didn't get enough embossing powder. To help conceal any little mishaps, I use my white gel pen and just add a dot of ink to any little "holes." It works like a charm!
Materials Used:

- Card Base - Standard A2
- Mats - Black: 4 1/8 x 5 5/8, Turquoise: 4 x 5 1/4, Red: 3 3/4 x 5 & Striped: 3 1/2 x 4 1/2
- Crayon Box - sized at 4" from Simply Charmed
- Sentiment - Scrappy Moms "Kids Incorporated" Stamp Set (heat embossed)
- Baker's Twine - Scrappy Moms Stamps (Pretty convenient, huh? You could order a set or two or stamps and some spiffy new baker's twine...I'm just saying.)
- Button - from my stash
- Sakura Gelly Roll Pen - white
Labels: crayon box, bakers twine, simply charmed

Happy Monday! If you just arrived here from Jenn's blog, Double N Designs, then you are in the right spot! (If not, make sure you go back to the EAD Designs Blog and start at the beginning! Liz is going to be giving away some EAD goodies on her site - so you don't want to miss out!) The theme of this week's Monday blog hop is "Going Irish," and do not let my card fool you - EAD Designs has some FABULOUS Irish or St. Patrick's day themed vinyl, stickers and rub-ons...I just didn't have any on hand, so I had to get a little creative. ;) I decided that a bunch of clovers would work perfectly with the "thanks bunches" sentiment from Thank You Sentiment Rub-ons.
Materials Used:
- Card Base: Standard A2
- Mat: Rectangle from George and Basic Shapes, welded to 4 "tag" shapes from Once Upon a Princess, Polka dot mat trimmed to 3 1/4 x 5
- (3) Shamrock sized at 1.5" from Paper Doll Dress-Up
- Sentiment from EAD Designs/Paper Smooches: Thank You Sentiment Rub-ons
- Ribbon - Papertrey Ink
- Sakura Gelly Roll Pen - White & Sakura Pigma Pen - 03 Black
Labels: thank you, shamrock, paper doll dress up, george and basic shapes, once upon a princess
Instructions for Thanks a Melon Bag (CTO #6)
Hello Everyone! I figured out my camera problem! The lens had little Baby E paw marks all over it!! Easy fix! As promised, here are instructions on how to make the Thanks a Melon Bag from my CTO #6 DT post!


The inside of this bag is just a little homemade box.

For the box, I start with a piece of CS that measures 7" x 6 1/2". I used my Martha Stewart Score Board to score the 7" side at 1" and 6" turned it and scored the 6 1/2" side at 2 3/4" and 3 3/4" (dashed lines). I cut the tabs in the center of the 6 1/2" side (solid lines) and then folded on my scored lines.

I flipped it over to the outside of the box and placed adhesive on the center tabs.

I prefer Glue Dots brand Glue Lines when I make boxes or bags because I like the steady hold I get with them but you can use your preferred adhesive. I then flipped it to the inside of the box and placed adhesive along the side panels on half of the box.

If using glue lines, remove backing from adhesive and fold the box side that does not have adhesive up to meet the tabs.

Remove backing from adhesive on side panels and fold up to create the open ended box.

For the handle, mark the sides of the box at 1/2" down and 1/2" across (just a dot, not the 1/2" or lines).

I used my Crop-A-Dile to place a jumbo brad from Stampin' Up! on the marked sides of the box.

This is what the finished open ended box looks like (minus the markings on the inside)! Add a strand of ribbon to make the handle.

I then cut my Watermelon out at 4" from the Simply Charmed Cart and adhered it to my box to make this cute little bag! I filled a Large Stampin' Up! Cello Bag with candy watermelon slices, added a tag and gave it away as a Thank You gift!
I hope you like it and I hope you can understand the instructions. Please let me know if you have any questions. The challenge is in full swing at CTO so if you haven't yet, create a card, layout or project and post by Sunday, March 27th, 11:59pm (EST). Challenge #6 is to make a Thank You with a Tag. The winner will be selected and entered into the monthly drawing. March's prize will be "ROCK PRINCESS" cricut cartridge!
Labels: favor box, watermelon, simply charmed

I had originally embossed a single bow for this little gift box card, but it just didn't pop. I then decided to cut it out in several sizes. I added dimensionals to the first 2 layers and curled the top 2! I really like the dimension I got from this a lot better!

The inspiration for this came from the Flaunt it Fridays Challenge to use the Birthday Bash Bunny w/ Present. I do not have that cart and I racked my brain to come up with a creative way to use another similar cut! I decided to flip the choice cut and have the present holding a bunny!! I love how it turned out!
Products Used:
- Scrap pile CS and Paper (I am pretty sure the pink is CTMH)
- Stampin' Up! Dimensionals and Stampin' Write Marker
- Doodlecharms Cricut Cartridge
- Basic Grey Button
- Twine from Michael's
- Signo White Gel Pen
Labels: bakers twine, doodlecharms, bunny, shape card, present

I still have pics to edit, but I thought I'd share this small tag as well. It's made with some leftovers from another project, I used my Cricut and Gypsy to cut out a bunch of these small hearts, I layered them on my Cricut cut tag and I added my crinkled ribbon to the top in a bow, with a button and some twine. I added scallop punched borders to the bottom, popped up a single heart with UCutIt from Glue Arts and then added the banner, twine, flower and pearls.

Thanks for stopping by today!
Labels: heart, tags

Background cardstock from DCWV The Sweet Stack! Giraffe from Create a Critter!


Labels: giraffe, create a critter, hello
All I did was use SCAL and welded these two scallops together then cut out 1 smaller scallop to go on top!

Just fold the welded scallop in half

Create a Critter butterfly!

Brads and a random flower stamp I found laying around :)

I just used a white gel pen to outline the edges! :)

Inside! The stamps I got from Hobby Lobby!

I hope ya'll are all having a wonderful day!
Butterfly Kisses ;)
Labels: circle card, butterfly card, create a critter, scallop edge
I made this super cute bird because it reminds me of the birds I see everyday at work! I just LOVE spring! I love the jerky cute hoppy movements these little fat birds make! This card just makes me smile! Happy Spring everyone! {hugs}~Raechel


 YOUR NEXT STOP IN THE HOP
Stampin Daisies
{supplies}
Cartridge: Home Decor
Stamp: My Pink Stamper's Happiest Moments
Paper: Paper Trey Ink, Recollections
Extras: Embossing Folder by Crafts too you, Buttons, Twine, Ribbon
Cartridge: Home Decor
Stamp: My Pink Stamper's Happiest Moments
Paper: Paper Trey Ink, Recollections
Extras: Embossing Folder by Crafts too you, Buttons, Twine, Ribbon
Labels: home decor, birds, bakers twine, cuttlebug
Wednesday, March 9, 2011
Bee Happy!

It's Maria and I'm back today with a card for you. I have been whining a bit on my Blog lately about not understanding how I turned into a card maker all of a sudden--I'm really a scrapbooker. A little secret here, I really enjoy making the cards, but I feel SO guilty that I'm not documenting my life as much anymore...something I'm trying really hard to get back to.

For the base of this one, I welded a Postage stamp image from Create A Critter to a rectangle in George in my Gypsy. I really enjoy making my own card bases this way.

Most of my designs--okay--all of my designs are made in the Gypsy now :) I love taking the time, when I have it, to make my projects and then be able to go to my Cricut when I'm ready and just push CUT! Taking a little time to set things up in the Gypsy with putting all the images of one color in a section makes this super simple when going to cut. For the main image in the card I welded the bee's together with the word Bee and cut the layers appropriately.

Embellishing...I added a little Prima trim, embossed the wings with the Cuttlebug and outlined the word Happy. I used a new pen I am loving. It is a Sharpie retractable fine point pen. It never soaks through and gives a great thin line. But, of course, I still LOVE my Copic multi-liners for this too :)

I really enjoyed this card.
I think it telling me telling my teenagers, BEE HAPPY, life is good!
I'll be back tomorrow with a layout for you :)
As always, if you have any questions, you can contact me through my Blog HERE.

Cricut Cartridges Used: sorry so many.....
Kates ABC's = Bee's @ 3.52", Sesame Street Seasons word Bee @ 2.11', Straight From the Nest HAPPY @ 2.37", Create A Critter Card Base @ 2.37", George Base weld rectangle @ 7.0" & base mat @ 5.06"
Paper Line Used:
Polka Dot = Cosmo Cricket Togetherness Mini Deck
Cuttlebug Folder Used:
Polka Dots
Other:
Prima trim
Stickles in SilverLabels: kates abcs, bees, sesame street seasons, create a critter, george and basic shapes, cuttlebug, postage stamp

I did everything with Esmerelda (My Gypsy). I didn't have to hide contour anything but I did flip the image and weld it together at the top. The candy is cut out at 4.75. This is all done with the Simply Charmed Cartridge.
Labels: shape card, candy, peachy keen

Labels: sweethearts, bike
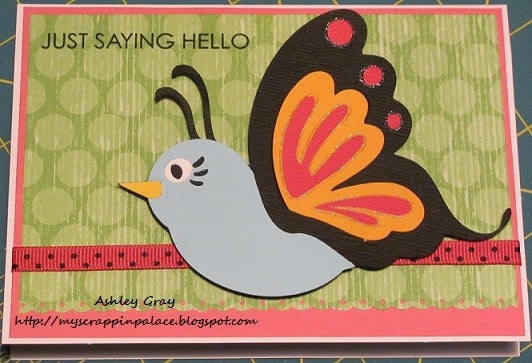
A cute card for someone special. Just a Hello... It comes with an envelope and will be sent in a mailer for protection.
Card is 4 x 5 1/2 and the inside is blank to write your own message.
Card is 4 x 5 1/2 and the inside is blank to write your own message.
Labels: hello, birds
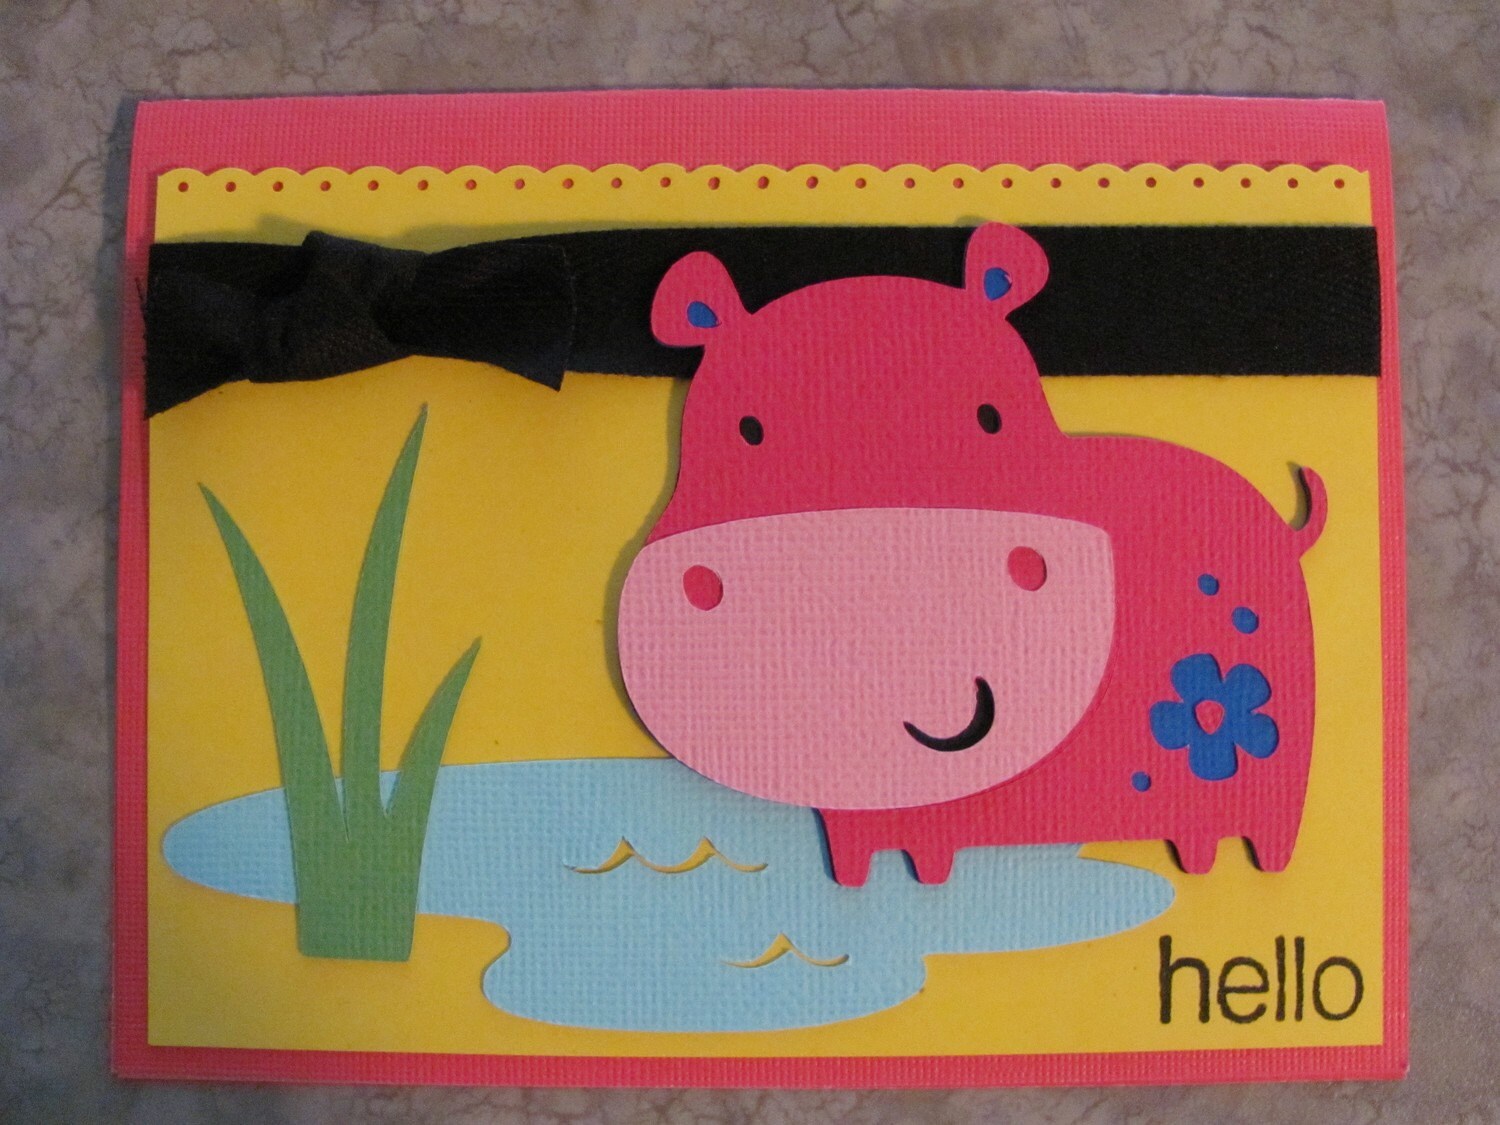
A cute Hippo card for someone special. It comes with an envelope and will be sent in a mailer for protection.
Card is 4 1/4 x 5 1/2 and the inside is blank to write your own message.
Card is 4 1/4 x 5 1/2 and the inside is blank to write your own message.
Labels: create a critter, hello hippo


Labels: birthday card, ice cream cone, peachy keen, shamrock, bakers twine

I used Create A Critter and cut the sun at 3". I used Esmerelda to hide the face of the sun so I could use my adorable Peachy Keen Face Stamps. The hearts are cut from Once Upon A Princess at all different sizes. Then I took my corner rounder and did both bottom corners.
Labels: create a critter, peachy keen, sun, once upon a princess, heart
seasonal weather.

Recipe:
5 1/4 x 5 1/4 base with Kraft Cardstock
5 x 5 layer
Circle cut @ 5" then cut in half (Plantin Schoolbook)
Cloud @ 1.60" (Create A Critter)
Bee @ 3" (Create A Critter)
Stampin Up Ribbon
Peachy Keen Everyday Character Faces
Sakura White Jelly Roll
Clear Gems
Labels: bee, plantin schoolbook, create a critter, peachy keen

Recipe:
Chick is cut @ 3 1/2 (CAC) Used Esmerelda to hide the face
Tag is cut @ 1 1/2 (Twinkle Toes)
Red Patterned Paper is 4 1/8 x 5 3/8
Orange Paper 4 1/2 x 3 1/2
Yellow Strip 2 1/2 x 4 1/8
Twine is from the Bead Section @ Michaels
Sweet Cheeks Stamps by ME: Spring In Bloom Set
Sakura White Jelly Roll
Labels: bakers twine, chick, tags, twinkle toes, create a critter, peachy keen
Te Quiero
Hello Everyone!!!
I made this card yesterday while I was waiting for my Hubby to come home. He has been gone all week and it has been hard. I made this card for him, just to let him know that I was happy he was coming back and that I missed him.

Recipe:
Card Base is cut @ 5" using Create A Critter
Kids cut @ 3" using A Child's Year
Blue Strip is 3/4 x 3 5/8
Green is 4 1/2 x 3 5/8
Brown Martha Stewart Twine
Sweet Cheeks Stamps by ME using Heartfelt Thoughts
Labels: create a critter, a childs year, bakers twine
Hello My Crafty Friends!
I hope that your enjoying your weekend and having fun with friends and family as well as making some fun craty time for yourself in there lol!! I don't have any big plans for this weekend and we are getting more snow today so that will keep me in also. I made todays creation using the Sweet Treats cartridge and My Pink Stampers Love-alicious set, then I did a little creative design on my cello-bag because I did'nt have anything other then just plain so I wanted to add something alittle more fun to the project, so take alook at the how-to video and see the out come, I thank you for stopping over today and hope that you are inspired to create and that if your in the cold that you stay warm and if you are in the warm please send warm wishes to us in the cold lol!
Create Hugs
Edna


Posted by Edna at 11:55 AM 20 comments I hope that your enjoying your weekend and having fun with friends and family as well as making some fun craty time for yourself in there lol!! I don't have any big plans for this weekend and we are getting more snow today so that will keep me in also. I made todays creation using the Sweet Treats cartridge and My Pink Stampers Love-alicious set, then I did a little creative design on my cello-bag because I did'nt have anything other then just plain so I wanted to add something alittle more fun to the project, so take alook at the how-to video and see the out come, I thank you for stopping over today and hope that you are inspired to create and that if your in the cold that you stay warm and if you are in the warm please send warm wishes to us in the cold lol!
Create Hugs
Edna


Labels: favor box, heart
~Happy Easter~
This is my first Easter Card. I love the way it came out. I am working on some set of cards right now and using all my stamp sets to do so.

Recipe:
Basket cut @ 3.5" from Doodlecharms
Eggs cut @ 3.5" from Doodlecharms
Tag cut @ 1" from Twinkle Toes
Twine from The Twinery in Blossom
Cuttlebug
Sweet Cheeks Stamps by ME using Spring In Bloom
Cuttlebug Folders used:
* Swiss Dots
* Spots and Dots
* Divine Swirls
* Tiny Mosiac
* Distressed Stripes
Labels: easter, doodlecharms, egg, bakers twine, cuttlebug, sesame street seasons
Wednesday, February 16, 2011
Don't Sweat The Small Stuff !!!!
Hello My Cricut Crafty Friends,
Welcome to another week of Cricut Cardz Chalenge, I just know that you all will love this weeks challenge and enjoy all the great designs form the the rest of te creative team. I chose to use my Just Because Cards cartridge, it has been awhile and I really wanted to make a cheer you up card lol!! with all the gloom weather and the hopes for Spring it really set the mood :) So the cardbase is a 5 x 5 and then the papers are Bazzill, DCWV, and Stampin Up I used my Martha Stwerart Bubble Punch and added some Black Ribbon for the color contrast and for the finish touch I used the newest set of My Pink Stamper
Fabulous Phrases, I just flipped over this collection the endless possibilities with long cards and square cards is just awesome. I hope that you are inspired to create today my friends and I am very happy that you stopped over, please come again soon I have many projects coming along for this week ;)
Create Hugs
Edna


Posted by Edna at 11:58 AM 14 comments Welcome to another week of Cricut Cardz Chalenge, I just know that you all will love this weeks challenge and enjoy all the great designs form the the rest of te creative team. I chose to use my Just Because Cards cartridge, it has been awhile and I really wanted to make a cheer you up card lol!! with all the gloom weather and the hopes for Spring it really set the mood :) So the cardbase is a 5 x 5 and then the papers are Bazzill, DCWV, and Stampin Up I used my Martha Stwerart Bubble Punch and added some Black Ribbon for the color contrast and for the finish touch I used the newest set of My Pink Stamper
Fabulous Phrases, I just flipped over this collection the endless possibilities with long cards and square cards is just awesome. I hope that you are inspired to create today my friends and I am very happy that you stopped over, please come again soon I have many projects coming along for this week ;)
Create Hugs
Edna


Labels: lemon aide, glass
You Got Mad Skills !!!!
Hello My Weekend Crafters !
I hope that your are in a sunny place today we have been very blessed the past 3 days with some beautiful spring weather, I was also very surprised this early afternoon by my Big Brother and his daughter stopping over for a vist. I so enjoy the time we get together my niece is just wonderful she has started making cards herself so I always take my extra cuts and scraps then put them in a box for her when she visits. Today she and I spent sometime in the design studio making some fun cards for her brother, cousin, and Dad we had a fabulous time :) So I have a fun card to share withyou that I created using Boys will Be Boys cartridge and My Pink Stamper newest Sportastic stamp set you can find it and all her sets HERE, these two went together just fabulous and I love the simple and fun turnout from that. I hope that you have enjoyed my creation today and your inspired to create, I thank you very much for stopping over and hope that you comeback again soon :)
Create HUgs
Edna

Posted by Edna at 4:57 PM 7 comments I hope that your are in a sunny place today we have been very blessed the past 3 days with some beautiful spring weather, I was also very surprised this early afternoon by my Big Brother and his daughter stopping over for a vist. I so enjoy the time we get together my niece is just wonderful she has started making cards herself so I always take my extra cuts and scraps then put them in a box for her when she visits. Today she and I spent sometime in the design studio making some fun cards for her brother, cousin, and Dad we had a fabulous time :) So I have a fun card to share withyou that I created using Boys will Be Boys cartridge and My Pink Stamper newest Sportastic stamp set you can find it and all her sets HERE, these two went together just fabulous and I love the simple and fun turnout from that. I hope that you have enjoyed my creation today and your inspired to create, I thank you very much for stopping over and hope that you comeback again soon :)
Create HUgs
Edna

Labels: basket ball, starr


Labels: favor box, giraffe, pinwheels, scallop edge, baby
Just Because Card
I used Vintage Chocolate Bakers Twine on this fun card.

The overall card measurements are 5 1/2 x 5 1/2, all of the paper is from Crate Paper, and the stamped sentiment is from My Pink Stamper.

I love the brown tones in this Bakers Twine!! It matches this card perfectly!

The laundry wash board and bucket came from the Country Life cartridge (cut at 3 inches) and then I added some white gel pen doodling to the bubbles. I also inked everything with Ranger Tea Dye distress ink. I put the eyelets on and strung the bakers twine through the top piece of patterned cardstock before I adhered it to my card base. That way the inside of the card is 'clean'.

I made this ruffle with Pine Cone Crinkle Ribbon. I first cut a strip of cardstock 5 1/2 x 1/4 inches. Then used my ATG gun to lay down a strip of adhesive covering the whole strip of cardstock. Next, I just pushed the ribbon into the adhesive as I 'gathered' it. Super easy, no sewing involved! I tucked the ends under on each side. The ribbon is wider than the cardstock strip, so it hangs over the edge and looks like it has been gathered. The ribbon you choose makes a big difference with this technique! Crinkle ribbon is thin and easy to work with!
Have a wonderful day!!!
Labels: just because card, laundry, crinkle ribbon

Labels: baby card, sail boat, new arrival
(Kimberly)

Labels: peachy keen, scallop edge, bakers twine, sun

Labels: baby card, favor box, new arrival


Labels: birthday card, cupcake, shape card


Labels: owls, bakers twine, just because card

The stamped sentiments are from Inside & Out stamp sets #1 and #2.

I used my Gypsy to weld two pick up trucks (6 inches each) together to make a shape card, which I then adhered to my card base. I had to use 2 tiny rectangles from the George cartridge to join the 'wooden rails' on the truck so they would also fold at the top.

The truck is from the Just because Cards cartridge and I used decorative edge scissors for the border.

I tied some Vintage Cherry Bakers Twine at the top and added lots of faux stitching and doodles.

I adhered the the truck and its shadow to the card base and then used pop it squares to raise some of the layers.

I added lost of hearts inside and outside of the shape card.

Labels: bakers twine, masculine card, just because cards, heart, george and basic shapes

Labels: baby card, boy, bakers twine
~~~ Rub A Dub Dub ~~~

Good morning Y'all !! Dan is running errands today and decided that he would go ahead and drop off the basket of baby presents we got for a sweet young woman that he used to work with. I had to jump up and make a card really quickly, for Danielle and Richard. I used New Arrival for the lil duck and Sentimentals for the postage stamp mats. Did lots of inking and poppin, added some beautiful Crinkle Ribbon,as well as some Bakers Twine and you can find them both here. I used a few punches and added the Rub a Dub Dub baby charm.Thanks so much for taking a peek !!!! xoxo Joy
Labels: baby card, bakers twine, ducky, new arrival, sentimentals, postage stamp
~~ Mother Deer ~~

Good morning Y'all!! I want to thank ALL of you that were concerned about Dan and I during the horrible weather we had here last Friday!!!! It was an afternoon and night that I wont soon forget. As I have told some of you, the sirens wailed ALL night long and then the NOAA radio would start blaring. I stopped counting all the times that we were under a Tornado Warning. Just when we thought we were out of the woods and we could breath a lil easier, another warning would scream at us ! Unfortunately, there were 3 deaths, out in the country and my heart breaks for the family members left behind! Thanks again for your concern,y'all don't know how much that means to me !!
Now, on to this lil card. I sometimes call my Mother, Mother Dear so I made this lil card for her for Mother's Day. I used Create a Critter for the cute lil deer and tulips. After MANY failed attempts at using a sentiment from the Mother's Day Cart ( thanks Darlene) I created Mother, using the Gypsy Font for the M and ( oh shoot) Plantin Schoolbook ( I think) for the other.Lots of inking and popping and the lil butterfly on the deer's nose as well as the others were punched using a Martha Stewart punch. Added a few pearls, a button and some beeeUtiful Crinkle Ribbon that you can purchase at http://craftspotbykimberly.blogspot.com/ . Thanks for taking a peek !! Dan and I are off to the lake to spend Easter with my baby boy. I hope Y'all have a safe and Blessed Easter !!!!
Labels: mothers day, deer, create a critter, plantin schoolbook
~~ Thinking of You ~~

Hi Y'all!! I hope your all safe and sound, the weather here is about to be BAD! Dan and I found out last week that our sweet next door neighbor, Kristine has breast cancer! Dare I said...HAD...we went and sat with Eddie yesterday while they did a lumpectomy and the Dr. seems to think he got it all!!! God is great! I used Country Life for the lil pitcher of flowers and I used a new style of card. ( new for me anyway) I started with a 12x12 piece of card stock and cut a piece 4.25 wide. I scored it at 2' and 7.5 so that I would have an A2 size card. Did lots of layering and inking. Added some vintage seam binding and a button. The sentiment is stamped, using a stamp from the Sweet Sentiments Collection that you can purchase over at http://craftspotbykimberly.blogspot.com/ . She has some darling new stamps AND if you aren't able to find vintage seam binding she has Crinkle Ribbon in the most beautiful colors !! She hand dyes the ribbon and its gorgeous !! Y'all know I am a horrible stamper, but I stamped that perfectly...the very 1st time!! wooohooo Have a great weekend and stay safe !!! xoxo
Labels: thinking of you, country life, flowers
Another Sailor Chick ~~~

Hi Y'all !! I made a card similar to this a few weeks ago and since I was at the lake, decided to make a lil boy sailor card. I used oh so many carts to pull this card together with and they are as follows:
Easter 2010 ...Chick
Paper Doll Dress Up...Sailor hat
Create a Critter...Pond
Just Because...Sun
New Arrival...Sail boat
Stretch your Imagination...Scalloped Frame
and I have no idea which cart the grass came from. All I can say is thank goodness for my Gypsy!!!
Thanks for taking a peek !!! Have a great weekend !
Labels: baby card, boy, easter 2010, paper doll, create a critter, just because cards, new arrival, stretch your imaginations
~~~ Hoppy Birthday ~~~

Good morning Y'all !!! Dan and I got back from then lake yesterday and while I was gone, I found some Mojo! I used the Sweethearts cart for the large frog and Paper Doll Dress Up for the smaller, hoppin frogs.I welded Hoppy together and Birthday came from the Create a Critter cart and I think the cake did as well. I used Stretch Your Imagination for the scalloped frame and thats just what I did... I stretched the frame to just the size I wanted, using my Gypsy. Thanks for taking a peek!!!!
Labels: birthday, create a critter, paper doll dress up, sweethearts, stretch your imaginations
Thinking of You ~~

Hi Y'all....I made this card for an old friend, who is in the last stages of Lou Gehrig's Disease. Zannie was Selma's Fonzy!! Always had a motorcycle...was always flirting with the girls, just a larger than life character and everybody loves him!! Thats why I added the motorcycle, cause he had and has a fine collection. I used Everyday Paperdolls for the motorcycle, added the buttons and hemp, did a tad of doodling and inking . I hope the Old Fonzy likes this card!! Thanks for stopping by !!
Labels: masculine card, motorcycle, everyday paperdolls
~~ It's a Girl ~~

Good morning Y'all...happy Friday! While visiting in Selma the other day, Mother got an invitation to a baby shower ,for an old friend of my son, John Allen. I told Mother not to fret, I would make a card and go by Target and look at the registry for her. I used New Arrival for all the cuts....regular and shadow. I just love that stork...he makes me smile. Did some inking ,embossing, poppin and doodlin. Thanks to Carole Beath,I am attempting to doodle more...she is such an inspiration...Thanks Carole !!! Oh, I did use Indi Art for the cloud. I hope y'all have a great weekend....thanks for stopping by!!!
Labels: baby card, new arrival, cuttlebug, indie art, stork, girl
~~ Trick or Treat ~~

I wanted to make the witches shoe to resemble the one on the paper, but I didnt have a pointed shoe, so I improvised and used the one from Sentimentals( or is it from Heritage ?!?...I made it over a week ago..the mind is the 1st to go, right ?!? ) I used the EK Success punch for the stars and moon...a delightful bargain at Michael's for only 299! Added a lil glitter, did some doodlin and poppin, added ribbon and there ya go. Thanks for taking a peek !!
Labels: halloween, sentimentals, heritage, trick or treat
Hello ~~

Hi Y'all.....I chatted with my friend Sandi online this morning and she all but forced me make a card for the Jitterbug challenge. So this is my take. I used lots of carts for this one. Everyday Paper Dolls for the kite, Doodlecharms for the bows, cause I didn't like the flimsy ones that were part of the kite cut. I used Stretch Your Imagination for the border,Home Decor( I think) for the cloud and Wild Card for the sentiment...wheeeeh. Lots of layering and popping, did a little inking and doodlin, added the buttons and there you have it.A thunderstorm is brewing as I type and the wind is gusting, so I imagine I could run out and fly a kite right now !!! Thanks for stopping by.....I'm headin to the lake tomorrow( if these thunderstorms leave the area) so I hope y'all have a great week!!!
Labels: hello, everyday paperdolls, doodlecharms, stretch your imaginations, home decor, wild card, kite
~~ Welcome Little One ~~

Happy Saturday Y'all !! This lil card was commissioned by my friend , Susan. She is hosting a baby shower next weekend and the baby's room has a hand painted mural of the moon and stars, done in hues of light blue and brown.Susan wanted a card that reflected those colors and this is what I came up with.I used New Arrival for the moon, using the regular cut as well as the shadow feature ,cut in brown, cut it out in chipboard,covered it and then I popped several layers. The lil cap, is from the same cart, once again using both the regular and shadow feature.The moon and cap were embossed using the Swiss Dots Cuttlebug folder.I used good ole George for the stars and Indie Art for the clouds. I cut the "Little One" from a portion of a Cuttlebug folder. I inked all the edges with Ranger Inks, added some fine crystal glitter to light blue flocking for the clouds, which I had embossed using the Swirls folder.I added the same fine glitter to the stars and then gave the entire card a light dusting with the glitter, no glue used. I just rubbed it into the paper with my fingers and I like the subtle effect! Thank you all so much for stopping by to take a peek!!!!
Labels: baby card, cuttlebug, george and basic shapes, new arrival
Trick or Treat~

This card is for Rivers, my great nephew.He's 12 so I made him a kinda grown up card. You know how that age can be ! I found this vintage card online, downsized it ,inked and matted it.I used Animal Kingdom for the owl, cut several times.Added some stickles and black tulle and there you have it !! Thanks for stopping by!!!
Labels: halloween, owls, trick or treat, cuttlebug
3 Little Ducks a Baby Shower card and Tag


This lil card was requested by 1 of my "swimmin wimmin" Jimmie Gayle, for a baby shower she is attending this weekend.The mother is expecting triplets, God Bless her! .I used the New Arrival cart, cutting the ducks at 1 1/2" , 2 times in blackout, in the orange and 1 time in the shift key for the yellow.I also cut the tag charms in 1 1/2 and 2".I used PPDU for the umbrella, cut at 5 1/2" and I snipped the handle to make it a lil smaller once I started assembling the card.Embossed the background paper with the sweet baby folder from Cuttlebug, and used the swiss dots and hearts folders, as well.Did a lil inking, popping and added the baby hearts along the umbrella.I used wave scissors for the water and the swirl embossing folder. I added a lil piece of white card stock so that all the ladies could sign it.I had so little of the blue card stock left over, but wanted to make a lil tag, cause Jimmie Gayle is so sweet.This is one example of her kindness, she is bringing me a tin filled with her Grandmothers old buttons tomorrow !!! Her grandmother was a seamstress during the depression to compensate her preacher husbands income, and Jimmie Gayle has lots of her buttons and she wants me to have them!!! See how sweet she is !!! I can't wait !! Thanks for taking a peek!!!
Labels: baby card, paper doll dress up, umbrella, cuttlebug, new arrival, ducky
Happy Birthday TB !!!


My Great niece is celebrating her 8th b'day in a few weeks and thankfully I found out her new favorite color, are any shades of aqua. So, I created a little background paper, used Celebrations for the Cat...she got a kitty several months back and adores it, hence the Cat, the hat and the 8.Cut the cat and the hat, 3 times, as well as the cupcake.Added some glitter and tiny glass beads for sprinkles, along with some stickles.Did some inking and poppin and Oh yea, made her a little envelope for the insider, to slip some money into.I always kinda"hide" the money and they love having just one more thing to open. Thanks so much for looking !!!!!
Labels: birthday card, celebrations, party hat
Some-bunny loves you!

Cut base card 11 x 4 1/4 and fold in half. Trim 1/2 inch off the front side as shown in picture below:

I made a border on my gypsy using the George cartridge (rectangle and circles) The rectangle is 5 1/2 inch by 1/2 inch. Each little circle is 0.40 wide x 0.37 high on my Gypsy. All are welded and the picture below shows the welded view. Click HERE to see a video showing how to make borders with your Gypsy.

I inked the border and then glued it in between the base card and the blue piece of patterned cardstock. I also added a strip of patterned cardstock (cream from Crate Paper) on the inside edge of the card.

I punched hoes and added eyelets.

The grass is cut from the Paper doll dress ups cartridge. I sized it on my Gypsy so that it was 5.5 inches wide and cut 2.

I ended up trimming the 2 pieces of grass to fit my card front. I inked everything on this card with vintage touch ink from Paper trey ink (the lighter color).

I used these thick pop it squares from Ranger to add dimension to the grass and the bunny.

When I trimmed the grass I offset it so the blades would be staggered.

Here is a side view showing the pop it square.

I tied Chocolate Bakers Twine through the two brads, looping it through twice and tied a tag on.


I like to put pop it squares behind my tags so that they stay where I want them!

I inked the bunny with the Vintage touch ink from Papertrey.

Then I layered the bunny with the pop its and also used a chalk brush to do the bunny cheeks. The eyes and nose are so small on this cut that I added a dot of zig 2 way glue where they needed to be and then used the Quicker Picker upper from Quickutz to pick up the tiny pieces and place them exactly where I needed them.

I love Glossy Accents and brushed (with my finger) glossy accents glue all over the bunny.

I also used the glossy accents to make the stamped sentiment stand out. Both stamps come from My Pink Stamper.

To add the Bakers Twine flower stems, I first added a line of glue with my Zig 2 way and then set the bakers twine in the glue.

As soon as the bakers twine was secure, I glued the flowers over the top of the 'stems'.

Not sure if you can tell from the picture, but I added a few 'dew drops' to the flowers with the glossy accents.

Click HERE to see a video showing how I made these sweet little flowers with my Gypsy and the Mothers Day Bouquet cartridge.
Pictures of the finished card:


Labels: bunny, flowers, grass, easter, scallop edge, mothers day bouquet, bakers twine, winter woodland, george and basic shapes, paper doll dress up
No comments:
Post a Comment